My grandmother used to make ice box pie every summer when it was too hot to turn on the oven. She’d whip one up in the morning, slide it into the refrigerator, and by dinnertime we’d have the most refreshing, creamy dessert waiting for us. I remember thinking it was magic—how could something so delicious require no baking? Years later, when I got her recipe card covered in flour smudges and handwritten notes, I realized the secret was simply sweetened condensed milk, citrus juice, and patience. Now this ice box pie recipe is my go-to for easy entertaining, and guests always assume I spent hours making it.
Why You’ll Love This Ice Box Pie Recipe
This ice box pie recipe is incredibly easy, requiring no baking and only about 15 minutes of hands-on work. You don’t need any special equipment beyond a mixing bowl and whisk, making it perfect for beginners or anyone without fancy kitchen tools. The filling sets up beautifully in the refrigerator through a simple chemical reaction between the citrus juice and condensed milk—no gelatin or complicated techniques required. It’s endlessly versatile, working with lime, lemon, or even key lime juice for different flavor profiles. The result is a smooth, creamy, tangy filling that’s perfectly balanced between sweet and tart. This dessert is ideal for summer since it doesn’t heat up your kitchen, and it can be made a day ahead, which is perfect for stress-free entertaining. Plus, it’s a crowd-pleaser that both kids and adults love.
What Is Ice Box Pie?
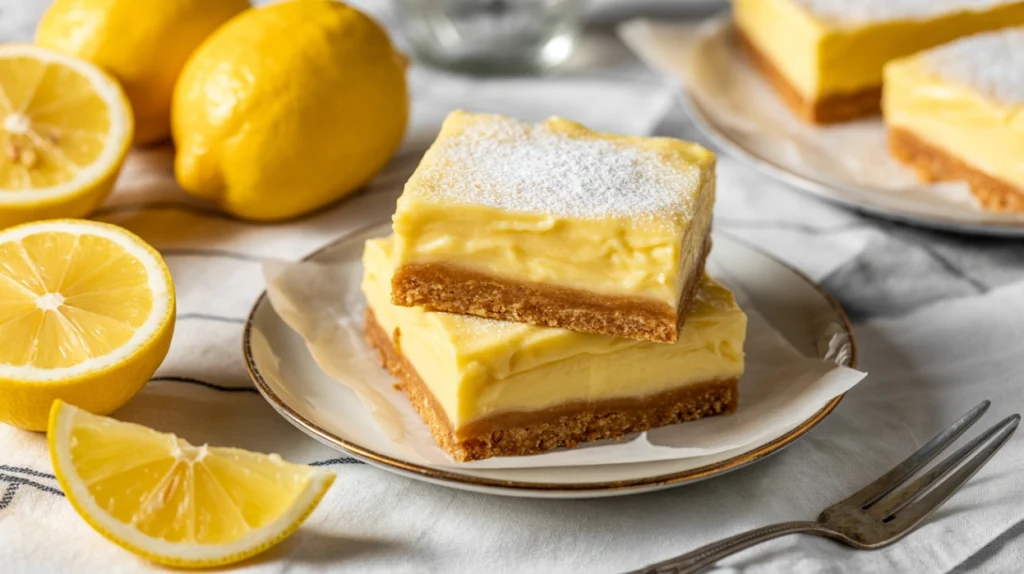
Ice box pie is a family of no-bake pies that set up in the refrigerator rather than being baked in the oven. This ice box pie recipe creates a classic version featuring a graham cracker crust filled with a tangy, creamy mixture that firms up during chilling. The name comes from old-fashioned ice boxes—the precursors to modern refrigerators—where these pies would chill and set. The filling typically contains sweetened condensed milk, which provides sweetness and creaminess, combined with citrus juice that causes the mixture to thicken through a process similar to curdling. Egg yolks are sometimes included for extra richness. The beauty of ice box pies is their simplicity and the magical transformation that happens in the fridge as the loose filling becomes sliceable and perfectly set. They became popular in the mid-20th century when home refrigerators became common, offering a convenient dessert option during hot weather.
Common Mistakes to Avoid
The biggest mistake with this ice box pie recipe is not chilling it long enough. The filling needs at least 4 hours to fully set, though overnight is ideal. Cutting into it too early results in a runny mess that won’t slice cleanly.
Using bottled lemon or lime juice instead of fresh is another common error. Fresh citrus juice is essential for proper setting and flavor. Bottled juice often contains preservatives that interfere with the thickening process and tastes artificial.
Not zesting the citrus before juicing it means you miss out on incredible flavor. The zest contains aromatic oils that add depth and brightness to the filling. Always zest first, then juice.
Overmixing the filling incorporates too much air and can create a foamy texture rather than smooth and creamy. Mix just until combined and smooth, no more.
Using a warm or room-temperature crust with cold filling creates uneven setting. Make sure your graham cracker crust is completely cooled before adding the filling.
Forgetting to cover the pie properly during chilling allows it to absorb refrigerator odors and can cause the surface to dry out. Always cover loosely with plastic wrap.
Finally, using imitation vanilla extract instead of real vanilla creates an artificial taste that detracts from the fresh, bright citrus flavors.
How to Know When Your Pie Is Done
This ice box pie recipe is done when the filling has transformed from a pourable liquid to a firm, set consistency. After the minimum 4-hour chill time, gently touch the center of the pie with a clean finger. It should feel firm and not leave an indentation.
The surface should look smooth and set rather than liquid or jiggly. When you very gently shake the pie, the filling should move as one solid mass rather than rippling like liquid.
The color will have lightened slightly and become more opaque as the filling sets. It should look creamy and uniform throughout without any translucent areas.
The edges will be completely set and may pull away very slightly from the crust, which is normal and indicates proper setting.
If you insert a knife about an inch from the center, it should come out clean without any wet filling clinging to it. The very center might be slightly softer than the edges, but it should still be set.
For the absolute best texture and easiest slicing, this pie benefits from an overnight chill of 8-12 hours. The longer rest allows the filling to achieve its firmest, most sliceable consistency.
What to Serve With Ice Box Pie
This ice box pie recipe creates a tangy, refreshing dessert that’s perfect on its own, especially on hot summer days. The creamy filling is rich enough that small slices are satisfying.
A dollop of freshly whipped cream on top adds a lovely contrast in both texture and flavor. Lightly sweetened whipped cream complements without overwhelming the citrus brightness.
Fresh berries, particularly raspberries or blueberries, provide a beautiful garnish and add a fruity element that pairs wonderfully with the citrus filling.
Toasted coconut flakes sprinkled on top create a tropical twist that works especially well with lime versions of this pie.
For an elegant presentation, garnish with candied citrus slices or thin strips of citrus zest that echo the flavor in the filling.
Serve alongside iced tea, lemonade, or sparkling water with fresh mint for a refreshing summer dessert course.
A small square of dark chocolate on the side provides a sophisticated contrast to the bright, tangy pie.
Storage Tips
Store your ice box pie covered loosely with plastic wrap or aluminum foil in the refrigerator for up to 4 days. The pie actually tastes best after 24 hours when the flavors have fully melded together.
Don’t store the pie uncovered, as it will absorb odors from other foods in your refrigerator and the surface may dry out and crack.
If you’ve topped the pie with whipped cream, it’s best to add it fresh just before serving. Whipped cream breaks down and becomes watery after a day or so.
This ice box pie recipe doesn’t freeze particularly well. The texture becomes grainy and watery when thawed, so it’s best enjoyed fresh from the refrigerator.
Individual slices can be stored separately, which is convenient for single servings. Place each slice in a small container or wrap carefully to maintain shape.
If the pie develops any liquid on the surface during storage, simply blot it gently with a paper towel before serving. This is condensation and doesn’t mean the pie has spoiled.
Always keep the pie refrigerated and never leave it at room temperature for more than 2 hours, as the dairy-based filling can spoil.
Estimated Nutrition (Per Slice, 8 Servings)
Calories: 380 | Total Fat: 16g | Saturated Fat: 9g | Cholesterol: 65mg | Sodium: 190mg | Total Carbohydrates: 54g | Dietary Fiber: 1g | Sugars: 45g | Protein: 6g
Note: Nutritional information is approximate and varies based on specific ingredients and portion sizes.
Recipe Overview
Prep Time: 15 minutes
Cook Time: 0 minutes (no-bake)
Total Time: 4 hours 15 minutes (including chilling)
Difficulty: Easy
Servings: 8 slices
Ingredients
For the Crust:
- 1½ cups graham cracker crumbs
- ⅓ cup granulated sugar
- 6 tablespoons unsalted butter, melted
For the Filling:
- 1 (14-ounce) can sweetened condensed milk
- 3 large egg yolks
- ½ cup fresh lime or lemon juice (about 4-5 limes or 3 lemons)
- 1 tablespoon lime or lemon zest
- 1 teaspoon vanilla extract
- Pinch of salt
For Topping (Optional):
- 1 cup heavy whipping cream
- 2 tablespoons powdered sugar
- Fresh berries or citrus zest for garnish
Step-by-Step Instructions
Step 1: Start by making the crust. In a medium bowl, combine graham cracker crumbs, sugar, and melted butter. Mix with a fork until the mixture resembles wet sand and holds together when squeezed.
Step 2: Press the crumb mixture firmly into the bottom and up the sides of a 9-inch pie pan. Use the bottom of a measuring cup or glass to pack it tightly. Place the crust in the refrigerator while you prepare the filling.
Step 3: Zest your citrus fruit first, then cut and juice it. You’ll need exactly ½ cup of juice, so squeeze extra if needed. Strain out any seeds or pulp.
Step 4: In a large mixing bowl, whisk together the sweetened condensed milk and egg yolks until smooth and well combined, about 1 minute.
Step 5: Add the fresh citrus juice, zest, vanilla extract, and salt to the condensed milk mixture. Whisk gently until everything is thoroughly combined and smooth. The mixture will begin to thicken slightly.
Step 6: Pour the filling into the chilled graham cracker crust. Use a spatula to spread it evenly, smoothing the top. The filling will be pourable at this stage, which is normal.
Step 7: Cover the pie loosely with plastic wrap, making sure the wrap doesn’t touch the filling surface. Place the pie in the refrigerator.
Step 8: Chill the pie for at least 4 hours, though overnight (8-12 hours) produces the best texture and allows flavors to develop fully. Don’t disturb the pie during this time.
Step 9: If making whipped cream topping, wait until just before serving. Beat heavy cream and powdered sugar with an electric mixer on high speed until stiff peaks form, about 3-4 minutes.
Step 10: Once the pie is fully set, remove it from the refrigerator. The filling should be firm throughout and not jiggle when gently shaken.
Step 11: If desired, spread or pipe the whipped cream over the top of the pie. Garnish with fresh berries, additional citrus zest, or toasted coconut.
Step 12: Slice with a sharp knife, wiping the blade clean between cuts for the neatest slices. Serve immediately and enjoy this refreshing, creamy dessert!
This simple yet impressive dessert is perfect for any occasion—enjoy!