
Every December, my kitchen transforms into a cookie factory as I make batch after batch of Christmas cookies for neighbors, teachers, and family gatherings. The tradition started when I was a kid helping my mom roll out dough and cut out shapes of trees, stars, and snowmen. Now my own children gather around the counter, arguing over who gets to use the reindeer cutter and sneaking bites of raw dough when they think I’m not looking. This xmas cookies recipe has been passed down through three generations, and it produces perfect sugar cookies every single time—tender, slightly crisp edges with soft centers, and they hold their shape beautifully for decorating.
Why You’ll Love This Xmas Cookies Recipe
This xmas cookies recipe creates classic sugar cookies with tender texture and buttery flavor that taste far superior to store-bought versions. The dough is incredibly easy to work with, rolling out smoothly without sticking and holding intricate cookie cutter shapes perfectly. Unlike many sugar cookie recipes, these don’t spread during baking, so your carefully cut shapes look exactly as intended when they come out of the oven. The cookies provide the perfect canvas for decorating with royal icing, buttercream, or simple colored sugars, making them ideal for creative holiday projects with kids. The recipe makes a generous batch perfect for cookie exchanges, gift-giving, or filling your holiday cookie jar. The dough can be made ahead and refrigerated or frozen, allowing you to spread the work over several days. Best of all, these cookies stay fresh for over a week when properly stored, so you can bake early and still have perfect cookies for Christmas Day.
What Are Xmas Cookies?
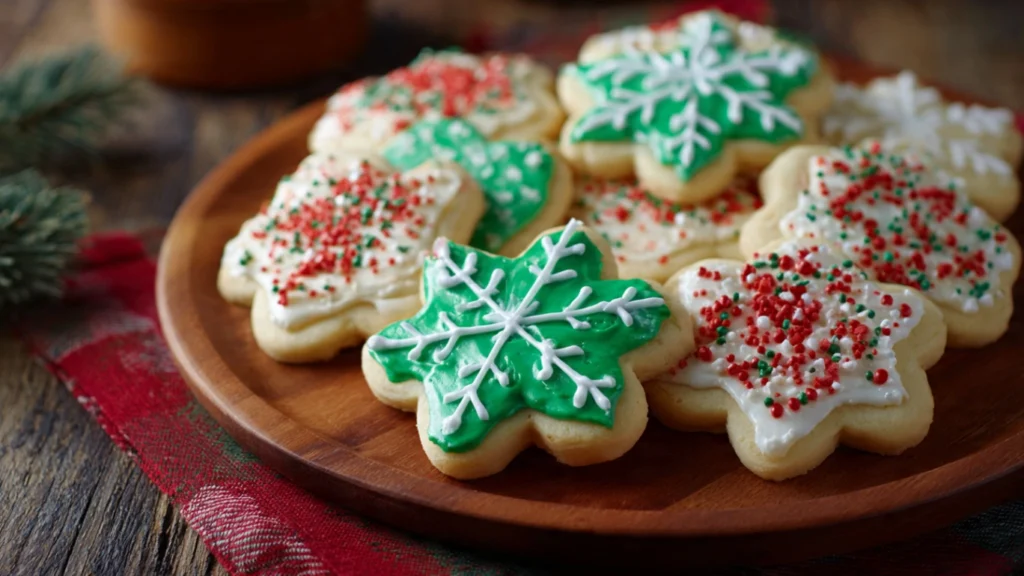
Xmas cookies are festive sugar cookies traditionally made during the Christmas season, typically cut into holiday shapes like trees, stars, bells, snowmen, and candy canes, then decorated with colorful icing and sprinkles. This xmas cookies recipe produces classic cut-out sugar cookies with a tender, slightly crisp texture that’s sturdy enough for decorating but still melts in your mouth. The tradition of Christmas cookies dates back centuries in Europe, where families would bake special treats to celebrate the holiday season. In America, Christmas cookie baking became particularly popular in the mid-1900s as cookie cutters and decorating supplies became widely available. These cookies are more than just dessert—they’re a holiday tradition, a creative activity, and an edible gift all in one. Good Christmas cookies should have a balanced sweet flavor with hints of vanilla and butter, hold their shape perfectly, and provide a smooth surface for decorating without crumbling or breaking.
Common Mistakes to Avoid
The biggest mistake with this xmas cookies recipe is not chilling the dough adequately. Warm dough spreads during baking, losing its shape and creating blurry cookie designs. Always chill for at least 2 hours, or overnight if possible.
Using too much flour when rolling out the dough makes cookies tough and dry. Use just enough flour to prevent sticking, or roll the dough between two sheets of parchment paper.
Rolling the dough too thick creates cookies that are cakey rather than crisp-tender. Aim for ¼-inch thickness for the classic sugar cookie texture.
Overbaking makes cookies hard and dry instead of tender. These cookies should be just barely golden around the edges when you remove them—they continue baking on the hot sheet.
Not spacing cookies properly on the baking sheet can cause them to bake unevenly. Leave at least 1 inch between cookies for proper air circulation.
Trying to decorate warm cookies causes icing to melt and run. Always let cookies cool completely before decorating, at least 30 minutes.
Finally, using margarine instead of real butter creates inferior flavor and texture. Butter is essential for that classic sugar cookie taste.
How to Know When Your Cookies Are Done
Properly baked Christmas cookies should be just barely golden around the edges with centers that still look slightly pale. This ensures they’ll be tender rather than hard.
The cookies should look set and dry on top rather than shiny or wet. They’ll firm up considerably as they cool, so don’t wait for them to feel hard in the oven.
When you lightly touch the edge of a cookie, it should feel firm but not hard. The center should still have a slight give.
This xmas cookies recipe typically requires 8-10 minutes at 350°F. Start checking at 7 minutes, especially if you’ve rolled them on the thinner side.
The cookies shouldn’t have any brown spots except possibly the lightest golden color at the edges. Any browning on top means they’re overbaked.
If you lift a cookie with a spatula, the bottom should be very pale with just a hint of color. Dark bottoms indicate the oven was too hot or they baked too long.
Let cookies cool on the baking sheet for 5 minutes before transferring. They’ll be too soft to move immediately but will firm up quickly.
What to Serve With Xmas Cookies
This xmas cookies recipe creates treats that are perfect with hot cocoa or hot chocolate. The combination is quintessentially Christmas and beloved by kids and adults alike.
Eggnog, whether traditional or non-alcoholic, pairs wonderfully with sugar cookies. The creamy, spiced beverage complements the sweet, buttery cookies perfectly.
Cold milk is always a classic choice, especially for dunking. The simple pairing lets the cookie flavors shine.
Coffee or tea makes these cookies perfect for holiday morning breakfasts or afternoon cookie exchanges. The warm beverages balance the sweetness.
Serve them as part of a holiday dessert platter alongside fudge, peppermint bark, and other Christmas treats for a festive spread.
These cookies are perfect for cookie decorating parties. Set out bowls of icing, sprinkles, and candies and let everyone create their own edible art.
Package them in pretty boxes or tins as homemade gifts. Few things say “Merry Christmas” like homemade cookies.
Storage Tips
Store your decorated xmas cookies in airtight containers at room temperature for up to 10 days. Layer them between sheets of parchment or wax paper to prevent sticking and protect decorations.
Don’t stack iced cookies directly on top of each other until the icing is completely dry and hard, which takes at least 4 hours or overnight.
For longer storage, freeze undecorated baked cookies for up to 3 months. Wrap them well in plastic wrap, then place in freezer bags. Thaw and decorate when ready.
The unbaked dough freezes beautifully for up to 3 months. Wrap it tightly in plastic wrap and place in a freezer bag. Thaw overnight in the refrigerator before rolling and cutting.
You can also freeze cut-out unbaked cookies on baking sheets, then transfer to freezer bags once solid. Bake directly from frozen, adding 1-2 minutes to the baking time.
If cookies become slightly soft during storage, they’re still perfectly fine to eat. The texture may change slightly but the flavor remains excellent.
Keep different cookie flavors or colors in separate containers to prevent flavor transfer and maintain the distinct appearance of each batch.
Estimated Nutrition (Per Cookie)
Calories: 95 | Total Fat: 4g | Saturated Fat: 2.5g | Cholesterol: 20mg | Sodium: 50mg | Total Carbohydrates: 13g | Dietary Fiber: 0g | Sugars: 7g | Protein: 1g
Note: Nutritional information is approximate and based on making 48 cookies, excluding icing and decorations.
Recipe Overview
Prep Time: 30 minutes
Cook Time: 10 minutes per batch
Total Time: 3 hours (including chilling)
Difficulty: Easy
Servings: 48 cookies
Ingredients
For the Cookies:
- 3 cups all-purpose flour
- 1 teaspoon baking powder
- ½ teaspoon salt
- 1 cup unsalted butter, softened
- 1 cup granulated sugar
- 1 large egg
- 2 teaspoons vanilla extract
- ½ teaspoon almond extract (optional)
For Decorating:
- Royal icing, buttercream, or store-bought icing
- Colored sugars, sprinkles, and candies
Step-by-Step Instructions
Step 1: In a medium bowl, whisk together flour, baking powder, and salt. Set aside.
Step 2: In a large bowl, beat the softened butter and sugar with an electric mixer on medium-high speed for 3-4 minutes until light and fluffy.
Step 3: Add the egg, vanilla extract, and almond extract if using. Beat until well combined and smooth.
Step 4: Gradually add the flour mixture to the butter mixture, mixing on low speed until just combined. Don’t overmix or the cookies will be tough.
Step 5: Divide the dough in half and shape each half into a flat disk. Wrap tightly in plastic wrap and refrigerate for at least 2 hours or up to 3 days.
Step 6: When ready to bake, preheat your oven to 350°F. Line baking sheets with parchment paper.
Step 7: Remove one disk of dough from the refrigerator. Let it sit at room temperature for 5-10 minutes to soften slightly for easier rolling.
Step 8: On a lightly floured surface, roll the dough to ¼-inch thickness. Use as little flour as possible to prevent dry cookies.
Step 9: Cut out shapes using cookie cutters. Place cookies on prepared baking sheets, spacing them about 1 inch apart. Gather scraps, re-roll once, and cut more cookies.
Step 10: Bake for 8-10 minutes until the edges are just barely golden. The centers should still look pale. Don’t overbake or they’ll be hard.
Step 11: Let cookies cool on the baking sheet for 5 minutes, then transfer to wire racks to cool completely, about 30 minutes.
Step 12: Once completely cool, decorate with your choice of icing, colored sugars, and sprinkles. Let decorations dry completely before storing, at least 2 hours.
Create beautiful holiday memories with these festive, delicious cookies!