I stumbled onto the idea of grazing cups completely by accident. I was hosting a baby shower for my sister-in-law last spring, and I had spent two hours arranging a beautiful grazing board on my kitchen island — carefully layering meats, cheeses, crackers, fruit, and little pots of honey and jam — when my husband walked by, reached across, and casually rearranged half of it trying to grab a piece of salami. I stood there staring at my ruined board and thought, there has to be a better way. That afternoon I started building individual little cups instead — small clear plastic cups, each one packed with its own perfect arrangement of all the same ingredients. The guests went crazy for them. They were adorable, easy to grab and hold, and nobody had to hover over a shared board. Grazing cups have been my go-to party food ever since, and I genuinely cannot imagine hosting without them now.
Why You’ll Love Them
Grazing cups solve just about every problem that comes with traditional party food. There’s no shared board that gets messy within minutes of the first guest arriving. There’s no awkward hovering or reaching across other people. Each guest gets their own perfectly curated little cup of snacks, which feels personal and intentional in the most charming way. They’re also endlessly customizable — you can theme them around a color palette, a holiday, a dietary need, or simply whatever’s in your refrigerator. They look spectacular arranged on a table or tiered stand, and they photograph beautifully, which matters when you’ve put effort into a party. Best of all, they can be assembled hours in advance, which takes the stress completely out of hosting and lets you actually enjoy your own party.
What Are Grazing Cups?
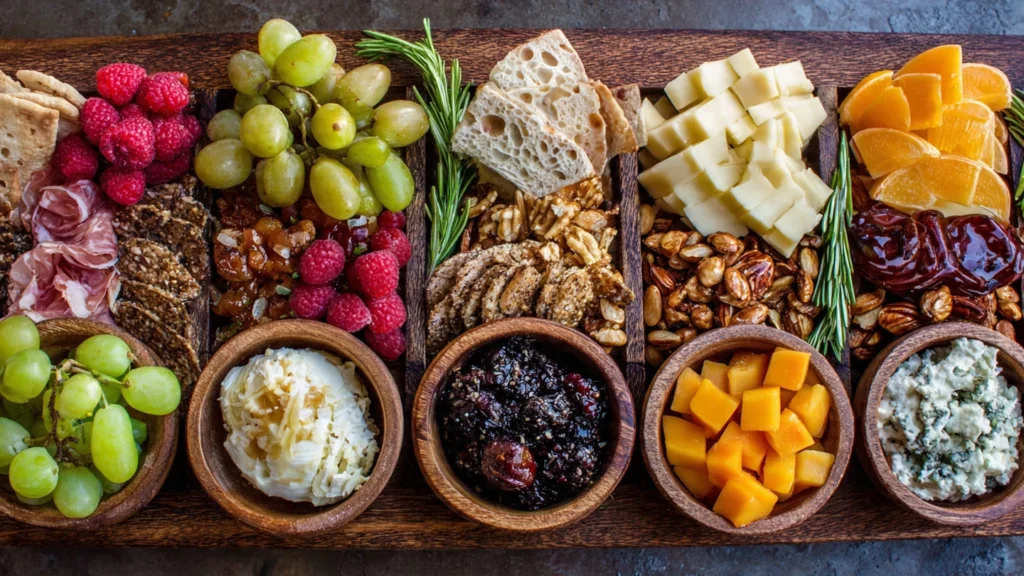
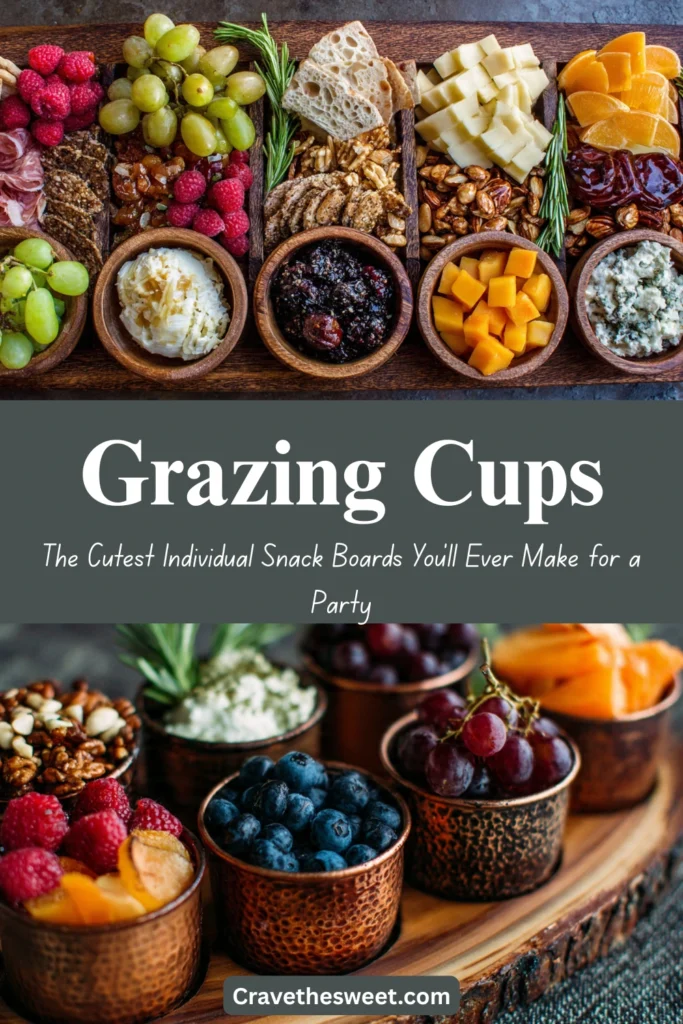
Grazing cups are individual, single-serving versions of a traditional grazing board or charcuterie platter. Instead of one large shared spread, each guest receives their own small cup — typically a clear plastic cup, a small mason jar, or a paper cup — filled with a carefully arranged combination of savory and sweet snacks. A classic grazing cup typically includes a selection of cured meats, a cube or two of cheese, a few crackers, some fresh or dried fruit, a nut or two, and a small garnish like a fresh herb sprig or a toothpick skewer of olives. The beauty of grazing cups is that every element you’d find on a full grazing board is represented in miniature, making each cup feel complete and satisfying on its own. They’re popular at baby showers, bridal showers, birthday parties, holiday gatherings, game days, and corporate events.
Common Mistakes to Avoid
Using cups that are too small. It’s tempting to go tiny and precious, but if your cups are too small, you can’t fit enough variety in to make them satisfying. Aim for 9–12 ounce clear plastic cups or wide-mouth half-pint mason jars for the best balance of presentation and substance.
Skipping the height variation. The most visually striking grazing cups have tall elements, medium elements, and short elements — think a tall rosemary sprig, a folded salami rose at medium height, and small cheese cubes tucked at the base. Flat, uniform-height cups look boring. Build upward.
Adding wet ingredients without barriers. Fresh fruit, grape tomatoes, and anything with moisture will make crackers and bread soft and soggy quickly if they’re touching. Tuck a small piece of parchment or a lettuce leaf between wet and dry ingredients to create a moisture barrier.
Overpacking the cups. It’s a natural instinct to fill every inch of space, but overstuffed cups look messy and make it hard for guests to actually eat the contents gracefully. Leave a little visual breathing room — the negative space actually makes the arrangement look more intentional and beautiful.
Assembling too far in advance with crackers inside. Crackers will absorb moisture from surrounding ingredients and turn soft over several hours. If you’re making grazing cups well ahead of time, add crackers as the very last step, right before serving.
How to Know They’re Done
A finished grazing cup should look full, colorful, and balanced without appearing chaotic or crammed. Step back and look at the cup from a slight distance — your eye should travel naturally through the different colors, textures, and heights rather than getting stuck on one element. There should be at least three distinct colors visible, at least two different textures (something smooth and something crunchy), and one element with height that anchors the whole arrangement. The cup should be stable enough to hold its arrangement when picked up and carried — if things are shifting and falling when you tilt it slightly, repack more firmly. A well-built grazing cup looks just as beautiful when a guest picks it up as it does sitting on the table.
What to Serve Alongside Grazing Cups
Grazing cups work beautifully as a standalone appetizer or snack, but if you’re building a full party spread around them, a few complementary additions round out the table wonderfully. A small bowl of extra crackers and breadsticks on the side gives guests the option to replenish. Individual ramekins of extra dips — fig jam, whole grain mustard, honey, or whipped ricotta — let people customize their experience. A simple crudité platter of fresh vegetables alongside the cups adds color and freshness to the table. For drinks, a sparkling water station with fruit and herb infusions, a wine and cheese pairing card, or a simple signature cocktail all complement the relaxed, social energy that grazing cups naturally create.
Storage Tips
Assembled cups without crackers: Assembled grazing cups without crackers can be covered with plastic wrap and refrigerated for up to 6 hours before serving. This makes them ideal for preparing the morning of a party.
Adding crackers: Always add crackers, breadsticks, or any other crispy elements at the very last moment — no more than 30 minutes before serving — to ensure they stay perfectly crunchy.
Leftover components: Store any leftover meats, cheeses, and fruits separately in airtight containers in the refrigerator for up to 3 days. Reassemble into fresh cups as needed or enjoy as snacks throughout the week.
Do not freeze: The fresh fruit, soft cheeses, and cured meats used in grazing cups do not freeze well once assembled. Always refrigerate and consume within the timeframe above.
Estimated Nutrition (Per Grazing Cup, Based on Standard Filling)
- Calories: ~320
- Total Fat: 20g
- Saturated Fat: 8g
- Carbohydrates: 22g
- Sugar: 8g
- Protein: 14g
- Sodium: 580mg
- Fiber: 2g
Note: Nutrition values are estimates and will vary significantly depending on specific ingredients and quantities used in each cup.
Recipe Overview
- Prep Time: 30 minutes
- Assembly Time: 20 minutes
- Total Time: 50 minutes
- Difficulty: Very Easy — no cooking required
- Servings: 12 grazing cups
Ingredients
Proteins and Charcuterie (choose 2–3):
- 6 oz thinly sliced salami or pepperoni
- 4 oz prosciutto, torn into soft folds
- 4 oz sliced turkey or smoked ham
Cheeses (choose 2–3):
- 6 oz sharp cheddar, cut into small cubes
- 4 oz gouda or colby jack, cut into cubes or small wedges
- 4 oz fresh mozzarella balls (ciliegine), drained
- Optional: small cubes of pepper jack for a spicy element
Crackers and Bread:
- 1 sleeve buttery round crackers
- 1 sleeve thin wheat crackers or crispbreads
- 12 small breadsticks or pretzel rods (one per cup for height)
Fresh and Dried Fruit:
- 1 cup red and green grapes, halved if large
- ½ cup fresh strawberries, halved
- ¼ cup dried cranberries or dried apricots, halved
Nuts and Extras:
- ½ cup roasted almonds, cashews, or candied pecans
- ¼ cup green or Kalamata olives, drained
- 12 cherry tomatoes or mini sweet peppers
Garnishes:
- 12 small sprigs fresh rosemary or thyme
- 12 decorative toothpicks or small skewers
- Optional: small cubes of honeycomb or tiny pots of fig jam for tucking in
Step-by-Step Instructions
Step 1: Gather Your Supplies
Before you start assembling your grazing cups, get everything organized and within reach. Set out 12 clear plastic cups (9–12 oz) or wide-mouth half-pint mason jars on a large tray or baking sheet — working on a tray lets you move all the cups together easily to the refrigerator or table. Lay out all your ingredients in individual small bowls or sections on your prep surface so you can move quickly through the assembly. Having everything visible and accessible at once makes the process feel relaxed and rhythmic rather than hectic.
Step 2: Prepare the Meats
Fold the salami slices into small rosette shapes — fold each round slice in half, then in half again to create a quarter-circle wedge shape, then pinch the pointed end and fan out the rounded edge slightly. These little salami roses are the most classic and charming element of grazing cups and take about 30 seconds each to master. Fold the prosciutto into loose, flowing ribbons by gathering each slice softly into an S-shape. Set both aside on a plate.
Step 3: Cut the Cheeses
Cut your block cheeses into small, uniform cubes — about ¾-inch cubes work best. Small cubes are easy to pick up without utensils and tuck neatly into the cups. If you’re using wedge-shaped cheese, cut small triangular pieces. Drain the mozzarella balls completely and pat them dry with a paper towel so they don’t add unwanted moisture to the cups. Keep all cheeses at room temperature for 15 minutes before assembling — slightly softened cheese looks more appealing and tastes better than cold, hard cubes.
Step 4: Start Building — Anchor with Tall Elements First
Begin each grazing cup by placing your tallest element first. A pretzel rod or breadstick leaned against the inside wall of the cup creates an immediate height anchor and gives the rest of the arrangement something to lean against. This is the structural backbone of your cup. If you’re using a rosemary sprig as garnish, you can also add it at this stage so you build around it naturally.
Step 5: Add the Meats and Cheeses
Tuck the folded salami rose or prosciutto ribbon in next, nestled against the breadstick. Add two or three cubes of different cheeses in different spots around the cup, varying the types for color contrast — pale cheddar next to creamy white mozzarella next to golden gouda creates visual interest immediately. Press them in firmly enough that they hold their position but don’t crush them. The goal is to create a snug, cohesive arrangement where everything supports everything else.
Step 6: Fill in with Fruit, Nuts, and Extras
Now fill in the gaps with your smaller elements — a small cluster of grapes, two or three strawberry halves, a few roasted almonds, a cherry tomato, and a small pile of dried cranberries or an apricot half. Use your fingers to tuck these ingredients into the spaces between the meats and cheese, varying colors and textures as you go. Place a small piece of parchment or a tiny lettuce leaf between any particularly juicy fruit and adjacent crackers to prevent sogginess. Add two or three olives using a small toothpick skewer for an elegant touch.
Step 7: Add Crackers Last
If serving within 30 minutes, tuck two or three crackers in now — fan them out in a small arrangement that adds another layer of height and texture. If refrigerating the cups for later, skip the crackers entirely at this stage and add them right before guests arrive.
Step 8: Garnish and Final Touches
Finish each grazing cup with a small fresh rosemary or thyme sprig tucked in at the back for a pop of green that makes the whole cup look polished and intentional. Step back and look at each cup — make any final adjustments, straightening a cracker here, repositioning a grape there. Arrange all 12 completed grazing cups on a tiered stand, wooden tray, or marble serving board and watch every single guest reach for one the moment they spot them.