I still remember the first time I tasted my grandmother’s banana pudding at a family reunion. The creamy vanilla custard, perfectly ripe bananas, and soft vanilla wafers melted together in a way that felt like a warm hug. That day, I knew I had to learn her secrets. Now, after years of practice and plenty of taste testing, I’m sharing this foolproof banana pudding recipe that brings back those cherished memories every single time.
Why You’ll Love This Banana Pudding Recipe
This dessert is pure comfort in a dish. You’ll fall in love with how the silky custard embraces each slice of banana, creating layers of incredible texture and flavor. What makes this recipe special is its simplicity—you don’t need fancy equipment or hard-to-find ingredients. Everything comes together in about 20 minutes of active work, making it perfect for busy weeknights or last-minute gatherings. The combination of homemade vanilla custard and fresh bananas creates a taste that store-bought pudding simply cannot match. Plus, it feeds a crowd without breaking the bank, making it ideal for potlucks, barbecues, and holiday celebrations.
What Is Banana Pudding?
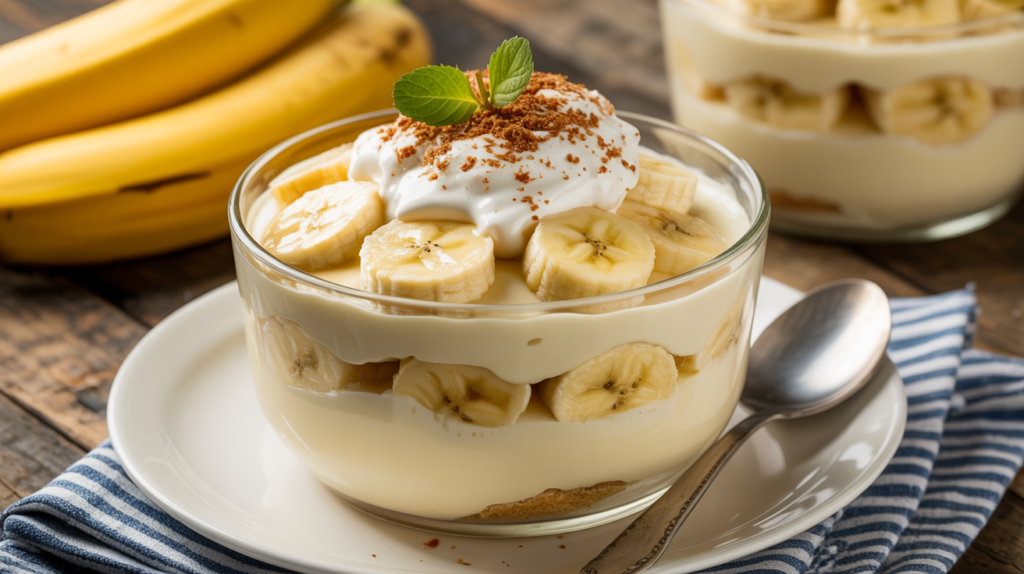
Banana pudding is a beloved Southern dessert that layers creamy vanilla custard with fresh banana slices and vanilla wafers. The traditional version features a rich custard made from scratch, though many modern variations use instant pudding for convenience. The magic happens as the layers sit together—the wafers soften slightly from the custard’s moisture while still maintaining some texture, and the bananas infuse their natural sweetness throughout. Some recipes top the dessert with whipped cream, while others use meringue that’s toasted to golden perfection. This version focuses on a classic approach that highlights the pure flavors without unnecessary complications. The result is a nostalgic treat that tastes like home, no matter where you’re from.
Common Mistakes to Avoid
Even though this banana pudding recipe is straightforward, a few missteps can affect your final result. The biggest mistake is using underripe bananas—they’ll be too firm and lack that sweet, creamy texture you want. Choose bananas with a few brown spots for the best flavor and consistency. Another common error is making the custard too hot or cooking it too quickly. This can cause lumps or even scrambled eggs, which nobody wants in their pudding. Always use medium heat and stir constantly with a whisk.
Many people also assemble their pudding too far in advance. While the flavors do need time to meld, making it more than a day ahead can result in overly brown bananas. To prevent excessive browning, toss your banana slices gently in a little lemon juice before layering—just enough to coat them lightly without adding a strong citrus flavor. Finally, don’t skip the chilling time. The pudding needs at least four hours in the refrigerator to set properly and allow all those wonderful flavors to come together.
How to Know Your Pudding Is Done
Knowing when your custard is perfectly cooked is essential for this banana pudding recipe. The custard should coat the back of a wooden spoon thickly—when you run your finger across the spoon, the line should stay clear without the custard running back together. This usually takes about 10 to 12 minutes of constant stirring over medium heat. The mixture will go from thin and milky to noticeably thicker, and you’ll see steam rising from the surface.
Once assembled, your banana pudding is “done” after proper chilling. The dessert should be cold throughout, with the wafers softened but not completely dissolved. The layers should hold their shape when you scoop into the dish, not run together into a soupy mess. If you’re adding a whipped cream topping, it should be fluffy and hold its peaks. These visual and textural cues tell you everything is perfect and ready to serve.
What to Serve With Banana Pudding
This banana pudding recipe shines as a standalone dessert, but certain pairings make it even more special. After a hearty Southern meal of fried chicken, collard greens, and cornbread, this creamy treat provides the perfect sweet finish. It also pairs wonderfully with barbecue—the cool, smooth pudding offers a refreshing contrast to smoky, savory meats. For a lighter meal, serve it after grilled fish or a fresh summer salad.
Coffee is a natural companion, as its slight bitterness balances the pudding’s sweetness beautifully. Sweet tea, another Southern staple, also works well. If you’re serving this at a party with multiple desserts, place it alongside fruit cobblers, pecan pie, or pound cake for a classic Southern dessert spread. The beauty of this recipe is its versatility—it fits into casual family dinners and elegant celebrations with equal grace.
Storage and Make-Ahead Tips
Proper storage keeps your banana pudding fresh and delicious. Cover the dish tightly with plastic wrap, pressing it directly onto the surface if possible to prevent a skin from forming. Store in the refrigerator for up to three days. While the pudding remains safe to eat during this time, the bananas will continue to darken, so it’s best enjoyed within two days for optimal appearance and flavor.
If you want to prep ahead, you can make the custard up to two days in advance. Let it cool completely, then store it in an airtight container in the refrigerator with plastic wrap pressed directly on the surface. When you’re ready to assemble, gently whisk the custard to restore its smooth texture before layering. However, don’t slice the bananas until you’re ready to build the dessert, as they brown quickly even in the refrigerator.
Unfortunately, banana pudding doesn’t freeze well. The custard can separate, and the bananas turn mushy and brown when thawed. The texture of the wafers also suffers. For the best quality, make only what you’ll eat within a couple of days.
Estimated Nutrition Information
This banana pudding recipe creates a rich, indulgent dessert. One serving of approximately one cup contains around 320 calories. You’ll get about 8 grams of protein from the milk and eggs, 45 grams of carbohydrates from the bananas, wafers, and sugar, and 12 grams of fat from the milk and eggs. Each serving provides roughly 150 milligrams of calcium, thanks to the dairy, plus potassium from the bananas.
Keep in mind these numbers are estimates and will vary based on specific ingredients and portion sizes. If you’re watching your sugar intake, you can reduce the sugar in the custard slightly, though this will affect the sweetness and thickness. Using low-fat milk will reduce the fat content but may result in a less creamy texture. Despite being a treat, this dessert does offer some nutritional benefits from the bananas, including vitamins and minerals that support overall health.
Recipe Overview
Prep Time: 20 minutes
Cook Time: 12 minutes
Chill Time: 4 hours
Total Time: 4 hours 32 minutes
Difficulty: Easy
Servings: 10-12
Ingredients
For the vanilla custard:
- 3 cups whole milk
- 3/4 cup granulated sugar
- 1/3 cup all-purpose flour
- 1/4 teaspoon salt
- 4 large egg yolks
- 2 tablespoons unsalted butter
- 2 teaspoons pure vanilla extract
For assembly:
- 5-6 medium ripe bananas
- 1 box vanilla wafer cookies (about 11 ounces)
- 2 cups heavy whipping cream
- 3 tablespoons powdered sugar
- 1 teaspoon vanilla extract
Optional:
- 1 tablespoon fresh lemon juice (to prevent banana browning)
Step-by-Step Instructions
Start by making your custard. In a medium saucepan, whisk together the sugar, flour, and salt until well combined. This dry mixture helps prevent lumps in your finished custard. Add the egg yolks and whisk vigorously until the mixture becomes pale yellow and smooth, about one minute.
Pour in the milk gradually while whisking constantly. This tempering process prevents the eggs from scrambling. Once all the milk is incorporated, place the saucepan over medium heat. Stir continuously with a whisk, making sure to scrape the bottom and sides of the pan. The mixture will seem thin at first, but be patient.
After about 10 to 12 minutes, the custard will thicken noticeably. It should coat the back of a wooden spoon and leave a clear line when you run your finger through it. Remove the pan from heat immediately—overcooking can cause the custard to become grainy or even scramble.
Stir in the butter and vanilla extract until the butter melts completely and everything is smooth. Place a piece of plastic wrap directly on the surface of the custard to prevent a skin from forming. Let it cool for about 30 minutes at room temperature, then transfer to the refrigerator to chill for at least one hour.
While the custard chills, prepare your bananas. Peel them and slice into rounds about a quarter-inch thick. If you’re concerned about browning, gently toss the slices with a tablespoon of lemon juice in a large bowl. The acid slows oxidation without making the pudding taste citrusy.
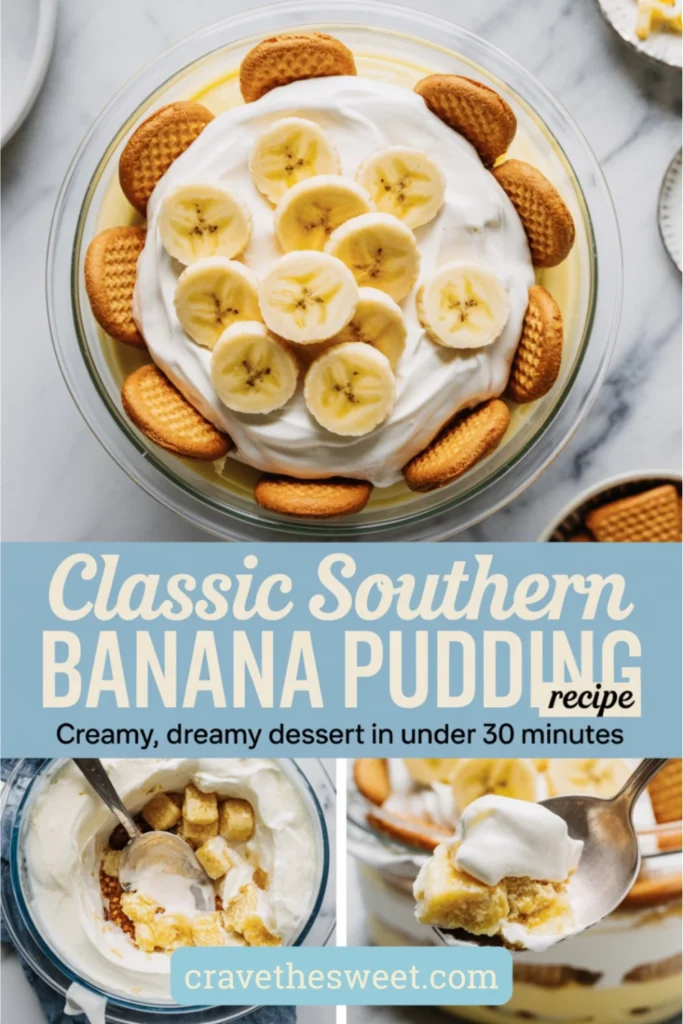
Now comes the fun part—assembly! In a trifle dish or a 9×13 inch baking dish, spread a thin layer of custard on the bottom. Arrange a layer of vanilla wafers over the custard, covering as much surface area as possible. Top the wafers with a layer of banana slices, arranging them in a single layer.
Spread about a third of the remaining custard over the bananas, smoothing it gently with a spatula. Repeat these layers—wafers, bananas, custard—two more times, ending with custard on top. Press down very gently on the layers to ensure everything is compact and the custard fills any gaps.
Cover the dish with plastic wrap and refrigerate for at least four hours, or preferably overnight. This chilling time is crucial for the flavors to develop and the wafers to soften to that perfect texture.
Before serving, make the whipped cream topping. In a large bowl, combine the heavy whipping cream, powdered sugar, and vanilla extract. Using an electric mixer or a whisk, beat until stiff peaks form. This usually takes about three to four minutes with a mixer.
Spread the whipped cream over the chilled pudding, creating decorative swirls if you like. For an extra touch, crush a few vanilla wafers and sprinkle them on top, or add a few banana slices as garnish.
Scoop generous portions into bowls and watch as everyone’s eyes light up with that first creamy, dreamy bite. This banana pudding recipe never fails to bring smiles and requests for seconds.