
When I was seven years old, I thought marble cake was the most magical dessert in the world. I’d sit at my aunt’s kitchen table, mesmerized by the swirls of vanilla and chocolate winding through each slice like a piece of edible art. I remember asking her how she got the two flavors to twist together so beautifully without mixing completely. She smiled and told me it was easier than it looked, just a simple swirling technique that anyone could master. Years later, when I finally tried making marble cake myself, I discovered she was absolutely right. This marble cake recipe has become one of my most reliable desserts, impressing guests while requiring nothing more than basic baking skills and a butter knife for swirling. The best part is watching faces light up when they see those gorgeous marbled slices.
Why You’ll Love This Marble Cake Recipe
This cake delivers the best of both worlds for anyone who can never decide between vanilla and chocolate. You get two classic flavors in every single bite, beautifully marbled together in an eye-catching pattern that makes even a simple cake look special. The texture is wonderfully moist and tender, with a fine crumb that practically melts in your mouth. What makes this marble cake recipe particularly appealing is its versatility. It works perfectly for birthday parties, potluck dinners, afternoon tea, or casual family desserts. Kids absolutely love the fun swirled appearance, and adults appreciate the nostalgic, comforting flavors. The cake is also incredibly forgiving for beginners since the marbling technique naturally looks rustic and beautiful, even if your swirls aren’t perfect. It stays fresh for days and actually tastes better on the second day as the flavors develop.
What Is Marble Cake?
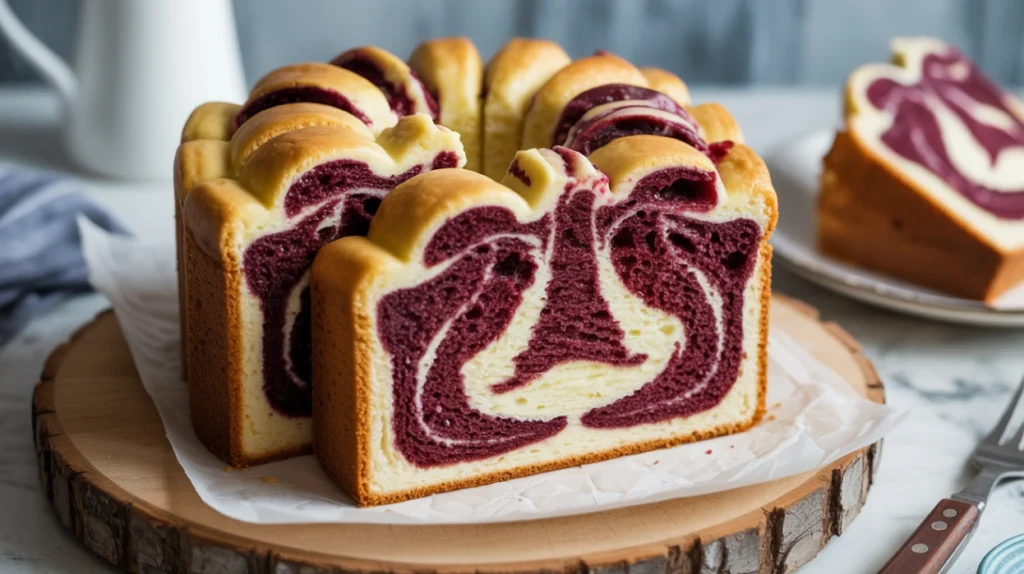
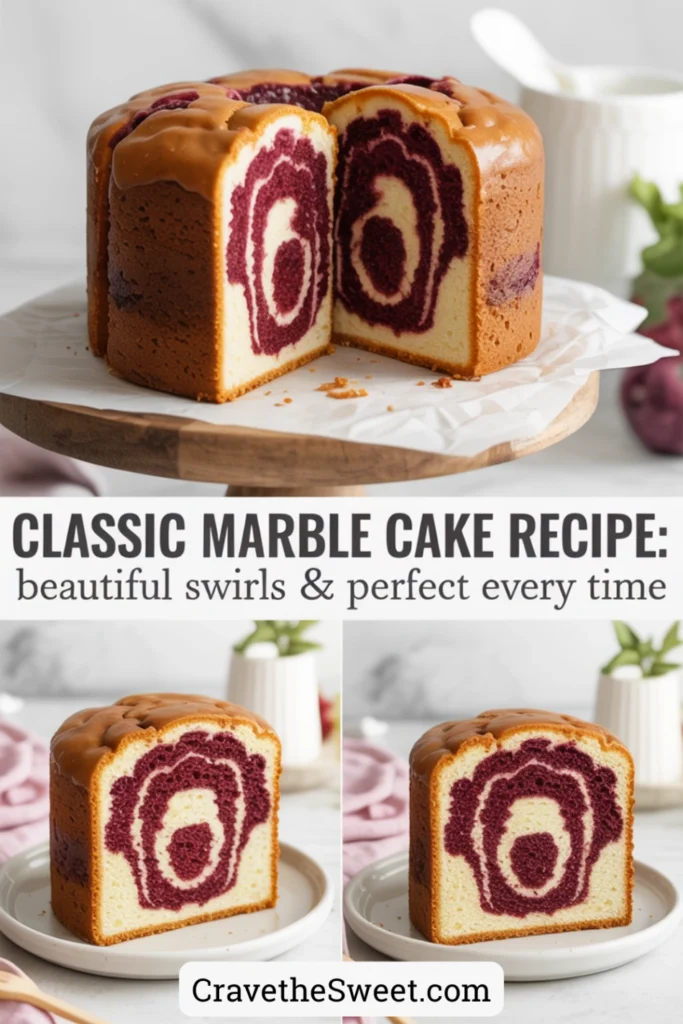
Marble cake is a classic American cake featuring swirled patterns of vanilla and chocolate batters baked together in one pan. The name comes from the resemblance to marble stone with its natural veining and color variations. Unlike layered cakes where flavors are separated, marble cake combines both flavors throughout, creating a beautiful visual effect and ensuring you taste both chocolate and vanilla in most bites. The technique involves making one basic vanilla batter, dividing it, and adding cocoa powder to one portion to create the chocolate element. The two batters are then spooned into the pan in alternating dollops and swirled together with a knife or skewer to create the signature marbled pattern. This marble cake recipe uses the traditional method that creates distinct swirls without the batters blending completely together, maintaining clear vanilla and chocolate sections throughout.
Common Mistakes to Avoid
The most common mistake when making marble cake is over-swirling the batters. Many people get carried away trying to create the perfect pattern and end up mixing the vanilla and chocolate together too much, resulting in a muddy brown cake instead of distinct marbled swirls. Remember that less is more when swirling. Just a few figure-eight or zigzag motions through the batter is all you need. Another frequent error is making the chocolate batter too thick by adding too much cocoa powder, which prevents it from swirling smoothly with the vanilla batter. The two batters should have similar consistencies for the best marbling effect. Some bakers also make the mistake of dropping all of one batter in first, then adding the other on top. This creates layers instead of marbling. Instead, alternate spoonfuls of each batter randomly throughout the pan before swirling. Not letting the butter and eggs come to room temperature can also affect texture, creating a denser cake instead of the light, fluffy result you want with this marble cake recipe.
How to Know When Your Marble Cake Is Done
Determining doneness is crucial for achieving that perfectly moist texture. Start checking your cake about five minutes before the recommended baking time ends. The top should be golden brown and spring back lightly when you gently press the center with your fingertip. Insert a toothpick or cake tester into the center of the cake, making sure you’re testing in both the vanilla and chocolate sections. It should come out clean or with just a few moist crumbs clinging to it. If you see wet batter, continue baking and check again in three to five minutes. The edges should also be pulling away slightly from the sides of the pan. Another indicator is smell. When your kitchen fills with that sweet, buttery cake aroma and the scent becomes quite strong, your cake is likely close to done. Remember that the cake will continue cooking slightly from residual heat even after you remove it from the oven, so avoid overbaking.
What to Serve With Marble Cake
Marble cake is delicious enough to stand on its own, but pairing it with complementary accompaniments can elevate the experience. A simple dusting of powdered sugar over the top adds a elegant finishing touch without overwhelming the cake’s beautiful marbled appearance. Vanilla ice cream is a classic pairing that adds a cold, creamy contrast to the tender cake. For chocolate lovers, a drizzle of chocolate ganache over individual slices intensifies the chocolate element. Fresh whipped cream provides a light, airy complement that doesn’t compete with the cake’s flavors. Berries, especially strawberries or raspberries, add a pop of color and a slight tartness that balances the cake’s sweetness beautifully. Hot coffee or tea makes this marble cake recipe perfect for breakfast or afternoon snacking. For a more decadent dessert, serve warm slices with a scoop of coffee ice cream and a drizzle of caramel sauce. Some people also enjoy spreading a thin layer of chocolate frosting or cream cheese frosting over cooled slices.
Storage Tips for Maximum Freshness
Proper storage keeps your marble cake tasting fresh and moist for days. Once the cake has cooled completely, cover it tightly with plastic wrap or aluminum foil, or store it in an airtight container. At room temperature, the cake will stay fresh for up to four days. Make sure to store it in a cool, dry place away from direct sunlight or heat sources. If your kitchen is particularly warm or humid, refrigerating the cake is a better option, though this may slightly firm up the texture. Before serving refrigerated cake, let it sit at room temperature for about 20 to 30 minutes to restore its soft, tender crumb. For longer storage, this marble cake recipe freezes exceptionally well for up to three months. Wrap the entire cake or individual slices tightly in plastic wrap, then wrap again in aluminum foil or place in a freezer-safe bag. Thaw overnight in the refrigerator or at room temperature for a few hours. Frozen and thawed marble cake tastes remarkably fresh.
Estimated Nutrition Information
Per serving (based on 12 slices): Approximately 295 calories, 13g fat, 41g carbohydrates, 4g protein, 80mg cholesterol, 220mg sodium. These values are estimates and will vary based on specific ingredients used.
Recipe Overview
Prep Time: 20 minutes
Cook Time: 45 minutes
Total Time: 1 hour 5 minutes
Difficulty: Easy
Servings: 12 slices
Ingredients
For the vanilla batter:
- 2 and 1/2 cups all-purpose flour
- 2 teaspoons baking powder
- 1/2 teaspoon salt
- 1 cup unsalted butter, softened
- 1 and 3/4 cups granulated sugar
- 4 large eggs, room temperature
- 2 teaspoons vanilla extract
- 1 cup whole milk, room temperature
For the chocolate swirl:
- 3 tablespoons unsweetened cocoa powder
- 2 tablespoons hot water
- 1 tablespoon granulated sugar
Step-by-Step Instructions
Begin by preheating your oven to 350°F. Generously grease a 10-inch bundt pan or tube pan with butter or baking spray, making sure to coat every crevice. Dust the pan lightly with flour, tapping out any excess. Proper greasing is essential for this marble cake recipe since you want those beautiful swirls to release perfectly from the pan.
In a medium bowl, whisk together the flour, baking powder, and salt until well combined. Set this aside. In a large mixing bowl, beat the softened butter with an electric mixer on medium speed until creamy and smooth, about one minute. Gradually add the sugar and continue beating for about four minutes until the mixture is light, fluffy, and pale in color. This step incorporates air into your batter, creating a lighter cake texture.
Add the eggs one at a time, beating well after each addition and scraping down the sides of the bowl as needed. Mix in the vanilla extract. The batter might look slightly curdled at this point, which is perfectly normal. With your mixer on low speed, add about one-third of the flour mixture, followed by half of the milk. Add another third of the flour, the remaining milk, and finally the last of the flour. Mix just until each addition is incorporated. Avoid overmixing once the flour is added, as this develops gluten and creates a tougher cake.
Remove about one-third of the vanilla batter and place it in a separate bowl. This will become your chocolate batter. In a small bowl, mix together the cocoa powder, hot water, and sugar until smooth and no lumps remain. Add this chocolate mixture to the smaller portion of batter and stir until evenly combined and the batter is a uniform chocolate color.
Now comes the fun part, creating the marble effect. Using a large spoon or ice cream scoop, drop alternating spoonfuls of vanilla and chocolate batter randomly into your prepared pan. Don’t worry about being too precise. The random placement actually creates better marbling. Continue until you’ve used all of both batters. The pan should be about two-thirds full.
Take a butter knife or wooden skewer and insert it into the batter, going all the way down to the bottom of the pan. Using a gentle zigzag or figure-eight motion, swirl through the batter about four to six times. Remember not to over-swirl. You want to create swirls and patterns, not mix the batters completely together. The marble effect should still show distinct sections of vanilla and chocolate.
Gently tap the pan on your counter a few times to release any air bubbles. Place the pan in the preheated oven and bake for 45 to 55 minutes, checking for doneness using the methods described earlier. Every oven is different, so start checking at 45 minutes.
When done, remove the cake from the oven and let it cool in the pan for about 15 minutes. Then carefully invert it onto a wire rack and remove the pan. Let the cake cool completely before slicing. The marbled pattern will be revealed beautifully with each slice, making this marble cake recipe a showstopper every single time.


