
The first time I made a fruit tart, I was terrified. It looked so fancy in the bakery window with those perfectly arranged berries and glossy finish that I assumed it was way beyond my skills. But then a friend told me her secret—fruit tarts are actually one of the easiest impressive desserts you can make. She was right! Once I tried this beautiful fruit tart recipe, I couldn’t believe how simple it was. The crust comes together in minutes, the creamy filling is just a few ingredients, and arranging the fruit is the fun part where you get to be creative. Now it’s my go-to dessert whenever I want to look like a fancy pastry chef without the stress.
Why You’ll Love This Beautiful Fruit Tart Recipe
This stunning dessert looks like it came from an expensive French bakery, but you can make it in your own kitchen with basic ingredients and tools. You’ll love how the buttery, crisp crust contrasts with the smooth, lightly sweet cream filling and fresh fruit topping. It’s not overly sweet, which means the natural flavors of the fruit really shine through. The recipe is surprisingly forgiving—even if your crust isn’t perfect or your fruit arrangement is a bit wonky, it’ll still taste absolutely incredible. Plus, you can customize it with whatever fruits are in season or look best at the market. It’s impressive enough for dinner parties, elegant for special celebrations, yet simple enough to make on a regular weekend. Your guests will be amazed, and you’ll have a secret smile knowing how easy it actually was.
What Is a Fruit Tart?
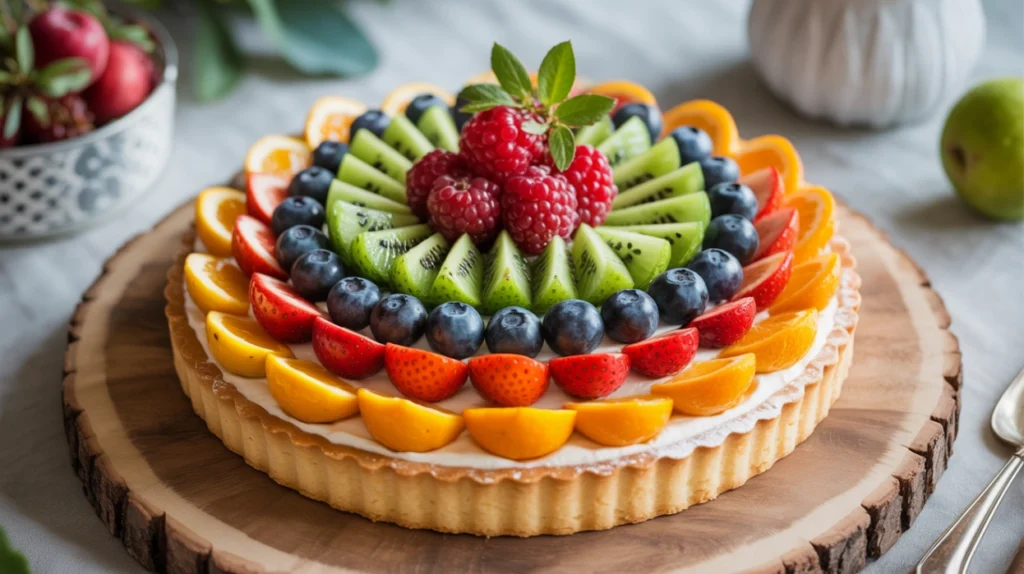
A classic fruit tart consists of three delicious layers working in perfect harmony. The base is a buttery tart crust called pâte sucrée, which is slightly sweet and wonderfully crisp. This isn’t like pie crust—it’s sturdier and more cookie-like, which helps it hold up under the weight of the filling and fruit. The middle layer is typically pastry cream or a lightened cream cheese filling that adds richness and helps the fruit stay in place. Finally, the top is decorated with fresh fruit arranged in beautiful patterns—think concentric circles of berries, overlapping slices of kiwi, or a colorful mix of whatever looks gorgeous. Some bakers brush the fruit with a light apricot glaze to make everything shine, though that’s completely optional. This beautiful fruit tart recipe brings all these elements together in a way that’s both delicious and visually stunning.
Common Mistakes to Avoid
The most common mistake when making this beautiful fruit tart recipe is not chilling the crust dough long enough. If the butter gets too warm, the crust will shrink dramatically during baking and might even slide down the sides of your pan. Always refrigerate the dough for at least 30 minutes before rolling it out. Another error is skipping the blind baking step or not doing it properly. You need to pre-bake the crust with weights to prevent it from puffing up and losing its shape.
Don’t overfill your tart shell with the cream filling—you need room for the fruit, and too much filling makes the tart difficult to slice neatly. When it comes to the fruit topping, avoid using fruits that release too much juice, like watermelon, or your tart will get soggy quickly. If you’re using strawberries, make sure they’re completely dry before placing them on the tart. Also, assemble your tart no more than a few hours before serving. The crust stays crispest when the filling and fruit are added closer to serving time. Finally, use a tart pan with a removable bottom—trying to serve a tart from a regular pan is nearly impossible without making a mess.
How to Know When Your Tart Crust Is Done
Your tart crust is perfectly baked when it’s an even golden brown color all over, including the bottom. After you remove the pie weights and parchment paper, check the base—it should look dry and set, not wet or doughy. If the bottom still looks pale or underdone, pop it back in the oven for another five to eight minutes. The edges might get darker than the center, and that’s fine as long as they’re not burning. A properly baked crust will be firm to the touch and have a wonderful buttery aroma filling your kitchen. Once it’s done, let it cool completely in the pan before adding any filling. A warm crust will make your cream filling too soft and runny. Patience here makes all the difference in getting that perfect crisp texture that contrasts so beautifully with the creamy filling.
What to Serve With Your Fruit Tart
Honestly, this beautiful fruit tart recipe is so stunning and complete on its own that it doesn’t need much accompaniment. A simple dollop of freshly whipped cream on the side is lovely if you want to add extra richness. Some people enjoy a scoop of vanilla ice cream, especially during summer when the tart is served chilled. A light dessert wine like Moscato or a sparkling Prosecco pairs wonderfully with the fresh fruit flavors. For a non-alcoholic option, serve it with hot tea or coffee—the buttery crust is perfect for dunking. If you’re serving this at a dinner party, it makes a beautiful ending after a rich main course because it’s refreshing rather than heavy. The bright, fruity flavors cleanse the palate perfectly.
Storage Tips for Maximum Freshness
Fruit tarts are best eaten the day they’re assembled, but you can prepare components ahead to make life easier. Bake the crust up to two days in advance and store it in an airtight container at room temperature. Make the cream filling a day ahead and keep it covered in the refrigerator. When you’re ready to serve, assemble everything together. Once assembled, a fruit tart will keep in the refrigerator for up to 24 hours, though the crust will gradually lose its crispness as moisture from the filling and fruit seeps in. Cover it loosely with plastic wrap, being careful not to disturb the fruit arrangement. Don’t freeze assembled fruit tarts—the fresh fruit won’t hold up well. However, you can freeze the baked, unfilled tart shell for up to one month if you want to plan way ahead.
Estimated Nutrition Information
Per slice (based on 8 servings): Approximately 320 calories, 18g fat, 36g carbohydrates, 5g protein, 95mg cholesterol, 140mg sodium. These values will vary depending on the types and amounts of fruit used.
Recipe Overview
Prep Time: 30 minutes (plus chilling time) Cook Time: 25 minutes Total Time: 2 hours (including chilling) Difficulty: Moderate Servings: 8 slices
Ingredients
For the tart crust:
- 1 and 1/4 cups all-purpose flour
- 1/4 cup granulated sugar
- 1/4 teaspoon salt
- 1/2 cup (1 stick) cold unsalted butter, cut into small cubes
- 1 large egg yolk
- 2 tablespoons cold water
For the cream filling:
- 8 ounces cream cheese, softened
- 1/3 cup powdered sugar
- 1 teaspoon vanilla extract
- 1/2 cup heavy whipping cream
For the topping:
- 3 to 4 cups fresh fruit (strawberries, blueberries, raspberries, kiwi, mandarin oranges, or your favorites)
- 2 tablespoons apricot jam (optional, for glaze)
Step-by-Step Instructions
Start by making the tart crust. In a food processor, pulse together the flour, sugar, and salt. Add the cold butter cubes and pulse until the mixture looks like coarse crumbs. Add the egg yolk and cold water, pulsing just until the dough starts to come together. If you don’t have a food processor, you can cut the butter into the flour mixture with a pastry cutter or your fingers.
Turn the dough out onto a clean surface and gather it into a disk. Wrap it in plastic wrap and refrigerate for at least 30 minutes.
Preheat your oven to 375 degrees Fahrenheit. Roll out the chilled dough on a lightly floured surface into a circle about 11 inches in diameter. Carefully transfer it to a 9-inch tart pan with a removable bottom, pressing it gently into the corners. Trim any excess dough from the edges.
Line the crust with parchment paper and fill it with pie weights, dried beans, or uncooked rice. This is called blind baking and prevents the crust from puffing up. Bake for 15 minutes, then carefully remove the parchment and weights. Return the crust to the oven and bake for another 10 to 12 minutes until golden brown all over. Let it cool completely in the pan.
While the crust cools, make your cream filling. Beat the softened cream cheese, powdered sugar, and vanilla extract together until smooth and creamy. In a separate bowl, whip the heavy cream until stiff peaks form. Gently fold the whipped cream into the cream cheese mixture until well combined. This creates a light, fluffy filling.
Once your tart crust is completely cool, spread the cream filling evenly inside, smoothing it with a spatula. Leave about a quarter inch of space at the top.
Now comes the fun part—arranging your fruit! Wash and dry all your fruit thoroughly. Slice strawberries, peel and slice kiwi, and leave berries whole. Arrange the fruit in whatever pattern makes you happy—concentric circles, straight rows, or a random artistic scatter all look beautiful.
If you want that professional bakery shine, warm the apricot jam in the microwave for 10 seconds until it’s liquid, then gently brush it over the fruit with a pastry brush.
Refrigerate your beautiful fruit tart recipe for at least one hour before serving to let everything set up nicely. Slice with a sharp knife, wiping it clean between cuts for neat slices. Enjoy the compliments!