

I discovered poke cake at a baby shower about ten years ago and was instantly fascinated. The hostess brought out this stunning cake with bright streaks of color running through every slice, and when I tasted it, I was amazed by how moist and flavorful it was. She explained that she’d literally poked holes in the cake and poured Jell-O over it, and I thought it was genius. The next weekend, I tried making my own version, and my kids went absolutely wild for it. Since then, this poke cake recipe has become my go-to for birthdays, potlucks, and summer gatherings. It’s incredibly easy, endlessly customizable, and always gets rave reviews. The best part? It looks like you spent hours decorating when it actually takes minimal effort.
Why You’ll Love This Poke Cake Recipe
This cake is wonderfully moist with bursts of fruity flavor throughout. The combination of tender cake, sweet Jell-O, and fluffy whipped topping creates perfect harmony in every bite. What makes this poke cake recipe special is how foolproof it is—even beginner bakers can achieve professional-looking results. Using a box cake mix means there’s no complicated measuring or mixing, and the Jell-O does all the decorating work for you. The visual impact is incredible with those colorful streaks running through the cake when you slice it. Kids absolutely love the bright colors and sweet flavor, while adults appreciate how light and refreshing it tastes, especially in warm weather. You can customize it endlessly with different cake flavors, Jell-O colors, and topping combinations. It’s also a make-ahead dream—the cake actually improves as it sits and the flavors meld together. Perfect for feeding crowds since it’s served right from the pan.
What Is a Poke Cake?
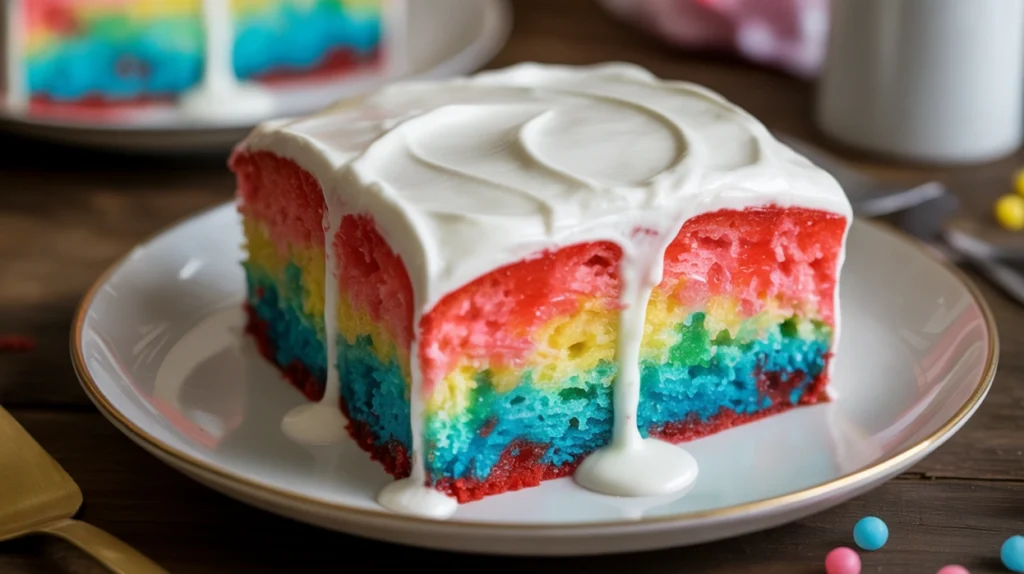
A poke cake is a simple American dessert where a baked cake is poked with holes, then filled with liquid Jell-O, pudding, or sweetened condensed milk that soaks into the cake. The concept became popular in the 1970s when Jell-O printed the recipe on their boxes. The technique creates streaks of color and flavor running through the cake while keeping it incredibly moist. After the liquid sets, the cake is typically topped with whipped cream or Cool Whip and refrigerated. The name comes from the essential first step—poking holes in the baked cake using the handle of a wooden spoon, a fork, or a skewer. These holes allow the liquid to penetrate deep into the cake. Traditional versions use strawberry or cherry Jell-O with white cake, creating a red and white effect perfect for holidays. However, you can use any combination of cake and Jell-O flavors to match themes, seasons, or personal preferences.
Common Mistakes to Avoid
The biggest mistake with this poke cake recipe is not poking enough holes or making them too shallow. You need lots of holes that go almost to the bottom of the cake for the Jell-O to properly penetrate. Space them about a half-inch apart. Another error is pouring the Jell-O immediately after mixing—it needs to cool to room temperature first, or it will melt the cake and create a soggy mess. However, don’t let it get too cool or it will start setting before it soaks in. Some people don’t refrigerate the cake long enough after adding the Jell-O. It needs at least three hours for the gelatin to set completely before you add the topping. Adding the whipped topping too soon causes it to mix with the liquid Jell-O and create a runny mess. Make sure the Jell-O layer is completely set and firm to the touch. Using a pan that’s too deep makes it hard for the Jell-O to reach the bottom, while a pan that’s too shallow causes overflow. A 9×13-inch pan is ideal. Finally, not covering the cake properly in the refrigerator can cause it to dry out or absorb other food odors.
How to Know When Your Poke Cake Is Done
The initial cake baking follows standard cake doneness tests—the top should be golden and spring back when lightly touched, and a toothpick inserted in the center should come out clean or with just a few moist crumbs. The edges will pull away slightly from the pan. After you’ve poked the holes and poured the Jell-O, you’ll need to refrigerate it for at least three hours. The Jell-O is ready for the next step when you touch the surface and it feels firm and set, not sticky or liquid. You should be able to see the colored streaks clearly through the holes. When you press gently on the cake, no liquid should seep up. Once you’ve added the whipped topping and refrigerated again, the cake is ready to serve after at least one hour, though overnight is even better. The entire dessert should be cold throughout, and when you cut a slice, you should see distinct layers with colorful Jell-O streaks running through the white cake.
What to Serve With Poke Cake
This poke cake recipe creates a dessert that’s complete on its own, but certain additions make it even more festive. Fresh berries scattered on top add color and a fresh element that complements the fruity Jell-O flavor. Sliced strawberries are classic with strawberry poke cake. Crushed cookies or graham crackers sprinkled on the whipped topping add a nice textural contrast. For holidays, use themed sprinkles or candies—red and green for Christmas, pastels for Easter, or red, white, and blue for the Fourth of July. Chocolate shavings work beautifully if you’ve made a chocolate version. Some people drizzle caramel or chocolate sauce over individual slices. The cake pairs wonderfully with coffee, iced tea, or lemonade. For kids’ parties, serve it alongside ice cream. A glass of cold milk is always a good choice too. Keep the accompaniments simple since the cake itself is quite sweet and flavorful.
Storage and Make-Ahead Instructions
Poke cake is actually best when made ahead—it needs time in the refrigerator for the Jell-O to set and the flavors to develop. You can make the entire cake up to two days before serving. Keep it tightly covered with plastic wrap or foil in the refrigerator. The cake will stay fresh for up to four days refrigerated, making it perfect for meal prep or enjoying leftovers. Always store it in the refrigerator, never at room temperature, because of the whipped topping. The cake can be made in stages if needed—bake the cake one day, add the Jell-O the next morning, and add the topping that evening. You can prepare it up to the point of adding the whipped topping, then add the topping just a few hours before serving for the freshest presentation. Cover individual slices tightly if storing leftovers. Don’t freeze poke cake—the texture of the Jell-O and whipped topping doesn’t hold up well to freezing and thawing.
Estimated Nutrition Information
Per serving (based on 15 servings): Approximately 295 calories, 12g fat, 44g carbohydrates, less than 1g fiber, 32g sugar, 3g protein. This is definitely a dessert meant for special occasions rather than everyday eating. The portion sizes are generous, and the sweet flavor means most people find one serving satisfying.
Recipe Overview
Prep Time: 20 minutes
Cook Time: 30 minutes
Total Time: 4 hours 50 minutes (including cooling and chilling)
Difficulty: Easy
Servings: 15
Ingredients
For the cake:
- 1 box (15.25 ounces) white cake mix
- Ingredients called for on cake mix box (typically eggs, oil, and water)
For the filling:
- 1 package (3 ounces) strawberry Jell-O (or any flavor you prefer)
- 1 cup boiling water
- 1/2 cup cold water
For the topping:
- 8 ounces whipped topping (Cool Whip), thawed
- Optional: fresh strawberries, sprinkles, or other decorations
Step-by-Step Instructions
Preheat your oven according to the cake mix box directions, typically 350°F. Spray a 9×13-inch baking pan with cooking spray or grease it with butter.
Prepare the white cake mix according to the package directions. Pour the batter into your prepared 9×13-inch pan and spread it evenly.
Bake according to the package instructions, usually 28 to 33 minutes, until the cake is golden on top and a toothpick inserted in the center comes out clean. The cake should spring back when lightly touched.
Remove the cake from the oven and let it cool on a wire rack for about 15 minutes. You want it still warm but not hot. Don’t let it cool completely before the next step.
While the cake is cooling slightly, prepare your Jell-O. Pour the boiling water into a medium bowl and add the Jell-O powder. Whisk for about two minutes until the powder is completely dissolved with no granules remaining.
Add the cold water to the Jell-O mixture and stir. Set it aside to cool to room temperature, about 10 to 15 minutes. It should still be liquid but not hot. If it’s hot, it will melt the cake structure.
Now for the fun part—poking the cake. Using the handle of a wooden spoon, a thick straw, or a similar round object, poke holes all over the entire cake. The holes should be about half an inch apart and go almost to the bottom of the pan. You want lots of holes—I usually make 60 to 80 holes.
Slowly pour the cooled Jell-O mixture evenly over the entire cake, making sure to pour directly over the holes. Use a spoon to spread it around if needed, ensuring all areas are covered. You’ll see the Jell-O immediately starting to soak into the holes.
Let the cake sit at room temperature for about 10 minutes to allow more Jell-O to soak in, then cover the pan tightly with plastic wrap.
Refrigerate for at least three hours, though four to five hours is better. The Jell-O needs this time to set completely. You can also refrigerate overnight at this stage.
Once the Jell-O is completely set and firm to the touch, remove the cake from the refrigerator. Spread the thawed whipped topping evenly over the entire surface of the cake using an offset spatula or the back of a spoon. Make sure to spread it all the way to the edges.
If desired, decorate the top with fresh strawberries, sprinkles, or other toppings. Get creative with your decorations to match your theme or occasion.
Cover the cake again and refrigerate for at least one more hour before serving. This allows the whipped topping to firm up and all the layers to meld together.
When ready to serve, cut into squares using a sharp knife. Wipe the knife clean between cuts for the neatest slices. Serve cold directly from the refrigerator.
As you cut into the cake, you’ll see beautiful streaks of colored Jell-O running throughout, creating that signature poke cake appearance.
This poke cake recipe has become my secret weapon for easy entertaining. The combination of moist cake, fruity Jell-O, and fluffy topping creates a dessert that’s both impressive and incredibly simple to make, perfect for any celebration.


