The first time I attempted a tarte tatin recipe, I was terrified. I’d seen it on a cooking show, with the dramatic flip revealing those gorgeous caramelized apples, and I thought it was way beyond my skill level. But my French neighbor, Marie, laughed at my hesitation. “It’s just apples, sugar, and pastry,” she said. “The flip is the fun part!” She walked me through it one autumn afternoon, and I couldn’t believe how straightforward it actually was. The smell of caramelizing apples and butter filled my kitchen, and when I flipped that tart onto a plate—perfectly golden and glistening—I felt like a professional pastry chef. Now it’s my signature dessert, and I’m here to show you that this elegant French classic is completely achievable in your own kitchen.
Why You’ll Love This Tarte Tatin Recipe
This tarte tatin recipe combines simplicity with stunning presentation. You’ll love how just a handful of basic ingredients transform into something that looks and tastes like it came from a Parisian patisserie. The contrast between the buttery, flaky pastry and the tender, caramelized apples is absolutely divine. Unlike many fancy desserts, this one is forgiving—even if your flip isn’t perfect, it still tastes incredible. The deep caramel flavor develops right in the pan, meaning less cleanup and more time to enjoy the process. It’s impressive enough for dinner parties but easy enough for a regular weekend treat. Plus, there’s something wonderfully satisfying about the theatrical flip that reveals your masterpiece. This dessert makes you feel like a culinary artist without requiring years of training.
What Is Tarte Tatin?
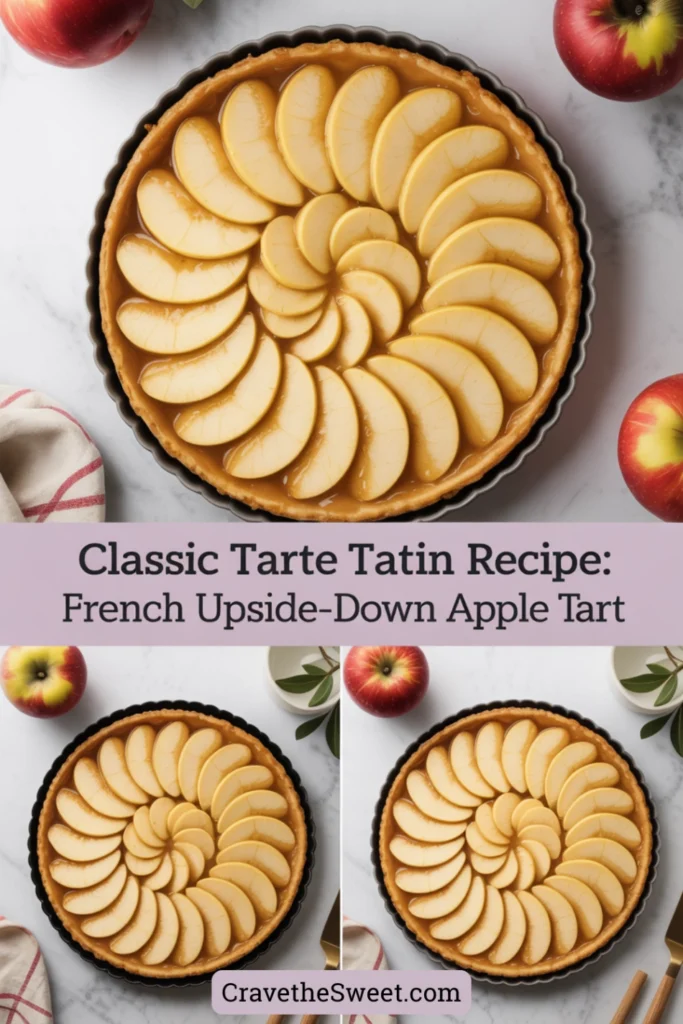
Tarte Tatin is a classic French upside-down tart that originated in the Loire Valley in the late 1800s. Legend says it was created by accident when one of the Tatin sisters, who ran a hotel, started making a traditional apple pie but left the apples cooking in butter and sugar too long. To save the dish, she put the pastry on top and finished it in the oven, then flipped it over when serving. The result was so delicious that it became the hotel’s signature dessert.
A proper tarte tatin recipe features apples that are first caramelized in butter and sugar directly in an oven-safe skillet, then topped with pastry and baked until golden. The magic happens when you flip it upside down, revealing beautifully arranged apples coated in glossy, amber caramel with buttery pastry underneath. The cooking method creates an intense caramel flavor that regular apple pies can’t match. While variations exist using pears, peaches, or other fruits, the traditional apple version remains the most beloved. It’s served warm, often with a dollop of cream, and represents rustic French cooking at its finest.
Common Mistakes to Avoid
Even though this tarte tatin recipe is more accessible than you might think, there are pitfalls to watch for. The biggest mistake is using the wrong type of apples. You need firm, tart apples that hold their shape during cooking—Granny Smith, Honeycrisp, or Braeburn work beautifully. Soft apples like Red Delicious turn to mush and won’t give you those defined slices. Another error is cutting apple pieces inconsistently. When slices are different thicknesses, some overcook while others stay underdone.
Many people get nervous about the caramel and either undercook it, leaving it pale and lacking depth, or overcook it until it’s bitter. The caramel should be a deep amber color—think of the shade of maple syrup. Don’t skip the step of arranging your apples nicely in the pan, even though they’ll be flipped later. That bottom layer becomes your presentation side, so take a moment to place them thoughtfully.
Using a pan that’s not oven-safe is dangerous and won’t work for this recipe. You need a heavy skillet, preferably cast iron, that can go from stovetop to oven. Also, resist the urge to flip the tart too soon after baking. Let it rest for a few minutes so the caramel sets slightly, but don’t wait too long or it will stick to the pan. Finally, being timid with the flip causes problems—you need one confident, swift motion.
How to Know Your Tarte Tatin Is Done
Determining doneness for this tarte tatin recipe involves checking both the pastry and the fruit. The pastry should be deeply golden brown on top—not pale, which indicates it’s underbaked. You’ll see it puffed up slightly and crispy around the edges. If you gently lift an edge of the pastry, the underside should also be golden, not doughy or white.
The apples underneath should be tender when pierced with a knife, but not completely falling apart. They’ll continue cooking slightly with residual heat after you remove the pan from the oven. The caramel should be bubbling around the edges of the pastry—you’ll hear a gentle sizzling sound. The entire tart will smell incredible, with notes of caramelized sugar and butter filling your kitchen.
One reliable test is to gently shake the pan. The tart should move slightly as one cohesive unit, not with liquid caramel sloshing around. If there’s still a lot of loose liquid, it needs more time. The timing typically ranges from 25 to 35 minutes, depending on your oven and the thickness of your apples. Trust your senses—golden pastry, tender apples, and bubbling caramel are your cues.
What to Serve With Tarte Tatin
This elegant tarte tatin recipe deserves equally thoughtful accompaniments. The classic pairing is a generous dollop of crème fraîche, whose tangy richness cuts through the sweet caramel beautifully. If crème fraîche isn’t available, lightly sweetened whipped cream or even vanilla ice cream works wonderfully. The cold cream melting into the warm tart creates an irresistible contrast.
For a truly French experience, serve it with a small glass of Calvados, the apple brandy from Normandy, or a sweet dessert wine like Sauternes. Coffee or espresso makes an excellent beverage choice, especially for afternoon gatherings. Some people enjoy a drizzle of heavy cream poured over their slice, letting it pool around the caramel.
During fall and winter, consider adding a sprinkle of cinnamon or a few toasted walnuts on top for extra warmth and texture. A small wedge of sharp cheddar cheese on the side is a surprisingly delicious combination that balances the sweetness. For special occasions, a dusting of powdered sugar and a sprig of fresh mint adds an elegant finishing touch. However you serve it, make sure to present it while still warm for the best flavor and texture.
Storage Tips
While tarte tatin is best enjoyed fresh from the oven, you can store leftovers successfully. Once the tart has cooled completely, cover it loosely with aluminum foil and keep it at room temperature for up to one day. The pastry will soften slightly as it sits, but the flavors actually deepen and meld together beautifully overnight.
For longer storage, refrigerate the covered tart for up to three days. To reheat, place slices in a 350°F oven for about 10 minutes until warmed through. This helps crisp up the pastry again. You can also reheat individual slices in a skillet over medium-low heat for a few minutes, which works particularly well for refreshing the caramel.
I don’t recommend freezing a completed tarte tatin, as the texture of both the apples and pastry suffers upon thawing. However, you can prepare components ahead. The apples can be caramelized in the pan, cooled, and refrigerated for a day before adding pastry and baking. Store-bought puff pastry freezes well following package directions. With this tarte tatin recipe, your best bet is to plan to serve it the same day you bake it, when the contrast between crispy pastry and tender apples is at its peak.
Estimated Nutrition Information
Per serving (based on 8 servings): Approximately 285 calories, 14g fat, 39g carbohydrates, 2g protein, 35mg cholesterol, 140mg sodium. These values vary depending on the specific ingredients used and portion sizes. Tarte tatin is definitely an indulgent dessert meant for special occasions and should be enjoyed as an occasional treat.
Recipe Overview
Prep Time: 20 minutes
Cook Time: 45 minutes
Total Time: 65 minutes
Difficulty: Medium
Servings: 8
Ingredients
For the tart:
- 6-7 medium firm apples (Granny Smith or Honeycrisp), peeled, cored, and quartered
- 3/4 cup granulated sugar
- 6 tablespoons unsalted butter
- 1 sheet puff pastry (about 8 ounces), thawed if frozen
- 1/4 teaspoon salt
- 1/2 teaspoon vanilla extract (optional)
For serving:
- Crème fraîche or whipped cream
Step-by-Step Instructions
Step 1: Prepare Your Ingredients
Preheat your oven to 375°F. Peel, core, and quarter your apples. Try to cut them into similar-sized pieces so they cook evenly. If your apple quarters are particularly large, you can cut them in half again. Pat them dry with paper towels to remove excess moisture. If using frozen puff pastry, make sure it’s fully thawed but still cold.
Step 2: Make the Caramel
In a 10-inch oven-safe skillet (cast iron works perfectly), melt the butter over medium heat. Add the sugar and salt, stirring to combine. Cook without stirring for about 5-7 minutes, swirling the pan occasionally, until the mixture turns a deep amber color. The caramel should look like the color of a copper penny. Don’t rush this step—proper caramelization creates the signature flavor of a great tarte tatin recipe.
Step 3: Arrange the Apples
Remove the pan from heat and add vanilla extract if using—it will bubble up, so be careful. Working quickly, arrange the apple quarters in the caramel in a circular pattern, placing them tightly together with rounded sides down. Remember, this bottom layer will be your presentation side after flipping. Fill in any gaps with smaller apple pieces. The pan will look very full, but the apples will shrink as they cook.
Step 4: Cook the Apples
Return the pan to medium heat and cook for about 15-20 minutes, until the apples have softened slightly and released some juice, and the caramel has thickened. You don’t want the apples completely tender at this stage—they’ll finish cooking in the oven. The caramel should be bubbling steadily around the apples.
Step 5: Add the Pastry
Roll out your puff pastry on a lightly floured surface to about 11 inches in diameter—just slightly larger than your pan. Carefully drape the pastry over the apples, tucking the edges down between the apples and the side of the pan. The pastry doesn’t need to be perfect; rustic works beautifully here. Cut a few small slits in the top to allow steam to escape.
Step 6: Bake
Place the skillet in your preheated oven and bake for 25-35 minutes, until the pastry is deeply golden brown and puffed. You’ll see caramel bubbling up around the edges. The kitchen will smell absolutely amazing.
Step 7: The Flip
This is the moment of glory in any tarte tatin recipe! Remove the pan from the oven and let it rest for exactly 5 minutes—no more, no less. Place a large serving plate upside down over the skillet. Using oven mitts and a firm grip, quickly and confidently flip the whole thing over. Give the pan a gentle shake if needed, then carefully lift it off. If any apples stick to the pan, simply place them back where they belong on the tart. Let cool for 10 minutes before slicing.
Step 8: Serve
Slice the tarte tatin into wedges while still warm and serve with crème fraîche, whipped cream, or ice cream. The combination of flaky pastry, tender apples, and glossy caramel is pure magic.
This tarte tatin recipe has become my secret weapon for impressing guests. Yes, it requires a bit of courage for that final flip, but I promise you’ll feel incredibly accomplished when you nail it. The flavors are sophisticated, the presentation is stunning, and the process is genuinely fun. Give it a try—your inner French pastry chef is waiting to emerge!