
My grandmother made icebox cake every summer when I was growing up, and I thought it was the fanciest dessert in the world. Layers of chocolate cookies and whipped cream transformed into something magical overnight in her refrigerator. Years later, when I was stressed about hosting my first dinner party and worried about complicated desserts, my mom reminded me of that simple recipe. I couldn’t believe something so easy could impress guests so much. Now this icebox cake recipe is my go-to whenever I want a stunning dessert without turning on the oven.
Why You’ll Love This Icebox Cake Recipe
This no-bake dessert requires zero baking skills and minimal hands-on time, making it perfect for beginners or hot summer days when you don’t want to heat up the kitchen. With just three basic ingredients, it’s incredibly budget-friendly yet looks and tastes elegant enough for special occasions. The magic happens while you sleep—the cookies soften as they absorb moisture from the cream, creating tender cake-like layers. It’s completely customizable with different cookies, flavored creams, or additions like berries and chocolate shavings. Make it a day or two ahead, which actually improves the texture and makes entertaining stress-free. Kids love helping assemble the layers, making it a fun family project. The nostalgic, retro appeal brings smiles to anyone who remembers this classic dessert from their childhood.
What Is an Icebox Cake?
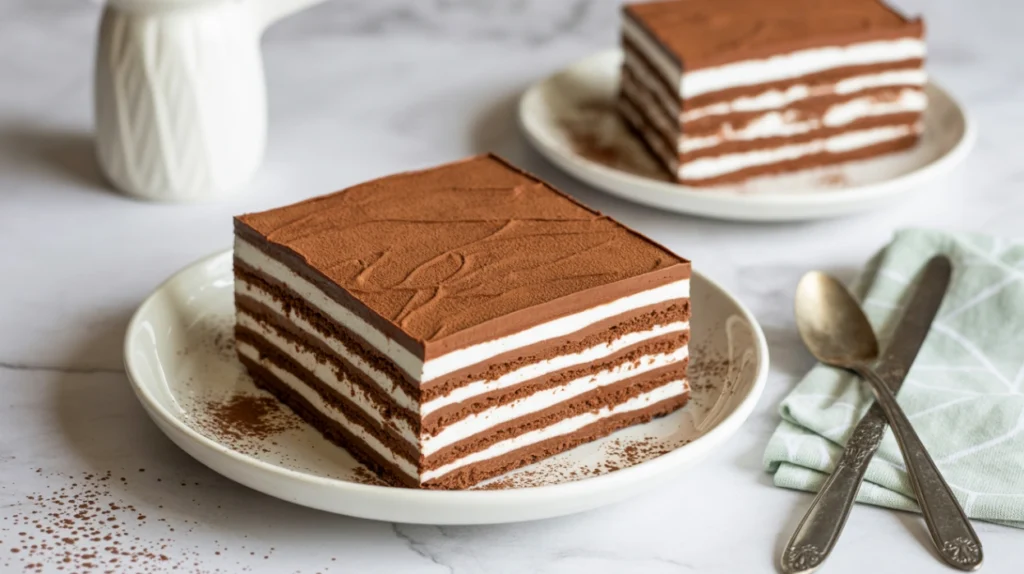
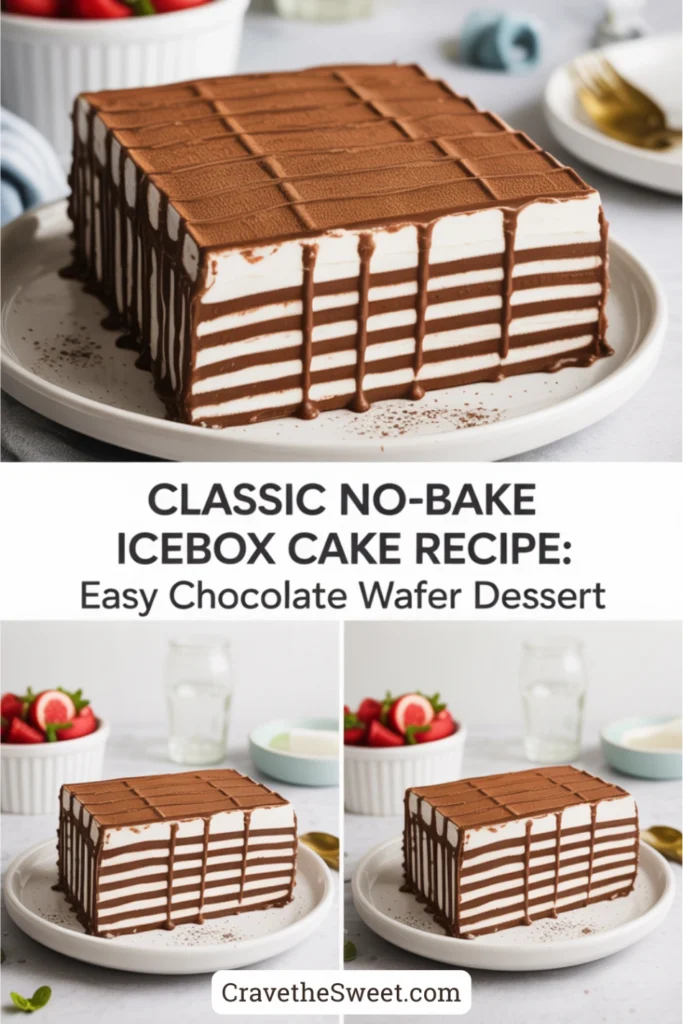
An icebox cake is a no-bake dessert made by layering cookies with whipped cream, then refrigerating until the cookies soften into cake-like layers. This vintage American dessert became popular in the early 1900s when home refrigerators, called “iceboxes,” became common. The original version used chocolate wafer cookies, but modern variations use graham crackers, vanilla wafers, or other cookies. As the assembled dessert sits in the refrigerator, moisture from the whipped cream gradually soaks into the crispy cookies, transforming their texture completely. After several hours or overnight, the cookies become soft and tender, almost indistinguishable from actual cake layers. The result is a delightfully creamy dessert with distinct layers that slice beautifully. The beauty of icebox cakes lies in their simplicity and the magical transformation that happens during chilling.
Common Mistakes to Avoid
Several errors can affect your icebox cake results. The most common mistake is not letting it chill long enough. The cake needs at least six hours, but overnight is better for fully softened cookie layers. Some people use stabilized whipped cream when regular works perfectly fine and tastes lighter. However, if making it more than a day ahead, adding a bit of cream cheese to the whipped cream helps it hold up better. Not spreading the cream evenly results in uneven softening and lopsided layers. Another issue is using too much or too little cream between layers—aim for about a half-inch thickness. Some folks try to slice it too soon after removing from the fridge, causing messy cuts. Let it sit at room temperature for about five minutes for cleaner slices. Making it too far in advance can cause the cookies to become overly soft and mushy, though this is rarely a problem if eaten within three days.
How to Know It’s Done
An icebox cake is properly “done” when the cookies have softened completely but still maintain their distinct layers. After the minimum six-hour chill time, gently press the top—it should feel soft and yielding rather than firm or crunchy. When you slice into it, the cookies should cut cleanly without cracking or crumbling, indicating they’ve absorbed enough moisture. The layers should be clearly visible but tender throughout. If a cookie still feels crisp when you bite into it, the cake needs more time. For best results, refrigerate overnight—this gives the cookies maximum time to transform into that perfect cake-like texture. The whipped cream should remain fluffy and stable, not weeping or separating. The finished cake should slice neatly, holding its shape on the plate while remaining soft and creamy.
What to Serve With Icebox Cake
This versatile dessert pairs beautifully with various accompaniments. Fresh berries—strawberries, raspberries, or blueberries—add color and a tart contrast to the sweet cream. A drizzle of chocolate sauce or caramel enhances the richness. Hot fudge creates a wonderful temperature contrast when served alongside the cold cake. Coffee or espresso makes an excellent beverage pairing, especially with chocolate versions. For extra indulgence, serve with a scoop of vanilla ice cream. Some people enjoy it with fresh fruit compote spooned over individual slices. It’s substantial enough to stand alone as dessert but also works on a dessert buffet alongside other sweets. The classic chocolate version is perfect after summer barbecues or holiday meals when you want something refreshing but satisfying.
Storage Tips
Store icebox cake covered in the refrigerator for up to three days. After that, the cookies can become overly soft and lose their definition. Cover the entire cake tightly with plastic wrap or keep it in an airtight cake container to prevent it from absorbing refrigerator odors and to maintain moisture. Individual slices can be wrapped separately for easy grab-and-go servings. Don’t freeze icebox cake, as the whipped cream separates and becomes watery when thawed, and the texture suffers significantly. If you must prepare well ahead, you can make it two days before serving for optimal texture. The cake actually improves after the first night as the cookies continue to soften. Keep it chilled until about ten minutes before serving for the best texture and easiest slicing.
Estimated Nutrition Information
Per slice (based on 8 servings): Approximately 320 calories, 22g fat, 28g carbohydrates, 18g sugar, 3g protein. This is a rich, creamy dessert meant for special occasions.
Recipe Overview
Prep Time: 20 minutes
Chill Time: 6-8 hours (or overnight)
Total Time: 6-8 hours
Difficulty: Easy
Servings: 8
Ingredients
- 2 cups heavy whipping cream, cold
- 1/4 cup powdered sugar
- 1 teaspoon vanilla extract
- 1 package (9 ounces) chocolate wafer cookies (about 40-45 cookies)
- Optional: chocolate shavings or cocoa powder for garnish
Step-by-Step Instructions
Start by chilling your mixing bowl and whisk or beaters in the freezer for about ten minutes. Cold equipment helps cream whip faster and achieve better volume.
Pour the cold heavy cream into your chilled bowl. Using an electric mixer or whisk, beat on medium speed until the cream begins to thicken, about two minutes. Add the powdered sugar and vanilla extract. Continue beating on medium-high speed until soft peaks form. The cream should hold its shape but the peaks should gently fold over when you lift the beater. Don’t overbeat or you’ll end up with butter. This whole process takes about four to five minutes with an electric mixer.
Choose your serving platter or dish. A rectangular dish works beautifully for this icebox cake recipe, or use a round cake plate. The dish should be large enough to accommodate a single layer of cookies.
Spread a thin layer of whipped cream on the bottom of your dish—this helps the first layer of cookies stick and prevents sliding.
Arrange a layer of chocolate wafer cookies on the cream. You can lay them flat in neat rows or stand them on edge in a log formation. For a traditional approach, lay them flat in slightly overlapping rows to cover the bottom completely.
Spread about one-third of the remaining whipped cream over the cookie layer, smoothing it evenly with an offset spatula or the back of a spoon. The cream layer should be about half an inch thick.
Add another layer of cookies, arranging them the same way as before. Spread with half of the remaining whipped cream.
Continue layering—cookies, then cream—until you’ve used all the cookies, ending with a final generous layer of whipped cream on top. You should have about four to five layers of cookies depending on your dish size.
Smooth the top layer of cream nicely, as this will be visible when serving. If desired, use your spatula to create decorative swirls in the cream.
Cover the entire cake loosely with plastic wrap, being careful not to let the wrap touch the whipped cream surface. Refrigerate for at least six hours, but preferably overnight. This chilling time is crucial—it allows the cookies to absorb moisture and soften into cake-like layers.
Just before serving, garnish with chocolate shavings, a dusting of cocoa powder, or fresh berries if desired. Let the cake sit at room temperature for about five to ten minutes before slicing for the cleanest cuts.
Slice with a sharp knife, wiping it clean between cuts for neat portions. Serve immediately and enjoy this wonderfully retro dessert that proves the simplest recipes are often the best!


