
I’ll never forget the first time I attempted a jelly roll for my daughter’s birthday. I’d seen those beautiful spiral cakes in bakery windows and thought they looked impossibly difficult. My first attempt cracked terribly when I tried to roll it, and I nearly gave up. But my daughter’s disappointed face motivated me to try again, this time following some key techniques I’d researched. When that second cake rolled up perfectly with beautiful swirls visible through the slice, I felt like I’d conquered Mount Everest. Now this jelly roll recipe is one of my proudest baking achievements, and I love sharing it with others who think it’s too hard to try.
Why You’ll Love This Jelly Roll Recipe
This elegant rolled cake looks incredibly impressive but uses simple ingredients you likely have in your pantry right now. The light, fluffy sponge cake has a delicate texture that’s perfect for rolling without cracking. Unlike heavy layer cakes, jelly rolls are refreshingly light and not overly sweet, making them perfect for spring and summer gatherings. The rolling technique might seem intimidating, but once you learn the key steps, it becomes quite straightforward. You can customize the filling endlessly—use jam, lemon curd, whipped cream, buttercream, or even ice cream for a frozen version. The baking time is remarkably quick at just ten to twelve minutes, much faster than traditional cakes. Jelly rolls are also portion-controlled since each slice is relatively thin, making them feel less indulgent. They slice beautifully, creating those gorgeous pinwheel cross-sections that make every serving look bakery-perfect.
What Is a Jelly Roll?
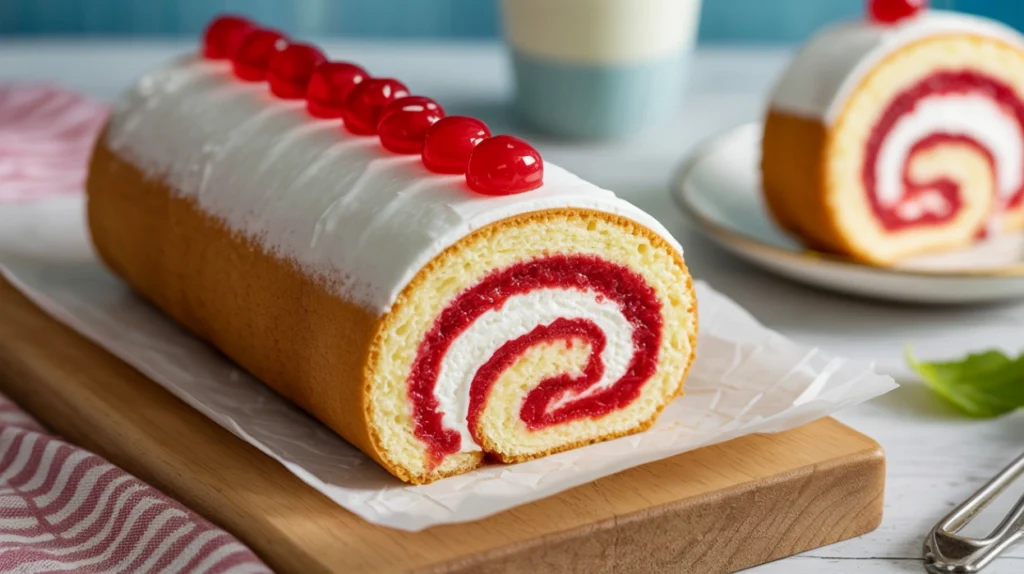
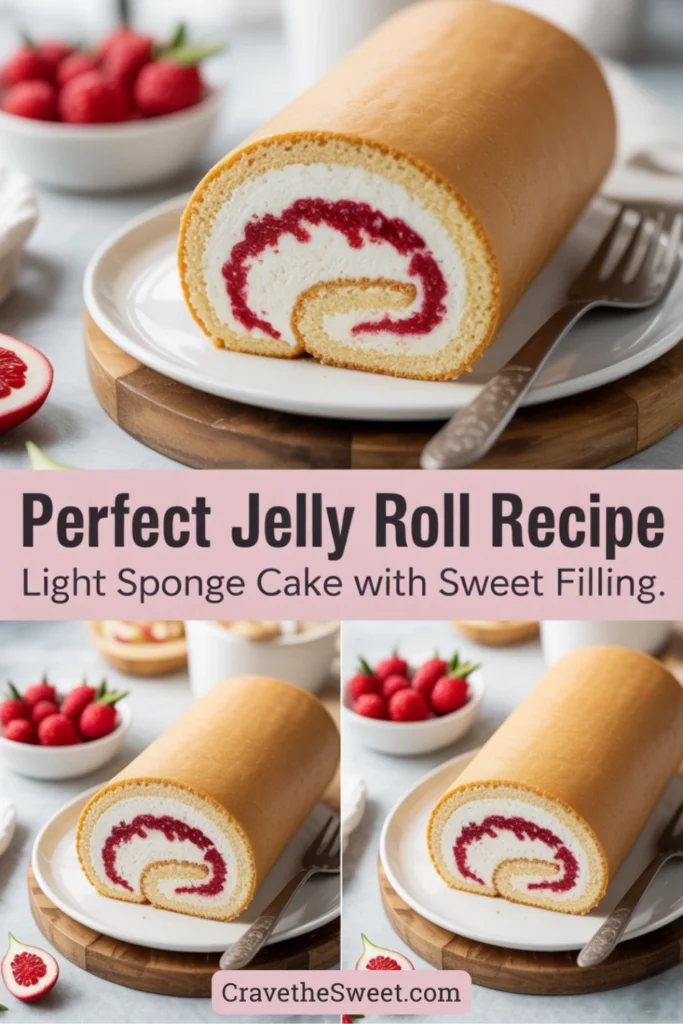
A jelly roll is a thin sponge cake baked in a shallow pan, spread with filling while still warm, then rolled into a log shape to create a spiral pattern when sliced. The name comes from the traditional filling of fruit jelly or jam, though modern versions use countless other fillings. This classic American dessert is known as a Swiss roll in many other countries, despite not actually originating in Switzerland. The cake itself is a type of sponge cake made with eggs, sugar, and flour, creating an airy texture that’s flexible enough to roll without breaking. The key characteristic is its thinness—typically only about half an inch thick—which allows it to bend and roll smoothly. The cake is rolled while still warm because the moisture and heat make it pliable. As it cools in its rolled shape, it sets into that distinctive spiral form. Jelly rolls can be simple or elaborate, dusted with powdered sugar or frosted with additional icing.
Common Mistakes to Avoid
Several pitfalls can derail your jelly roll success. The most critical mistake is letting the cake cool too much before rolling. The cake must be rolled while still warm and flexible—waiting too long causes cracks. However, rolling it when it’s too hot can also cause problems, so timing is key. Overbaking is another common issue that creates a dry, brittle cake that cracks when rolled. The cake should be just set and barely golden. Using the wrong size pan affects thickness—this recipe requires a standard 15×10-inch jelly roll pan. Some people forget to line the pan properly with parchment paper, causing the cake to stick and tear when removed. Not rolling the cake initially with the towel is a mistake many first-timers make—this step trains the cake to hold its spiral shape. Spreading filling too thickly makes rolling difficult and causes filling to squeeze out the ends. Another error is using cold filling, which can firm up the cake too quickly. Finally, slicing the roll before it’s completely cooled results in squished, messy slices rather than clean spirals.
How to Know It’s Done
A perfectly baked jelly roll has several clear indicators. The top should be light golden brown with no wet or shiny spots remaining. When you gently press the center with your fingertip, the cake should spring back immediately without leaving an indentation. If your finger leaves a dent, it needs more time. The edges will just begin pulling away from the sides of the pan. The surface should look dry and set, not moist or jiggly. A toothpick inserted in the center should come out clean or with just a few moist crumbs—never wet batter. The total baking time is typically ten to twelve minutes, but always rely on visual and tactile cues rather than time alone since ovens vary. The cake will smell wonderfully sweet and slightly vanilla-scented. Once removed from the oven, it should feel light and springy, not dense or heavy. These signs ensure your cake has the perfect texture for successful rolling.
What to Serve With Jelly Roll
This versatile dessert pairs beautifully with many accompaniments and occasions. Fresh berries alongside each slice add color and a tart contrast to the sweet cake. A dollop of whipped cream or vanilla ice cream turns it into an extra-special dessert. Hot tea or coffee makes the perfect beverage pairing for afternoon tea service. For holidays, dust it with powdered sugar and serve with eggnog or hot chocolate. Some people enjoy fresh fruit compote spooned over individual slices. It’s elegant enough for formal dinners yet casual enough for picnics and potlucks. Jelly rolls work beautifully on dessert buffets because they’re easy to slice and serve. For kids’ parties, serve with glasses of cold milk. The classic raspberry or strawberry version is perfect for Mother’s Day or Valentine’s Day. Chocolate variations pair wonderfully with coffee-flavored desserts. The light texture makes it an ideal dessert after heavy meals when you want something sweet but not too filling.
Storage Tips
Proper storage maintains your jelly roll’s texture and freshness. Once completely cooled and filled, wrap the entire roll tightly in plastic wrap to prevent it from drying out. Store at room temperature for up to two days if your filling doesn’t require refrigeration. Jelly and jam fillings are shelf-stable, so those versions can sit out. However, if you’ve used whipped cream, cream cheese frosting, or any dairy-based filling, refrigerate the wrapped roll for up to three days. Let refrigerated jelly rolls sit at room temperature for about fifteen minutes before slicing for easier cutting and better flavor. For longer storage, wrap the filled roll tightly in plastic wrap, then aluminum foil, and freeze for up to one month. Thaw overnight in the refrigerator still wrapped. The unfilled cake can also be rolled in a towel, cooled completely, wrapped well, and frozen for up to three months—fill it after thawing. Slice only what you’ll serve immediately, as cut surfaces dry out faster than the intact roll.
Estimated Nutrition Information
Per slice (based on 10 slices): Approximately 180 calories, 4g fat, 32g carbohydrates, 22g sugar, 4g protein. Nutritional values vary significantly based on filling choice.
Recipe Overview
Prep Time: 20 minutes
Cook Time: 12 minutes
Cooling/Assembly Time: 45 minutes
Total Time: 1 hour 15 minutes
Difficulty: Moderate
Servings: 10 slices
Ingredients
For the cake:
- 4 large eggs, at room temperature
- 3/4 cup granulated sugar
- 1 teaspoon vanilla extract
- 3/4 cup all-purpose flour
- 1 teaspoon baking powder
- 1/4 teaspoon salt
- Powdered sugar for dusting
For the filling:
- 3/4 cup fruit jam or jelly of your choice (raspberry, strawberry, or grape are classic)
- Alternative: 1 cup whipped cream or buttercream frosting
Step-by-Step Instructions
Preheat your oven to 375°F. This temperature is crucial for this jelly roll recipe—too low and the cake won’t set properly, too high and it will dry out. Line a 15×10-inch jelly roll pan with parchment paper, leaving a slight overhang on the short ends for easy removal. Grease the parchment paper lightly with cooking spray or butter.
In a large mixing bowl, beat the eggs with an electric mixer on high speed for about five minutes until they become thick, pale yellow, and tripled in volume. This step is critical for creating the light, airy texture that allows the cake to roll without cracking. The mixture should flow in thick ribbons when you lift the beaters.
Gradually add the granulated sugar while continuing to beat, about two tablespoons at a time. Beat for another two minutes until the mixture is very thick and fluffy. Add the vanilla extract and mix briefly to incorporate.
In a separate small bowl, whisk together the flour, baking powder, and salt. Sift this dry mixture over the egg mixture in three additions, gently folding with a rubber spatula after each addition. Fold carefully using a motion that cuts down through the center and sweeps up the sides—you want to maintain as much air as possible in the batter. The mixture should remain light and fluffy, not deflated.
Pour the batter into your prepared pan and spread it gently but evenly with an offset spatula or the back of a spoon, making sure it reaches all corners. The layer will be quite thin.
Bake for ten to twelve minutes, watching carefully. The cake is done when it’s light golden brown, springs back when lightly touched, and a toothpick inserted in the center comes out clean.
While the cake bakes, lay a clean kitchen towel on your counter and dust it generously with powdered sugar. This prevents sticking during the rolling process.
The moment the cake comes out of the oven, run a knife around the edges to loosen it. Immediately invert the hot cake onto the prepared towel. Carefully peel off the parchment paper.
Starting at one short end, roll up the cake and towel together into a log. This step might seem odd, but it’s essential—rolling the cake while warm trains it to hold its shape. Roll relatively tightly but not so tight that you compress the cake. Let the rolled cake cool completely in this position, about thirty to forty-five minutes. The towel absorbs excess moisture and prevents sticking.
Once completely cool, carefully unroll the cake. It will naturally want to stay slightly curved, which is perfect. If you’re using jam, stir it briefly to make it spreadable. Spread your filling evenly over the entire surface, leaving about a half-inch border on all edges. Don’t overfill—about three-quarters cup is plenty.
Starting from the same short end, roll the cake back up without the towel this time. Roll gently but firmly, using the cake’s natural curve as a guide. Place the roll seam-side down on a serving platter.
Dust the top generously with powdered sugar using a fine-mesh sieve. For a decorative touch, you can create diagonal stripes by placing strips of parchment paper on top, dusting with sugar, then carefully removing the paper strips.
Refrigerate for at least thirty minutes before slicing to help the roll set and make cutting easier. Use a sharp serrated knife and wipe it clean between cuts for the prettiest slices.
Your beautiful jelly roll is now ready to serve! Each slice reveals that gorgeous spiral pattern that makes this classic dessert so special and impressive.


