
When my daughter turned six, she asked for a rainbow cake for her birthday. I’d seen pictures of these colorful layer cakes online and assumed they required professional skills and hours of work. But after researching, I realized it was actually just one basic cake recipe divided into portions and tinted with food coloring. The day of her party, when I cut into that cake and revealed six bright layers of color, the kids went absolutely wild. Their faces lit up with pure joy, and parents asked if I’d ordered it from a fancy bakery. The truth was, it took me less time than making a regular layer cake since all the layers baked at once. This rainbow cake recipe has become my go-to for birthdays, celebrations, and any time someone needs a mood boost in cake form.
Why You’ll Love This Rainbow Cake Recipe
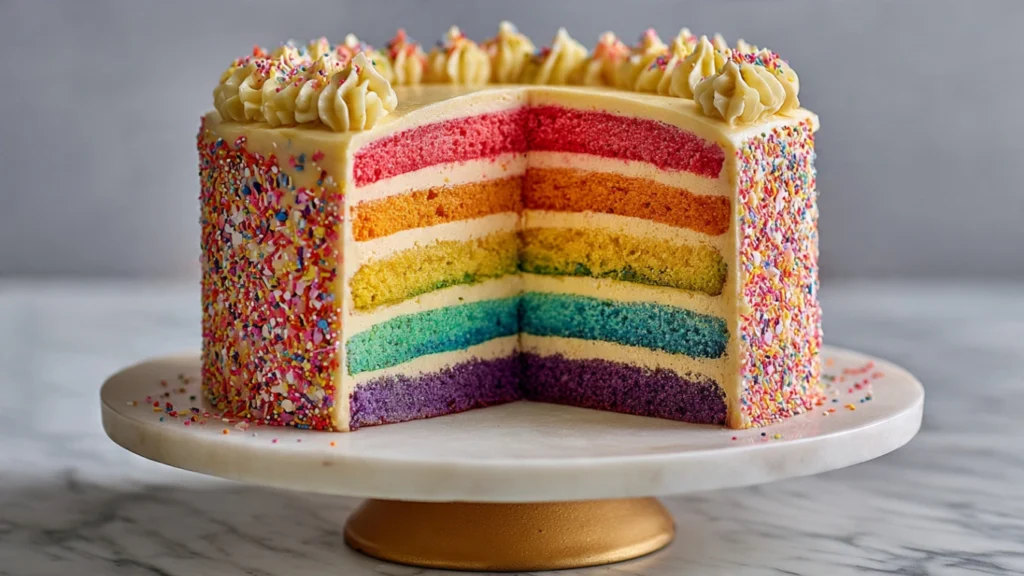
This cake is absolutely stunning with six or seven vibrant colored layers stacked tall and covered in fluffy white frosting. The reveal when you slice it never fails to impress. What makes this rainbow cake recipe special is how surprisingly simple it is. You’re not making six separate cake batters—you divide one batter into portions and tint each one. All the layers bake simultaneously, saving time. The cake itself is moist and tender with a classic vanilla flavor that lets the colors shine. Kids absolutely adore it, making it perfect for birthdays and celebrations. Adults love it too—there’s something joyful about bright colors that appeals to everyone. The recipe is also incredibly versatile. You can adjust the number of layers, change the frosting flavor, or even make it in different sizes.
What Is a Rainbow Cake?
A rainbow cake is a layer cake where each layer is tinted a different color of the rainbow—typically red, orange, yellow, green, blue, and purple, sometimes with an additional indigo layer. The cake became popular in the early 2000s and gained massive traction on social media for its dramatic visual impact. Unlike regular layer cakes where the color is a surprise, rainbow cakes are specifically designed to showcase the colored layers when sliced. The cake is usually covered in white or pastel-colored frosting so the bright layers are hidden until cutting. The base is typically a white or vanilla cake that takes food coloring well without affecting flavor. Some versions arrange the layers in rainbow order from bottom to top, while others get creative with the arrangement. The key is using gel food coloring rather than liquid to achieve vibrant colors without affecting the batter’s consistency.
Common Mistakes to Avoid
The biggest mistake with this rainbow cake recipe is using liquid food coloring instead of gel. Liquid coloring creates pale, washed-out colors and adds too much liquid to the batter. Always use gel or paste food coloring for vibrant results. Another error is not weighing or carefully measuring the batter portions—uneven amounts create layers of different thicknesses. Some people overbake the layers because they’re thin. Check them early and remember they bake faster than regular cake layers. Not letting the layers cool completely before stacking causes the frosting to melt and the cake to slide. Be patient. Using too much frosting between layers makes the cake unstable and prone to leaning or collapsing. A thin layer of frosting between each colored layer is all you need. Finally, trying to skip the crumb coat results in cake crumbs mixing into the final frosting layer and dulling the white appearance.
How to Know When It’s Done
Each thin layer is done when it springs back when lightly touched and a toothpick inserted in the center comes out clean or with just a crumb or two. Because these layers are thinner than regular cake layers, they bake quickly—usually 10 to 15 minutes. The edges will just barely start to pull away from the pan sides. The tops should look set and no longer wet or shiny. Don’t wait for them to be deeply golden—you want them to remain light to keep the colors vibrant. Check all pans at the minimum time since they may bake at different rates depending on oven position. Once removed from the oven, let them cool in the pans for five minutes, then turn out onto wire racks. They must cool completely—at least one hour—before stacking and frosting.
What to Serve With Rainbow Cake
This rainbow cake recipe creates such a festive, complete dessert that it rarely needs accompaniments. However, certain additions enhance the celebration. Serve with vanilla ice cream for a classic pairing. Fresh berries add color and freshness alongside each slice. For kids’ parties, serve with fruit punch or lemonade. The cake is perfect for birthday celebrations—add candles and let the birthday person make a wish. Some people sprinkle rainbow sprinkles on top of the white frosting before serving for extra color. For adult celebrations, champagne or prosecco pairs wonderfully. The cake works beautifully for pride celebrations, unicorn-themed parties, or rainbow-themed baby showers. Present it on a cake stand for maximum visual impact before cutting.
Storage and Make-Ahead Tips
Store the assembled and frosted cake covered at room temperature for up to two days or refrigerated for up to five days. The cake actually tastes better the second day as flavors meld. Bring refrigerated cake to room temperature 30 minutes before serving for best texture. The unfrosted layers can be wrapped tightly and stored at room temperature for two days or frozen for up to three months. Thaw frozen layers at room temperature before frosting. You can bake the layers one day and frost the next to break up the work. The buttercream frosting can be made up to three days ahead and stored in the refrigerator—bring to room temperature and re-whip before using. Once assembled and frosted, the entire cake can be frozen for up to one month, though colors may fade slightly.
Estimated Nutrition Information
Per slice (based on 12 slices): Approximately 485 calories, 22g fat, 68g carbohydrates, less than 1g fiber, 52g sugar, 4g protein. This is definitely an indulgent celebration cake meant for special occasions. The generous slices reflect the festive nature of the dessert.
Recipe Overview
Prep Time: 40 minutes
Cook Time: 15 minutes
Total Time: 2 hours 30 minutes (including cooling)
Difficulty: Medium
Servings: 12
Ingredients
For the cake:
- 3 cups all-purpose flour
- 1 tablespoon baking powder
- 1/2 teaspoon salt
- 1 cup unsalted butter, softened
- 2 cups granulated sugar
- 4 large eggs, room temperature
- 1 tablespoon vanilla extract
- 1 and 1/2 cups whole milk
- Gel food coloring in red, orange, yellow, green, blue, and purple
For the frosting:
- 1 and 1/2 cups unsalted butter, softened
- 6 cups powdered sugar
- 1/4 cup heavy cream
- 2 teaspoons vanilla extract
- Pinch of salt
Step-by-Step Instructions
Preheat your oven to 350°F. Grease and flour six 8-inch round cake pans. If you don’t have six pans, you can bake in batches, though all at once is easier.
In a medium bowl, whisk together flour, baking powder, and salt. Set aside.
In a large bowl, beat butter and sugar with an electric mixer on medium-high speed for four minutes until light and fluffy.
Add eggs one at a time, beating well after each. Add vanilla and mix until combined.
With mixer on low, add flour mixture in three additions, alternating with milk in two additions. Begin and end with flour. Mix just until combined.
Divide the batter evenly among six bowls—each should have about one cup of batter. Weigh them for accuracy if possible.
Add gel food coloring to each bowl—one color per bowl. Start with a small amount and add more until you achieve vibrant colors. Stir each thoroughly.
Pour each colored batter into a prepared pan and spread evenly. The layers will be thin.
Bake for 12 to 15 minutes until the layers spring back when touched and a toothpick comes out clean. Watch carefully as they bake quickly.
Let cool in pans for five minutes, then turn out onto wire racks to cool completely, about one hour.
While cakes cool, make the frosting. Beat softened butter on medium speed for two minutes until creamy.
Add powdered sugar one cup at a time, mixing on low after each addition. Add cream, vanilla, and salt.
Beat on medium-high speed for three minutes until light and fluffy. The frosting should be spreadable but hold its shape.
Once layers are completely cool, level the tops if needed using a serrated knife.
Place the purple layer on your serving plate. Spread a thin layer of frosting on top—about one-third cup.
Add the blue layer and frost. Continue stacking in rainbow order: green, yellow, orange, then red on top.
Apply a thin crumb coat over the entire cake—a very thin layer of frosting that seals in crumbs. Refrigerate for 30 minutes.
Apply the final layer of frosting, making it as smooth or textured as you like. A offset spatula helps create a smooth finish.
Refrigerate for at least 30 minutes before slicing to let the frosting set.
When ready to serve, use a sharp knife and wipe it clean between cuts to show off those beautiful rainbow layers.
This rainbow cake recipe never fails to bring smiles and joy to celebrations. The dramatic reveal of colorful layers creates a magical moment that makes any occasion feel extra special, and knowing how simple it actually is to make is our little secret.


