

My grandmother used to make these wonderful layered bars every Christmas, and the sweet date filling sandwiched between buttery oat layers was always my favorite treat on her dessert table. Years later, I asked for her date squares recipe, and now I make them year-round because they’re just too good to save for holidays alone.
Why You’ll Love This Date Squares Recipe
These bars are naturally sweet from the dates, so you don’t need tons of added sugar. The combination of chewy dates and crunchy oat layers creates an amazing texture contrast in every bite. They’re surprisingly simple to make with basic pantry ingredients you probably already have. Date squares keep beautifully for days, making them perfect for meal prep, lunchboxes, or unexpected guests. The wholesome ingredients mean you can feel good about enjoying them as a breakfast treat or afternoon snack. Plus, they’re absolutely delicious served warm with a scoop of vanilla ice cream for dessert.
What Are Date Squares?
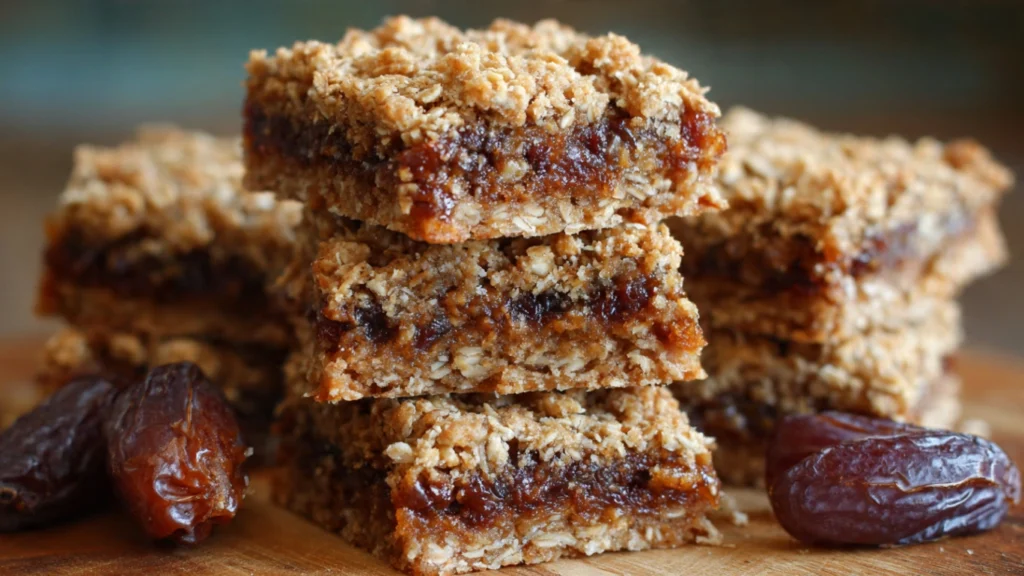
Date squares are a traditional dessert bar featuring a sweet date filling layered between two crumbly oat crusts. Sometimes called matrimonial cake or date crumbles, this date squares recipe has roots in Canadian and British baking traditions. The bottom layer is a buttery mixture of oats, flour, and brown sugar that gets pressed into a pan. The middle layer is made from chopped dates cooked down with water or orange juice until thick and jammy. The top layer uses the same oat mixture as the bottom, creating a crumbly streusel-like topping. When baked, the layers meld together into bars that slice beautifully and have that perfect balance of sweet, chewy filling and crispy, buttery crumble.
Common Mistakes to Avoid
The most frequent mistake with this date squares recipe is not cooking the date filling long enough. If the filling is too thin and watery, it will make the bars soggy. Cook it until it’s thick like jam and most of the liquid has evaporated.
Another error is making the oat layers too thick or too thin. You want about two-thirds of the mixture for the layers and one-third for the top. If the bottom is too thin, it won’t support the filling properly.
Don’t press the bottom layer too firmly. It should be compact but still have some texture. If you pack it down too hard, it becomes dense and tough instead of crumbly and tender.
Many people overbake these bars, which makes them dry and hard. The top should be golden brown but not dark. Remember they’ll continue to firm up as they cool.
Finally, avoid cutting the bars while they’re still hot. They need time to cool and set completely, or they’ll fall apart when you try to slice them.
How to Know Your Date Squares Are Done
Your date squares recipe is complete when the top layer is golden brown and looks dry rather than wet. The edges should be slightly darker than the center, and you might see some bubbling around the sides where the date filling peeks through.
When you gently press the center of the pan, the top should feel firm and spring back slightly. If it feels mushy or leaves an indentation, give it a few more minutes in the oven.
The date filling should be thick enough that it doesn’t ooze out when you remove the pan from the oven. If you see liquid pooling around the edges, the filling wasn’t cooked down enough before assembly.
After cooling completely, the bars should cut cleanly with a sharp knife. Each piece should hold together nicely with distinct layers visible.
What to Serve With Date Squares
These bars are wonderful with hot beverages. A strong cup of coffee perfectly balances the sweetness, while black or chai tea makes an elegant pairing. Hot apple cider is lovely during fall and winter months.
For a more indulgent dessert, serve warm date squares with vanilla ice cream or a dollop of fresh whipped cream. The contrast of cold cream against warm bars is absolutely heavenly.
They’re also delicious alongside a cheese plate. The sweetness of the dates complements sharp cheddar or creamy brie beautifully, making them suitable for a sophisticated dessert course.
Pack these bars in lunchboxes with fresh apple slices and cheese cubes for a satisfying midday meal. They provide good energy and keep you full between meals.
Storage Tips for Date Squares
Store your finished date squares in an airtight container at room temperature for up to five days. Layer them between sheets of parchment paper to prevent sticking. Keep them in a cool, dry place away from direct sunlight.
These bars freeze exceptionally well for up to three months. Wrap individual squares in plastic wrap, then place them all in a freezer-safe container or bag. Thaw at room temperature for a couple of hours or microwave individual pieces for twenty to thirty seconds.
If your kitchen is very warm, you can refrigerate the bars, though they taste best at room temperature. Let refrigerated bars sit out for fifteen minutes before serving to bring out the full flavor.
Don’t leave these bars uncovered, as they’ll dry out quickly. The oat layers especially can become hard and stale when exposed to air.
Estimated Nutrition Information
Per square (based on 16 servings): Approximately 215 calories, 8g fat, 35g carbohydrates, 3g protein, 3g fiber. These bars provide good fiber from the oats and dates.
Recipe Overview
Prep Time: 20 minutes
Cook Time: 35 minutes
Cooling Time: 1 hour
Total Time: 1 hour 55 minutes
Difficulty: Easy
Servings: 16 squares
Ingredients
For the date filling:
- 3 cups chopped pitted dates
- 1 cup water
- 2 tablespoons lemon juice
- 1/4 teaspoon salt
For the oat layers:
- 1 and 1/2 cups all-purpose flour
- 1 and 1/2 cups old-fashioned oats
- 1 cup packed brown sugar
- 1/2 teaspoon baking soda
- 1/2 teaspoon salt
- 3/4 cup unsalted butter, melted
- 1 teaspoon vanilla extract
Step-by-Step Instructions
Step 1: Make the date filling
Combine chopped dates, water, lemon juice, and salt in a medium saucepan. Bring to a boil over medium-high heat, then reduce to medium-low. Simmer for ten to twelve minutes, stirring frequently, until the dates break down and the mixture thickens to a jam-like consistency. Remove from heat and let cool while you prepare the oat layers.
Step 2: Prepare your pan
Preheat your oven to 350°F. Line an 8×8 inch baking pan with parchment paper, leaving overhang on two sides for easy removal later.
Step 3: Mix the oat layer
In a large bowl, whisk together flour, oats, brown sugar, baking soda, and salt. Pour in the melted butter and vanilla extract. Stir until the mixture is evenly moistened and crumbly. It should hold together when squeezed.
Step 4: Create the bottom layer
Take about two-thirds of the oat mixture and press it evenly into the bottom of your prepared pan. Press firmly enough to create a solid base, but don’t pack it down too hard.
Step 5: Add the date filling
Spread the cooled date filling evenly over the bottom oat layer, leaving a small border around the edges. Use a spatula to smooth it into an even layer.
Step 6: Add the top layer
Sprinkle the remaining oat mixture evenly over the date filling. Gently press down very lightly, but keep it crumbly on top for the best texture.
Step 7: Bake
Place the pan in the preheated oven and bake for thirty to thirty-five minutes, until the top is golden brown and the edges are slightly darker.
Step 8: Cool completely
Remove from the oven and let the date squares cool completely in the pan, at least one hour. This cooling time is crucial for the bars to set properly.
Step 9: Cut and serve
Using the parchment overhang, lift the entire slab out of the pan onto a cutting board. Cut into sixteen squares using a sharp knife. Wipe the knife clean between cuts for the neatest edges.
This date squares recipe creates perfectly balanced bars with just the right amount of sweetness and texture. They’re ideal for any occasion and always disappear quickly whenever I make them!


