
I’ll never forget the first time I successfully made a lemon meringue pie with those gorgeous sky-high peaks of toasted meringue. My grandmother had always made it look so easy, but my first few attempts resulted in weepy meringue and runny filling. After finally mastering this lemon meringue pie recipe, I realized the key is just understanding a few simple techniques that make all the difference.
Why You’ll Love This Lemon Meringue Pie Recipe
This pie delivers the perfect balance of tart lemon filling and sweet, fluffy meringue that makes this classic dessert so beloved. The bright, fresh lemon flavor is incredibly refreshing and not overly sweet like many store-bought versions. The meringue topping is stable and won’t weep or shrink when you follow the proper technique. This lemon meringue pie recipe creates a filling that’s thick and creamy, never runny or soupy. The contrast between the crisp crust, silky filling, and cloud-like meringue creates an amazing textural experience. While it requires a few steps, each component is actually quite simple and the impressive results are absolutely worth the effort.
What Is Lemon Meringue Pie?
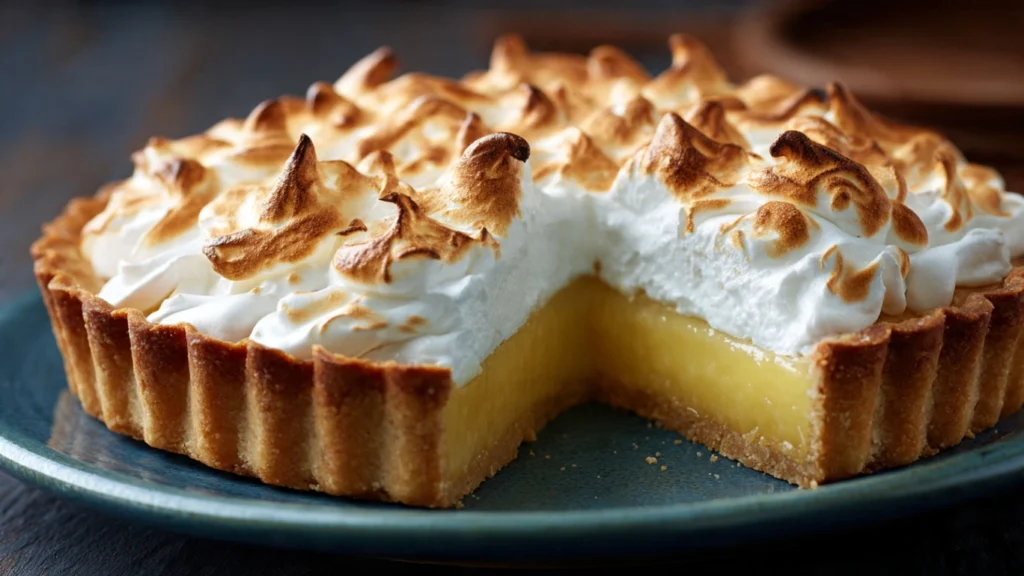
Lemon meringue pie is a classic American dessert featuring three distinct layers: a flaky pastry crust, a tangy lemon custard filling, and a tall meringue topping. This lemon meringue pie recipe creates a filling made from fresh lemon juice, sugar, eggs, and cornstarch that’s cooked until thick and glossy. The meringue is made by whipping egg whites with sugar until they form stiff, glossy peaks. The assembled pie gets a quick trip under the broiler or in the oven to lightly toast the meringue peaks, creating that signature golden-brown finish. The dessert became popular in the late 1800s and has remained a beloved classic ever since, particularly in diners and home kitchens across America.
Common Mistakes to Avoid
The most frustrating mistake with this lemon meringue pie recipe is getting weepy meringue that releases liquid and makes the pie soggy. This happens when you put meringue on cold filling. Always spread meringue on hot filling so it cooks from underneath, preventing weeping.
Another common error is undercooking the lemon filling. If it’s not cooked long enough, the cornstarch won’t fully activate and the filling will be runny. Cook it until it’s thick enough to heavily coat the back of a spoon.
Don’t make meringue on a humid day if you can avoid it. High humidity prevents meringue from achieving the proper texture and it’s more likely to weep or become sticky.
Many people underbeat the meringue. It needs to reach stiff peaks that stand straight up when you lift the beaters. Soft peaks will deflate and create a flat topping.
Finally, avoid cutting the pie while it’s still warm. The filling needs several hours to set completely, or it will ooze out when you slice it.
How to Know Your Lemon Meringue Pie Is Done
Your lemon meringue pie recipe is complete when the meringue peaks are beautifully golden brown with darker tips. The color should be even across the top, though the highest peaks will naturally brown more.
The meringue should feel dry to a light touch and shouldn’t leave any residue on your finger. If it still feels sticky or wet, it needs more time under the broiler or in the oven.
When you gently jiggle the pie, the filling underneath should be completely set and not jiggly at all. The meringue will move slightly as one piece, but you shouldn’t see liquid filling sloshing around.
After the pie has cooled and chilled for at least three hours, a knife should cut through cleanly, revealing distinct layers that don’t run together.
The filling should be thick and creamy, holding its shape on the fork rather than being runny or soupy.
What to Serve With Lemon Meringue Pie
This pie is so flavorful and complete on its own that it rarely needs accompaniments. However, a simple cup of hot coffee or tea makes a lovely pairing for an afternoon dessert.
Fresh berries on the side add a pop of color and their natural tartness complements the lemon flavor beautifully. Raspberries or blueberries work particularly well.
For a more indulgent presentation, add a small dollop of lightly sweetened whipped cream beside each slice. The cream adds richness that balances the tart lemon.
Iced tea is wonderful with lemon meringue pie, especially on warm days. The refreshing beverage echoes the bright lemon flavors in the dessert.
This pie is perfect as the finale to a light dinner of grilled fish or chicken. The bright, clean flavors provide a refreshing end to the meal without being too heavy.
Storage Tips for Lemon Meringue Pie
Store your lemon meringue pie loosely covered in the refrigerator for up to three days. Don’t wrap it tightly or the meringue will stick to the covering. Use a cake dome or invert a large bowl over it if you have one.
This pie is best eaten within twenty-four hours for optimal meringue texture. After that, the meringue can start to weep slightly or become a bit tough, though it’s still perfectly edible.
Don’t freeze lemon meringue pie. The meringue becomes rubbery and weeps excessively when thawed, and the filling can separate.
If you need to make the pie ahead, you can prepare and bake the crust and make the filling up to a day in advance. Store them separately and add the meringue just before serving for the freshest results.
Always refrigerate leftover pie promptly. The egg-based filling and meringue shouldn’t sit at room temperature for more than two hours.
Estimated Nutrition Information
Per slice (based on 8 servings): Approximately 380 calories, 12g fat, 65g carbohydrates, 6g protein, 1g fiber. This is a special occasion dessert.
Recipe Overview
Prep Time: 30 minutes
Cook Time: 25 minutes
Cooling Time: 3 hours
Total Time: 4 hours
Difficulty: Intermediate
Servings: 8 slices
Ingredients
For the crust:
- 1 store-bought or homemade 9-inch pie crust, baked and cooled
For the filling:
- 1 and 1/2 cups granulated sugar
- 1/3 cup cornstarch
- 1/4 teaspoon salt
- 1 and 1/2 cups water
- 4 large egg yolks
- 2 tablespoons unsalted butter
- 1/2 cup fresh lemon juice
- 1 tablespoon lemon zest
For the meringue:
- 4 large egg whites, room temperature
- 1/4 teaspoon cream of tartar
- 6 tablespoons granulated sugar
- 1/2 teaspoon vanilla extract
Step-by-Step Instructions
Step 1: Make the filling
In a medium saucepan, whisk together sugar, cornstarch, and salt. Gradually whisk in water until smooth. Cook over medium heat, stirring constantly, until the mixture thickens and comes to a boil.
Step 2: Temper the eggs
In a small bowl, lightly beat egg yolks. Slowly add about half a cup of the hot mixture to the yolks while whisking constantly. This tempers them so they won’t scramble.
Step 3: Finish the filling
Pour the egg mixture back into the saucepan. Bring to a gentle boil and cook for two minutes, stirring constantly. The filling should be very thick. Remove from heat and stir in butter, lemon juice, and lemon zest until smooth.
Step 4: Fill the crust
Pour the hot filling into your baked pie crust immediately. Set aside while you make the meringue. Keep the filling hot for the next steps.
Step 5: Start the meringue
In a completely clean bowl, beat egg whites and cream of tartar with an electric mixer on medium speed until soft peaks form.
Step 6: Add sugar
Gradually add sugar one tablespoon at a time while continuing to beat. Beat on high speed until stiff, glossy peaks form and the sugar is completely dissolved. Beat in vanilla extract.
Step 7: Top the pie
Immediately spread meringue over the hot filling, making sure it touches the crust all around the edges. This seal prevents shrinking. Create decorative peaks with the back of a spoon.
Step 8: Brown the meringue
Place pie under the broiler for one to two minutes, watching constantly, until the peaks are golden brown. Alternatively, bake at 350°F for twelve to fifteen minutes.
Step 9: Cool completely
Let the pie cool at room temperature for one hour, then refrigerate for at least three hours before slicing. This allows the filling to set properly.
This lemon meringue pie recipe creates a stunning dessert that tastes as amazing as it looks. With its perfect balance of sweet and tart, it’s no wonder this classic has remained a favorite for generations!