
When my daughter’s first birthday approached, I panicked about ordering a cake from a bakery—too expensive and too many unknown ingredients. My mother convinced me to try making one myself, insisting birthday cakes were easier than I thought. She was right. The simple vanilla layers turned out beautifully, and decorating with buttercream was actually fun. Now this birthday cake recipe is my go-to for every family celebration. There’s something special about serving a homemade cake—the birthday person always seems more touched knowing you made it yourself. Plus, I’ve saved hundreds of dollars over the years while creating exactly the flavors and designs we want.
Why You’ll Love This Birthday Cake Recipe
This birthday cake recipe creates a classic vanilla layer cake with tender, moist crumb and perfect structure for stacking and decorating. The flavor is pure, nostalgic vanilla—the kind everyone loves and never gets tired of. Unlike boxed mixes that can taste artificial, this homemade version uses real butter, vanilla extract, and simple ingredients for authentic flavor. The recipe is surprisingly straightforward with no complicated techniques—if you can measure ingredients and use a mixer, you can make this cake. It produces consistent, reliable results every time, so you don’t have to worry about birthday cake disasters. The layers are sturdy enough to frost and decorate without crumbling but still wonderfully tender to eat. You can easily customize the flavor by adding extracts, citrus zest, or food coloring to match any party theme. Best of all, making your own birthday cake costs a fraction of bakery prices while tasting infinitely better and more personal.
What Is Birthday Cake?
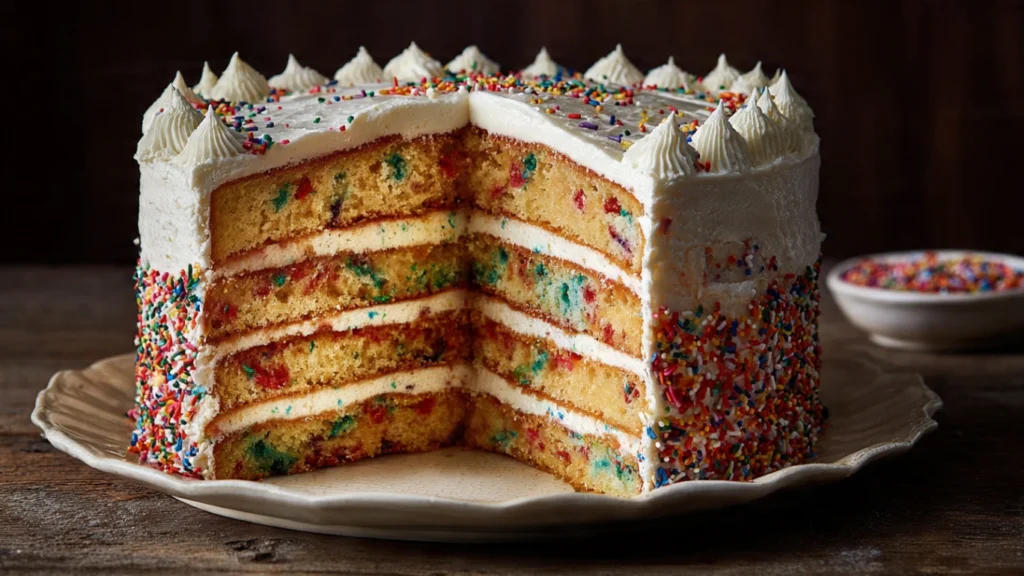
Birthday cake is traditionally a festive layer cake served at birthday celebrations, typically featuring vanilla or chocolate cake layers with buttercream frosting, often decorated with the birthday person’s name, age, or themed decorations. This birthday cake recipe produces a classic American-style vanilla layer cake—the kind you imagine when someone says “birthday cake.” The vanilla flavor is versatile and universally loved, making it perfect for guests of all ages. Traditional birthday cakes usually have 2-3 layers with frosting between each layer and covering the outside, often with additional decorations like sprinkles, candles, or piped designs. The cake itself should be moist and tender with fine crumb that holds together well when sliced. Good birthday cake strikes a balance between being special enough for a celebration but not so complex or intense that it overwhelms. It should taste homemade and comforting while looking festive and celebratory.
Common Mistakes to Avoid
The biggest mistake with this birthday cake recipe is using cold ingredients straight from the refrigerator. Butter, eggs, and milk should be at room temperature for proper mixing and even texture.
Overmixing the batter after adding flour develops too much gluten, creating tough, dense cake instead of tender layers. Mix just until you can’t see dry flour.
Not properly preparing the pans causes cakes to stick. Grease, flour, and line the bottoms with parchment paper for easy release.
Opening the oven door during the first 20 minutes of baking causes cakes to fall. Keep the door closed until nearly done.
Overbaking makes the layers dry. Use the toothpick test and remove from oven when just barely done—they continue cooking as they cool.
Trying to frost warm cake causes frosting to melt and slide off. Layers must be completely cool, at least 1 hour after baking.
Finally, not leveling the cake layers before stacking creates a wobbly, leaning cake. Level each layer with a serrated knife for professional results.
How to Know When Your Cake Is Done
The cake layers should be golden brown on top and pulling away slightly from the pan sides. This visual cue indicates they’re nearly ready.
Insert a toothpick into the center of each layer. It should come out clean or with just a few dry crumbs, not wet batter.
When you lightly press the center of a layer, it should spring back immediately. If it leaves an indentation, it needs more time.
This birthday cake recipe typically requires 25-30 minutes at 350°F. Start checking at 23 minutes, as oven temperatures vary.
The layers should feel light when you lift the pan—heavy pans indicate underbaked, dense cake.
The tops should look set and dry, not wet or shiny. Small cracks are fine and don’t indicate a problem.
After removing from the oven, the layers should hold their shape without sinking dramatically in the middle. Slight settling is normal.
What to Serve With Birthday Cake
This birthday cake recipe is traditionally served with vanilla or chocolate buttercream frosting. The classic combination never disappoints.
Ice cream on the side creates the ultimate birthday dessert. Let guests choose their favorite flavor to go with their cake slice.
Fresh berries between the layers or on top add freshness and color while cutting through the sweetness.
Chocolate ganache poured over vanilla cake creates an elegant, sophisticated presentation perfect for adult birthdays.
Sprinkles, both mixed into the batter and decorating the outside, create festive “funfetti” cake that kids especially love.
Whipped cream frosting offers a lighter alternative to buttercream that some people prefer.
Serve with milk, coffee, or punch depending on the party’s formality and the guests’ ages.
Storage Tips
Store birthday cake covered at room temperature for up to 2 days if your kitchen isn’t too warm. Buttercream keeps the cake moist and fresh.
For longer storage, refrigerate the cake for up to 5 days. Cover loosely with plastic wrap or use a cake carrier to protect decorations.
Bring refrigerated cake to room temperature for 30 minutes before serving for the best flavor and texture.
This birthday cake recipe freezes beautifully for up to 2 months. Freeze unfrosted layers wrapped tightly in plastic wrap and foil.
Thaw frozen layers overnight in the refrigerator, still wrapped, before frosting and decorating.
Frosted cake can also be frozen. Freeze uncovered until frosting is solid, then wrap tightly to preserve decorations.
Individual slices can be wrapped and frozen separately for enjoying birthday cake long after the celebration ends.
Estimated Nutrition (Per Slice, 12 Servings)
Calories: 285 | Total Fat: 12g | Saturated Fat: 7g | Cholesterol: 75mg | Sodium: 245mg | Total Carbohydrates: 41g | Dietary Fiber: 1g | Sugars: 28g | Protein: 4g
Note: Nutritional information is approximate and for unfrosted cake only.
Recipe Overview
Prep Time: 20 minutes
Cook Time: 28 minutes
Total Time: 2 hours (including cooling)
Difficulty: Easy
Servings: 12 slices
Ingredients
- 2½ cups all-purpose flour
- 2½ teaspoons baking powder
- ½ teaspoon salt
- 1 cup unsalted butter, softened
- 2 cups granulated sugar
- 4 large eggs, room temperature
- 1 tablespoon vanilla extract
- 1 cup whole milk, room temperature
Step-by-Step Instructions
Step 1: Preheat your oven to 350°F. Grease two 9-inch round cake pans with butter or cooking spray, dust with flour, and line the bottoms with parchment paper.
Step 2: In a medium bowl, whisk together flour, baking powder, and salt. Set aside.
Step 3: In a large bowl, beat softened butter and sugar with an electric mixer on medium-high speed for 4-5 minutes until light, fluffy, and pale in color.
Step 4: Add eggs one at a time, beating well after each addition. The mixture should be smooth and creamy. Mix in vanilla extract.
Step 5: With the mixer on low speed, add about one-third of the flour mixture. Mix just until combined.
Step 6: Add half of the milk and mix until incorporated. Don’t overmix.
Step 7: Continue alternating flour mixture and milk, ending with flour. Mix each addition just until you can’t see dry ingredients—stop as soon as everything is combined.
Step 8: Divide the batter evenly between the two prepared pans. Use a kitchen scale for precision or just eyeball it. Smooth the tops with a spatula.
Step 9: Bake for 25-30 minutes until the cakes are golden brown, spring back when lightly touched, and a toothpick inserted in the center comes out clean.
Step 10: Remove from oven and let cool in pans for 10 minutes on wire racks.
Step 11: Run a knife around the edges, then invert cakes onto wire racks. Remove parchment paper and flip cakes right-side up. Let cool completely, about 1 hour.
Step 12: Once completely cool, level the tops with a serrated knife if needed. Place one layer on a serving plate, frost the top, add the second layer, then frost the entire cake. Decorate as desired and add candles for the celebration!
Make someone’s special day even sweeter with this homemade treasure!


