
The first time I tasted authentic Boston cream pie, I was on a business trip to Massachusetts, sitting in a cozy café near Faneuil Hall. I expected just another chocolate dessert, but that first bite stopped me mid-conversation. The silky vanilla custard, tender cake, and glossy chocolate ganache created such perfect harmony that I immediately asked the server if they sold whole ones to go. They didn’t, so I made it my mission to recreate that magic at home. After several attempts and a few kitchen disasters, I finally cracked the code. Now, this Boston cream pie recipe is my go-to showstopper for special occasions, and it’s easier than you might think.
Why You’ll Love This Boston Cream Pie Recipe
This Boston cream pie recipe delivers bakery-quality results without requiring professional skills or equipment. The cake layers are incredibly moist and tender, providing the perfect foundation for the rich pastry cream filling. Unlike some desserts that taste overly sweet or one-dimensional, this dessert offers beautiful balance—the vanilla custard adds elegance, while the chocolate ganache brings just enough richness without overwhelming your palate.
What makes this recipe particularly appealing is that each component can be made ahead. You can bake the cake layers one day, prepare the custard the next, and assemble everything on the third day. This flexibility makes it perfect for entertaining when you want to spread out the work. The finished dessert looks impressive enough for celebrations, yet it’s forgiving enough for beginners. Plus, once you master this Boston cream pie recipe, you’ll have techniques you can apply to countless other desserts.
What Is Boston Cream Pie?
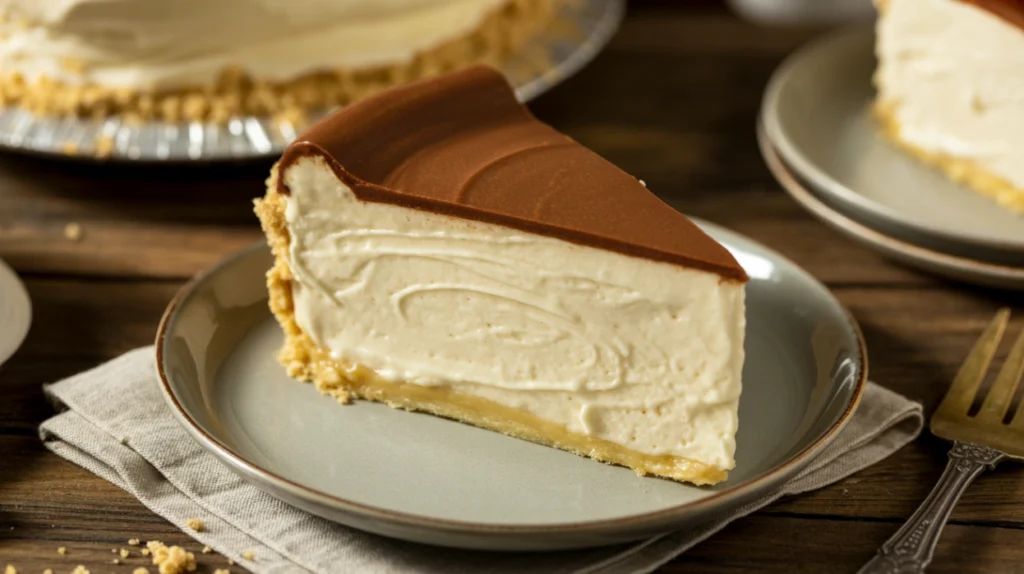
Despite its name, Boston cream pie is actually a cake, not a pie. This classic American dessert consists of two layers of sponge cake filled with vanilla pastry cream and topped with chocolate ganache. The “pie” name dates back to the 1800s when cakes and pies were often baked in the same pans, and the terms were used somewhat interchangeably.
Created at Boston’s Parker House Hotel in 1856, this dessert became so beloved that Massachusetts declared it the official state dessert in 1996. Traditional Boston cream pie features a light, airy cake similar to génoise or hot milk cake, which soaks up flavors beautifully without becoming soggy. The pastry cream should be thick enough to stay put between the layers but still creamy and luxurious. The chocolate topping is typically ganache rather than frosting, giving it that signature glossy finish that makes the dessert so visually stunning.
Common Mistakes to Avoid
Even with a straightforward Boston cream pie recipe, several pitfalls can derail your efforts. The biggest mistake is undercooking the pastry cream. If you pull it off the heat too early because you’re worried about scrambling the eggs, you’ll end up with a thin, runny filling that oozes out the sides. The custard needs to reach full thickness, which happens when it comes to a gentle boil and you see big, slow bubbles breaking the surface. Don’t be afraid of this step—just keep stirring constantly.
Another common error is assembling the dessert while components are still warm. If your cake isn’t completely cool, the pastry cream will melt and slide right off. Similarly, warm custard won’t set properly between the layers. Patience is essential here. Many bakers also make the mistake of using cake flour when all-purpose works better for this particular recipe, or they overbake the cake layers, resulting in dry, crumbly cake instead of the tender crumb you want.
Finally, don’t skip leveling your cake layers. That domed top might look beautiful, but it creates an unstable base for stacking. A level surface ensures your Boston cream pie sits evenly and looks professional.
How to Know It’s Done
For the cake layers, insert a toothpick into the center. It should come out clean or with just a few moist crumbs—not wet batter. The cake should also spring back when lightly pressed with your finger, and it will start pulling away slightly from the sides of the pan. This usually takes 25-30 minutes at 350°F, but ovens vary, so start checking at the 23-minute mark.
The pastry cream is done when it coats the back of a spoon thickly, and you can draw a line through it with your finger that holds its shape. You’ll also notice the custard goes from a thin, soupy consistency to suddenly thickening dramatically in just a minute or two. When you see those large, slow bubbles breaking on the surface, you’re there. Remove it from heat immediately and transfer to a bowl to stop the cooking process.
The ganache is ready when it’s smooth, glossy, and has cooled to a thick but pourable consistency—similar to pancake batter. If it’s too thin, it will run off the sides; too thick, and it won’t spread smoothly.
What to Serve With Boston Cream Pie
This Boston cream pie recipe creates a rich, decadent dessert that shines as the star of any meal. A simple cup of hot coffee makes an excellent pairing—the slight bitterness balances the sweetness beautifully. Black coffee or a cappuccino work especially well. For tea drinkers, English breakfast or Earl Grey provide nice contrast.
If you’re serving this for a dinner party, keep the main course relatively light. The dessert is quite rich, so it pairs best after meals featuring grilled fish, roasted chicken, or pasta with lighter sauces. Fresh berries on the side—strawberries or raspberries—add a tart element that cuts through the richness nicely. A small scoop of vanilla ice cream isn’t traditional, but it’s absolutely delicious alongside a slice.
For beverages beyond coffee and tea, consider dessert wine like a late-harvest Riesling, or even a glass of cold milk for a nostalgic touch. Sparkling water with lemon helps cleanse the palate between bites.
How to Store Boston Cream Pie
Because this Boston cream pie recipe contains pastry cream, refrigeration is essential. Store the assembled dessert covered in the refrigerator for up to three days. The chocolate ganache may lose some of its glossy shine after a day, but the flavor remains excellent. Use a cake dome or cover loosely with plastic wrap, being careful not to let the wrap touch the chocolate surface.
Individual components can be prepared ahead and stored separately. The baked cake layers can sit at room temperature, well-wrapped, for one day, or refrigerated for up to three days. The pastry cream should be refrigerated with plastic wrap pressed directly on the surface to prevent a skin from forming. It keeps for up to four days. Make the ganache fresh on assembly day for the best appearance.
While you can freeze the unfilled cake layers for up to two months, I don’t recommend freezing the assembled dessert. The custard doesn’t freeze well and becomes grainy when thawed. For best results, bake and assemble within a day or two of serving.
Estimated Nutrition Information
Per slice (based on 8 servings): Approximately 380 calories, 18g fat, 48g carbohydrates, 7g protein, 165mg cholesterol, 190mg sodium. These values are estimates and will vary based on specific ingredients and portion sizes.
Recipe Overview
Prep Time: 30 minutes
Cook Time: 30 minutes
Chill Time: 2 hours
Total Time: 3 hours
Difficulty: Intermediate
Servings: 8-10
Ingredients
For the Cake:
- 1½ cups all-purpose flour
- 1½ teaspoons baking powder
- ¼ teaspoon salt
- 3 large eggs, room temperature
- 1 cup granulated sugar
- 6 tablespoons unsalted butter
- ½ cup whole milk
- 1½ teaspoons vanilla extract
For the Pastry Cream:
- 2 cups whole milk
- 4 large egg yolks
- ½ cup granulated sugar
- ¼ cup cornstarch
- 2 tablespoons unsalted butter
- 2 teaspoons vanilla extract
- Pinch of salt
For the Chocolate Ganache:
- 6 ounces semi-sweet chocolate, chopped
- ½ cup heavy cream
- 1 tablespoon light corn syrup
Step-by-Step Instructions
Step 1: Prepare the Cake Pan
Preheat your oven to 350°F. Grease a 9-inch round cake pan, line the bottom with parchment paper, then grease the paper. Dust lightly with flour, tapping out the excess. This preparation ensures easy release after baking.
Step 2: Mix Dry Ingredients
In a medium bowl, whisk together the flour, baking powder, and salt. Set aside. This simple step ensures even distribution of the leavening agent throughout your cake.
Step 3: Beat Eggs and Sugar
In a large bowl, beat the eggs and sugar with an electric mixer on high speed for 5 minutes until thick, pale, and tripled in volume. The mixture should fall in thick ribbons when you lift the beaters. This step incorporates essential air into your Boston cream pie recipe.
Step 4: Heat Milk and Butter
In a small saucepan, heat the butter and milk together until the butter melts and the mixture is hot but not boiling. Remove from heat and stir in vanilla extract.
Step 5: Combine and Bake
Gently fold the flour mixture into the egg mixture in three additions, being careful not to deflate the batter. Quickly fold in the hot milk mixture until just combined. Pour into the prepared pan and bake for 25-30 minutes until golden and a toothpick comes out clean. Cool in the pan for 10 minutes, then turn out onto a wire rack to cool completely.
Step 6: Make the Pastry Cream
Heat the milk in a saucepan until steaming. In a bowl, whisk egg yolks, sugar, cornstarch, and salt until smooth. Slowly pour the hot milk into the egg mixture while whisking constantly. Return everything to the saucepan and cook over medium heat, whisking constantly, until thickened and bubbling, about 5 minutes. Remove from heat and whisk in butter and vanilla. Transfer to a bowl, press plastic wrap directly on the surface, and refrigerate until completely cold, at least 2 hours.
Step 7: Prepare the Ganache
Place chopped chocolate in a heatproof bowl. Heat cream until just simmering, then pour over chocolate. Let sit for 2 minutes, then whisk until smooth. Stir in corn syrup for extra shine. Let cool until slightly thickened but still pourable.
Step 8: Assemble Your Boston Cream Pie
Using a serrated knife, carefully slice the cooled cake horizontally into two even layers. Place the bottom layer on a serving plate. Spread the chilled pastry cream evenly over the bottom layer, leaving a small border around the edge. Top with the second cake layer, cut side down. Pour the ganache over the top, using a spatula to spread it to the edges, allowing some to drip down the sides naturally.
Step 9: Chill and Serve
Refrigerate the assembled Boston cream pie for at least 30 minutes to set the ganache before slicing. Use a sharp knife, wiping it clean between cuts, for the neatest slices.
This Boston cream pie recipe transforms simple ingredients into something truly spectacular. The combination of textures and flavors never fails to impress, and watching someone take that first bite—eyes widening in surprise—makes every step worthwhile.