I’ll never forget the first time I successfully made homemade candy bars that tasted just like the real thing. My kids took one bite and their eyes lit up with pure joy. Making your own butterfinger recipe at home sounds intimidating, but I promise it’s surprisingly simple and requires just a handful of ingredients you probably already have in your pantry.
Why You’ll Love This Butterfinger Recipe
This homemade version tastes incredibly close to the classic candy bar we all know and love, but fresher and even more delicious. You’ll save a significant amount of money making these yourself, especially if you’re feeding a crowd or preparing treats for holidays. The recipe uses simple ingredients without any mysterious additives or preservatives. You can make a big batch and have candy bars ready whenever a craving strikes. Plus, there’s something truly special about making candy from scratch—it feels like magic watching simple ingredients transform into that signature crispy, flaky, peanut butter center. Kids absolutely love helping with this recipe, and it makes wonderful homemade gifts that people genuinely appreciate.
What Is a Butterfinger?
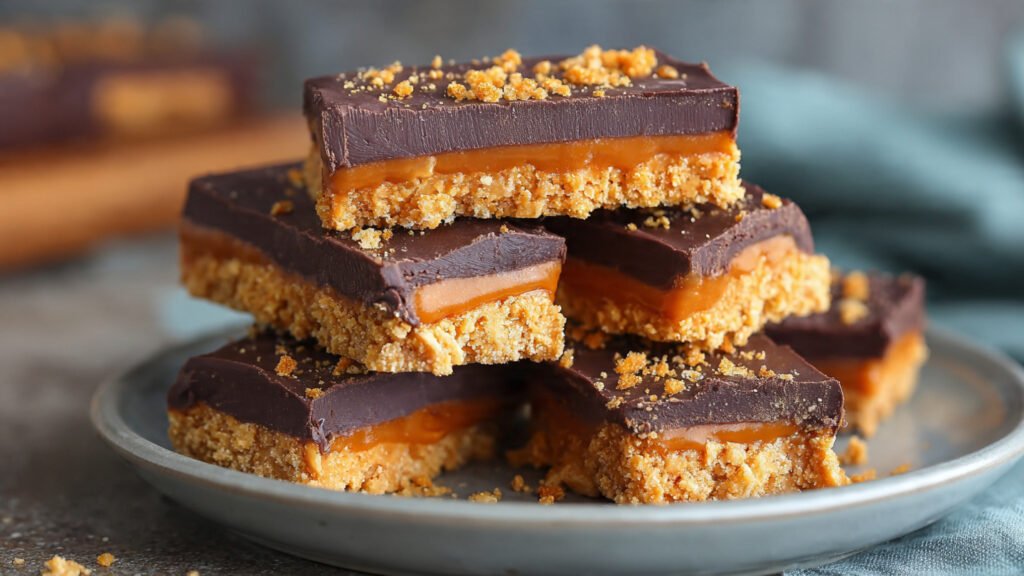
A butterfinger is an iconic American candy bar known for its unique crispy, flaky peanut butter center covered in chocolate. The texture is unlike any other candy—it’s crunchy yet melts in your mouth, with layers that shatter when you bite into them. The original candy bar has been around since 1923, making it a nostalgic favorite for generations. When you make this butterfinger recipe at home, you’re creating that same crispy peanut butter honeycomb texture using candy corn as a secret ingredient. The candy corn melts down and combines with peanut butter to create those distinctive flaky layers. Once the mixture cools and hardens, you coat it in chocolate for the complete candy bar experience. The result is a treat that captures everything we love about the classic version.
Common Mistakes to Avoid
The most frequent mistake with this butterfinger recipe is overheating the candy corn mixture. If you cook it too hot or too long, it becomes hard as a rock and impossible to bite through. Keep your heat at medium and stir constantly to prevent burning.
Another error is trying to rush the cooling process. The peanut butter mixture needs adequate time to set at room temperature before you add the chocolate. If you try to coat warm candy with chocolate, everything melts into a mess.
Don’t skip the parchment paper when spreading out your mixture. Without it, the candy will stick terribly to your pan, and you’ll lose half your batch trying to pry it off.
Some people use natural peanut butter thinking it’s a healthier choice, but it doesn’t work well in this recipe. The oils separate and the texture turns out completely wrong. Stick with regular creamy peanut butter for the best results.
Finally, avoid using chocolate chips alone for coating. They’re formulated to hold their shape and don’t melt as smoothly. Add some coconut oil or use melting chocolate specifically designed for candy making.
How to Know Your Butterfinger Is Done
Your butterfinger recipe is complete when the peanut butter mixture has cooled completely and feels firm to the touch. Press it gently with your finger—it should be hard and crispy, not soft or bendable. If it still feels tacky or warm, give it more time to set.
The mixture should break cleanly when you snap off a piece. It shouldn’t bend or feel chewy at all. That crispy, shattering texture is what you’re aiming for.
Once you’ve added the chocolate coating, the bars are done when the chocolate has completely hardened. It should look matte rather than shiny and shouldn’t feel sticky when you touch it lightly. This usually takes about an hour in the refrigerator.
When you bite into a finished bar, you should hear that satisfying crunch and feel the layers flake apart in your mouth just like the store-bought version.
What to Serve With Butterfinger Bars
These candy bars are rich and sweet, so they pair beautifully with beverages that provide some balance. Hot coffee is absolutely perfect—the slight bitterness cuts through the sweetness wonderfully. A cold glass of milk is the classic choice that never disappoints, especially for kids.
For a fun dessert idea, chop up your homemade butterfinger bars and use them as ice cream toppings. They’re incredible sprinkled over vanilla, chocolate, or peanut butter ice cream.
You can also crumble these bars into brownie batter before baking for an amazing candy bar brownie experience. The pieces stay crunchy even after baking and add wonderful texture.
If you’re serving these at a party, arrange them on a platter with other homemade candies like peanut butter cups, chocolate truffles, or caramels for an impressive candy buffet.
Storage Tips for Homemade Candy Bars
Store your finished butterfinger bars in an airtight container at room temperature for up to two weeks. Layer them between sheets of parchment or wax paper to prevent the chocolate from sticking together. Keep the container in a cool, dry place away from direct sunlight and heat sources.
If your kitchen gets very warm, you can refrigerate the bars, but know that the chocolate may develop a white coating called bloom when you bring them back to room temperature. This doesn’t affect the taste at all—it’s just a cosmetic issue.
These bars freeze exceptionally well for up to three months. Wrap each bar individually in plastic wrap, then place them all in a freezer-safe container or bag. Thaw them in the refrigerator overnight or at room temperature for about an hour before eating.
Avoid storing these in humid conditions as moisture can make the crispy center lose its crunch and become chewy instead.
Estimated Nutrition Information
Per bar (based on 20 servings): Approximately 180 calories, 10g fat, 22g carbohydrates, 3g protein, 1g fiber. These are treats meant for occasional enjoyment as part of a balanced diet.
Recipe Overview
Prep Time: 15 minutes
Cook Time: 5 minutes
Cooling Time: 1 hour
Total Time: 1 hour 20 minutes
Difficulty: Easy
Servings: 20 bars
Ingredients
For the candy center:
- 16 ounces candy corn
- 1 and 1/2 cups creamy peanut butter
- Pinch of salt
For the chocolate coating:
- 3 cups semi-sweet or milk chocolate chips
- 2 tablespoons coconut oil
Step-by-Step Instructions
Step 1: Prepare your workspace
Line a 9×13 inch baking pan with parchment paper, making sure it covers the bottom and comes up the sides. Set this aside while you make the candy mixture.
Step 2: Melt the candy corn
Pour the candy corn into a large microwave-safe bowl. Microwave on high for one minute, then stir. Continue microwaving in thirty-second intervals, stirring after each one, until the candy corn is completely melted and smooth. This usually takes about two to three minutes total.
Step 3: Add peanut butter
Immediately stir the peanut butter and salt into the melted candy corn. Mix vigorously until everything is completely combined and smooth. The mixture will be very thick and sticky.
Step 4: Spread the mixture
Pour the peanut butter mixture into your prepared pan. Use a spatula or your hands (lightly greased with cooking spray) to spread it evenly across the pan. Press it down firmly to create an even layer about half an inch thick.
Step 5: Let it set
Allow the mixture to cool completely at room temperature for at least one hour. Don’t refrigerate it during this step—it needs to cool gradually to develop the right texture. The mixture should become very hard and crispy.
Step 6: Cut into bars
Once the mixture is completely hard, lift it out of the pan using the parchment paper. Place it on a cutting board and use a sharp knife to cut it into twenty rectangular bars, or whatever size you prefer.
Step 7: Prepare the chocolate
Combine the chocolate chips and coconut oil in a microwave-safe bowl. Microwave in thirty-second intervals, stirring between each one, until the chocolate is completely melted and smooth. You can also melt this in a double boiler if you prefer.
Step 8: Coat the bars
Using a fork or dipping tool, dip each bar into the melted chocolate, making sure it’s completely coated on all sides. Let any excess chocolate drip off, then place the coated bar on a parchment-lined baking sheet.
Step 9: Set the chocolate
Once all bars are coated, place the baking sheet in the refrigerator for about thirty minutes to one hour, until the chocolate is completely set and hard.
Step 10: Enjoy your homemade candy
Your butterfinger recipe is complete! Remove the bars from the refrigerator and enjoy them right away, or store them in an airtight container.
This butterfinger recipe proves that amazing homemade candy doesn’t require fancy equipment or professional skills. With just three main ingredients and a little patience, you can create candy bars that rival anything from the store. The crispy, flaky peanut butter center combined with smooth chocolate makes these irresistible treats that disappear quickly every single time.