
My grandmother used to make butterscotch pie for every family gathering, and I’d always sneak an extra slice when no one was looking. The silky, caramel-like filling and billowy meringue topping made it impossible to resist. For years, I thought this dessert was too complicated to recreate, but once I finally tried making it myself, I realized how simple it actually is. Now, this butterscotch pie recipe is my go-to when I want to impress guests or simply treat myself to a nostalgic, comforting dessert that tastes like home.
Why You’ll Love This Butterscotch Pie Recipe
This butterscotch pie recipe creates a dessert that’s pure comfort in every bite. The filling has a deep, rich flavor that’s distinct from regular vanilla pudding, with caramelized brown sugar notes that make it truly special. Unlike overly sweet desserts, this pie has a sophisticated balance of sweetness and buttery depth that adults and kids alike appreciate. The homemade filling takes only about 15 minutes of active cooking time, and the results far surpass anything you could buy from a store. The combination of smooth filling, flaky crust, and fluffy meringue creates the perfect textural contrast that keeps you coming back for more.
What Is Butterscotch Pie?
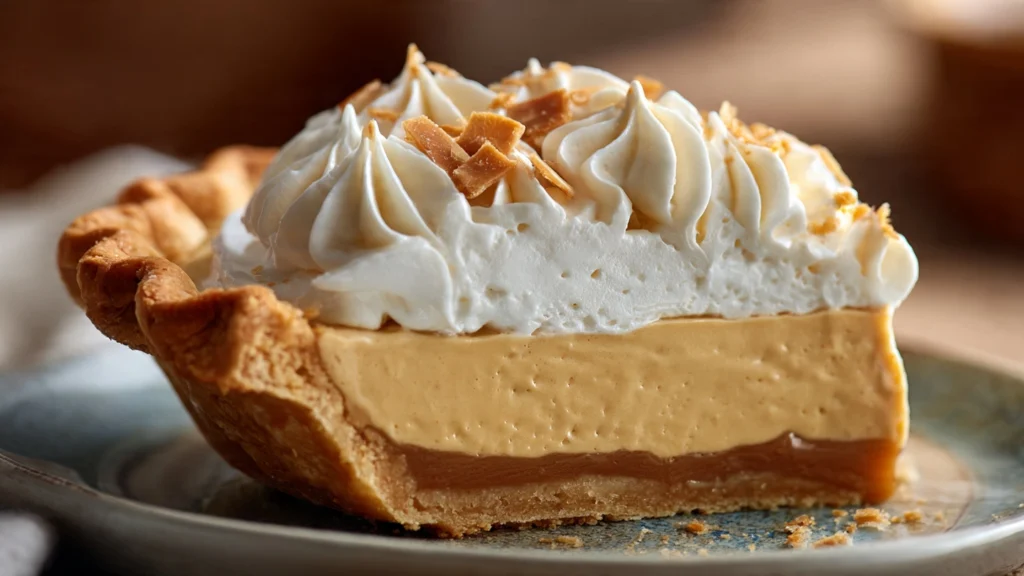
Butterscotch pie is a classic American dessert featuring a creamy, cooked filling made primarily from brown sugar, butter, and egg yolks. The distinctive butterscotch flavor comes from cooking brown sugar and butter together, creating those wonderful caramel notes that define this pie. The filling is poured into a pre-baked pie crust and traditionally topped with meringue made from the leftover egg whites, though whipped cream is also a popular option. This butterscotch pie recipe produces a silky-smooth custard that’s firm enough to slice cleanly but soft enough to melt in your mouth. It’s similar to banana cream pie in texture but with a completely unique, buttery caramel flavor profile.
Common Mistakes to Avoid
The most frequent problem people encounter with this butterscotch pie recipe is lumpy filling. This happens when you add ingredients too quickly or don’t whisk constantly. Always add the hot mixture to the eggs slowly while whisking vigorously to temper them properly. Rushing this step results in scrambled eggs instead of silky custard.
Another mistake is undercooking the filling. If you remove it from heat too soon, the pie won’t set properly and will be runny when sliced. The mixture needs to bubble and thicken substantially before it’s ready. Cook until it coats the back of a spoon and holds its shape.
Don’t skip the plastic wrap step when cooling the filling. Press plastic wrap directly onto the surface to prevent a skin from forming. That thick skin on top ruins the smooth texture you’ve worked hard to create.
Weeping meringue frustrates many bakers. This happens when the meringue isn’t sealed to the crust edges or when it’s added to cold filling. Always spread meringue over hot filling and make sure it touches the crust all around to prevent shrinking and weeping.
Finally, overbaking the meringue makes it tough and rubbery. Watch carefully and remove the pie as soon as the peaks turn golden brown.
How to Know When Your Pie Is Done
For the filling portion of this butterscotch pie recipe, you’ll know it’s ready when it thickens noticeably and large bubbles break the surface. The mixture should coat the back of a wooden spoon, and when you run your finger through it, the line should hold without running back together. This typically takes about 8-10 minutes of constant stirring over medium heat.
Once the filling is in the crust, it needs to cool until set. Properly set filling should jiggle slightly as a whole when you gently shake the pie but shouldn’t slosh or ripple like liquid. This usually takes about 4 hours of refrigeration.
If you’re topping with meringue, it’s done when the peaks turn a beautiful golden brown color, which takes about 10-12 minutes at 350°F. The tips should be toasted while the valleys remain white. Don’t wait for the entire meringue to brown, or you’ll end up with an overcooked, tough topping.
What to Serve With Butterscotch Pie
This butterscotch pie recipe shines as a standalone dessert, but certain accompaniments elevate it even further. A hot cup of strong coffee cuts through the sweetness beautifully and brings out the caramel notes in the filling.
Fresh berries, particularly raspberries or strawberries, provide a tart contrast that balances the rich sweetness. Scatter a handful around each slice for color and flavor contrast.
For an extra indulgent presentation, drizzle caramel sauce around the plate or add a small scoop of vanilla ice cream alongside. The cold ice cream against the creamy pie creates a wonderful temperature contrast.
Chopped toasted pecans sprinkled on top add a delightful crunch and nutty flavor that complements the butterscotch beautifully. You can also add them directly to the filling before pouring it into the crust.
This pie works wonderfully as part of a dessert buffet alongside other cream pies like chocolate or coconut for variety.
Storage Tips
Store your finished pie in the refrigerator, loosely covered with plastic wrap or aluminum foil. If topped with meringue, the pie will keep for 2-3 days, though the meringue quality decreases after the first day. Meringue tends to weep and become soggy over time, so it’s best enjoyed within 24 hours.
If you’ve topped your butterscotch pie recipe with whipped cream instead of meringue, it will maintain better texture for up to 3 days refrigerated.
For longer storage, consider freezing the pie without the topping. Wrap the filled pie tightly in plastic wrap, then aluminum foil, and freeze for up to 2 months. Thaw overnight in the refrigerator before adding fresh meringue or whipped cream.
Never leave this pie at room temperature for more than 2 hours, as the egg-based filling can develop harmful bacteria. Always refrigerate promptly after serving.
The unbaked pie crust can be frozen separately for up to 3 months, making it easy to prepare components ahead of time.
Estimated Nutrition (Per Slice, 8 Servings)
Calories: 385 | Total Fat: 16g | Saturated Fat: 9g | Cholesterol: 145mg | Sodium: 245mg | Total Carbohydrates: 56g | Dietary Fiber: 1g | Sugars: 38g | Protein: 6g
Note: Nutritional information is approximate and varies based on specific ingredients and portion sizes.
Recipe Overview
Prep Time: 20 minutes
Cook Time: 25 minutes
Total Time: 4 hours 45 minutes (including chilling)
Difficulty: Medium
Servings: 8 slices
Ingredients
For the Crust:
- 1 pre-made 9-inch pie crust (or homemade), baked and cooled
For the Filling:
- 1 cup packed dark brown sugar
- ⅓ cup cornstarch
- ½ teaspoon salt
- 3 cups whole milk
- 4 large egg yolks
- 3 tablespoons butter
- 1½ teaspoons vanilla extract
For the Meringue:
- 4 large egg whites (reserved from filling)
- ¼ teaspoon cream of tartar
- 6 tablespoons granulated sugar
- ½ teaspoon vanilla extract
Step-by-Step Instructions
Step 1: Preheat your oven to 350°F if making meringue. Ensure your pie crust is fully baked and cooled before starting the filling.
Step 2: In a medium saucepan, whisk together brown sugar, cornstarch, and salt until no lumps remain. The brown sugar clumps will break down as you cook.
Step 3: Gradually whisk in the milk until the mixture is completely smooth. Place the saucepan over medium heat.
Step 4: Cook the mixture, stirring constantly with a whisk, until it thickens and begins to bubble. This takes about 8-10 minutes. Don’t stop stirring or it will scorch.
Step 5: In a separate bowl, lightly beat the egg yolks. Once the milk mixture is bubbling, slowly add about 1 cup of the hot mixture to the yolks while whisking constantly. This tempers the eggs and prevents scrambling.
Step 6: Pour the tempered egg mixture back into the saucepan while whisking. Continue cooking for 2 more minutes, stirring constantly, until very thick.
Step 7: Remove from heat and stir in butter and vanilla extract until the butter melts completely and the mixture is glossy.
Step 8: Pour the hot filling into your prepared pie crust. Press plastic wrap directly onto the surface of the filling to prevent a skin from forming.
Step 9: For the meringue, beat egg whites and cream of tartar with an electric mixer on medium speed until soft peaks form, about 2 minutes.
Step 10: Gradually add sugar one tablespoon at a time while continuing to beat. Add vanilla and beat on high until stiff, glossy peaks form, about 3-4 more minutes.
Step 11: Remove plastic wrap from the still-warm filling. Spread meringue over the hot filling, making sure it touches the crust edges all around. Create decorative peaks with the back of a spoon.
Step 12: Bake for 10-12 minutes until meringue peaks are golden brown. Remove from oven and cool on a wire rack for 1 hour, then refrigerate for at least 3 hours before slicing.
Serve cold and enjoy this timeless classic!