
My daughter asked me to bake cookies for her school bake sale when she was seven years old. I panicked because I’d never made cookies from scratch before. After trying several disappointing batches, I finally cracked the code to the perfect chocolate chip cookie. The look on her face when she tasted that first warm cookie made all the trial and error worth it. Now, this chocolate chip cookie recipe is requested at every family gathering, and I’m thrilled to share it with you today.
Why You’ll Love This Chocolate Chip Cookie Recipe
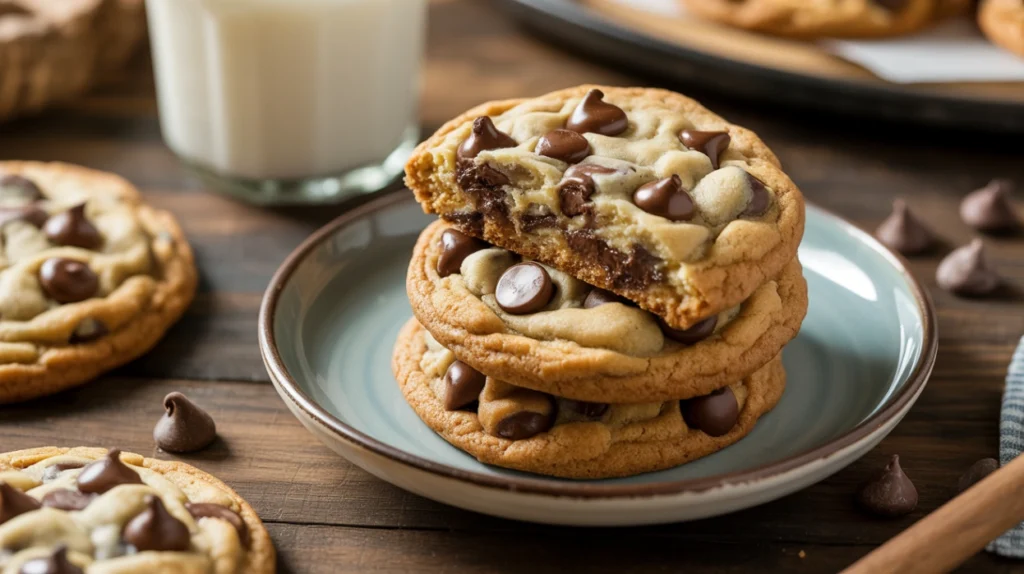
These cookies are everything you dream about—crispy edges with soft, chewy centers loaded with melty chocolate chips. The secret is browning the butter, which adds a deep, nutty flavor that makes these taste like they came from an expensive bakery. This recipe is incredibly forgiving for beginners but impressive enough for experienced bakers. You don’t need any fancy equipment, just a mixing bowl and a wooden spoon. The cookies stay fresh for days and actually taste even better the next day after the flavors have melded together. They’re perfect for any occasion, from casual after-school snacks to holiday cookie exchanges. Best of all, you can have warm cookies in your hands in under 30 minutes from start to finish.
What Is a Chocolate Chip Cookie?
A chocolate chip cookie is an American classic dessert made from butter, sugar, eggs, flour, and chocolate chips. The original version was created accidentally in the 1930s when a baker added chopped chocolate to her cookie dough, expecting it to melt throughout. Instead, the chocolate held its shape, creating the beloved treat we know today. The perfect chocolate chip cookie has a golden brown exterior with slightly crispy edges that give way to a soft, chewy interior. The chocolate chips should be distributed throughout, creating pockets of melted chocolate in every bite. This chocolate chip cookie recipe uses both brown and white sugar for the ideal texture—brown sugar adds moisture and chewiness, while white sugar helps with spreading and creates those crispy edges everyone loves.
Common Mistakes to Avoid
Even simple recipes have pitfalls that can affect your results. The biggest mistake is using cold butter straight from the refrigerator. Your butter should be softened to room temperature, which means it holds a fingerprint when pressed but doesn’t look greasy or melted. Cold butter won’t incorporate properly, while melted butter makes cookies spread too thin.
Another common error is overmixing the dough after adding flour. Mix just until the flour disappears—overmixing develops gluten and creates tough, cakey cookies instead of tender ones. Many bakers also make their cookies too small. Use a proper cookie scoop or measure about three tablespoons of dough per cookie for the right size and baking time.
Skipping the chilling step is tempting but harmful to your results. Chilling the dough for at least 30 minutes prevents excessive spreading and allows flavors to develop. Don’t overcrowd your baking sheet either—leave at least two inches between cookies so they have room to spread without merging together.
Finally, overbaking is the fastest way to ruin this chocolate chip cookie recipe. Cookies continue baking on the hot pan after leaving the oven, so remove them when they look slightly underdone in the center. They’ll firm up as they cool.
How to Know Your Cookies Are Done
Perfect timing separates good cookies from great ones. Your chocolate chip cookies are done when the edges are golden brown and set, but the centers still look slightly soft and underbaked. This usually takes 10 to 12 minutes at 350 degrees Fahrenheit, depending on your oven and cookie size.
The cookies should have spread out and flattened slightly but still maintain some thickness. You’ll notice small cracks forming on the surface—this is a good sign. The edges will look firm and slightly darker than the center. If you gently press the edge, it should feel crisp, while the center gives slightly under pressure.
Don’t wait for the entire cookie to look completely baked through. Remember, they’ll continue cooking on the hot baking sheet for several minutes after you remove them from the oven. This carryover cooking is crucial for achieving that perfect chewy texture. If your cookies look completely done in the oven, they’ll be overbaked and dry once cooled. Trust the process and pull them out when they still look a bit soft in the middle.
What to Serve With Chocolate Chip Cookies
These cookies are delicious on their own, but certain pairings elevate them to another level. The classic combination is cold milk—whole milk is traditional, but any kind works. The contrast between warm cookies and cold milk is pure magic. Coffee is another excellent choice, especially for adults. The slight bitterness of coffee balances the sweetness perfectly.
For a fun dessert, make ice cream sandwiches by placing vanilla ice cream between two cookies. You can roll the edges in mini chocolate chips or sprinkles for extra flair. Hot chocolate pairs wonderfully with these cookies, especially during winter months. Simply dunk the cookies in your cocoa for an indulgent treat.
If you’re serving these at a party, arrange them on a platter with fresh strawberries and whipped cream for dipping. For an elegant touch, serve them alongside coffee or espresso after dinner. They also complement vanilla or caramel ice cream beautifully. The versatility of this chocolate chip cookie recipe means it fits any occasion or pairing you can imagine.
Storage Tips
Proper storage keeps your cookies fresh and delicious for days. Once completely cooled, store them in an airtight container at room temperature. Layer them between sheets of parchment paper to prevent sticking. They’ll stay fresh for up to one week, though they rarely last that long in my house.
For longer storage, freeze baked cookies in a freezer-safe container for up to three months. Thaw them at room temperature or warm them in a 300-degree oven for five minutes to refresh that just-baked taste. You can also freeze the cookie dough, which is incredibly convenient. Scoop the dough into balls, freeze them on a baking sheet until solid, then transfer to a freezer bag. Bake frozen dough balls straight from the freezer, adding an extra minute or two to the baking time.
If your cookies lose their softness after a day or two, place a slice of bread in the container with them. The cookies will absorb moisture from the bread and soften up again. For crispy cookies that have gone soft, refresh them in a 300-degree oven for three to five minutes.
Estimated Nutrition Information
Each cookie from this chocolate chip cookie recipe contains approximately 180 calories. You’ll get about 2 grams of protein, 24 grams of carbohydrates, and 9 grams of fat per cookie. The sugar content is around 14 grams per cookie, including both added sugars and natural sugars from the chocolate.
These cookies provide small amounts of iron from the flour and calcium from the chocolate chips. The butter contributes vitamins A and D. One cookie contains roughly 120 milligrams of sodium.
Keep in mind these are estimates based on making 24 cookies from the recipe. Larger cookies will have more calories and nutrients, while smaller ones will have less. If you’re looking to make these slightly healthier, you can reduce the sugar by a quarter cup, though this will affect the texture slightly. Using dark chocolate chips instead of milk chocolate reduces sugar and adds antioxidants. However, these cookies are meant to be an occasional treat, so enjoy them without guilt.
Recipe Overview
Prep Time: 15 minutes
Chill Time: 30 minutes
Bake Time: 12 minutes
Total Time: 57 minutes
Difficulty: Easy
Servings: 24 cookies
Ingredients
- 2 and 1/4 cups all-purpose flour
- 1 teaspoon baking soda
- 1 teaspoon salt
- 1 cup unsalted butter, softened
- 3/4 cup granulated sugar
- 3/4 cup packed light brown sugar
- 2 large eggs, room temperature
- 2 teaspoons vanilla extract
- 2 cups semi-sweet chocolate chips
Step-by-Step Instructions
Start by whisking together the flour, baking soda, and salt in a medium bowl. Set this aside—you’ll add it to the wet ingredients later. This dry mixture ensures the leavening and salt distribute evenly throughout your dough.
In a large mixing bowl, cream together the softened butter, granulated sugar, and brown sugar. Use a wooden spoon or electric mixer on medium speed. Beat for about three minutes until the mixture is light and fluffy. The color will lighten slightly, and you’ll see the texture become creamy rather than grainy.
Add the eggs one at a time, beating well after each addition. The eggs should incorporate fully before adding the next one. Pour in the vanilla extract and mix until combined. The mixture might look slightly curdled—this is normal and will smooth out when you add the flour.
Add the flour mixture to the wet ingredients gradually. Mix on low speed or stir gently with a wooden spoon until just combined. You should see no more streaks of flour, but don’t overmix. The dough will be thick and slightly sticky.
Fold in the chocolate chips using a wooden spoon or spatula. Distribute them evenly throughout the dough so every cookie gets plenty of chocolate. At this point, cover the bowl with plastic wrap and refrigerate for at least 30 minutes. This chilling time is crucial for preventing flat, greasy cookies.
Preheat your oven to 350 degrees Fahrenheit. Line two baking sheets with parchment paper or silicone baking mats. Don’t skip this step—it prevents sticking and ensures even baking.
Once chilled, scoop the dough using a cookie scoop or spoon, making balls about three tablespoons in size. Place them on the prepared baking sheets, leaving at least two inches between each cookie. They’ll spread as they bake, so proper spacing prevents them from merging together.
Bake for 10 to 12 minutes, until the edges are golden brown but the centers still look slightly soft. The cookies will appear underdone—resist the urge to bake them longer. They’ll continue cooking on the hot pan after removal.
Let the cookies cool on the baking sheet for five minutes. This cooling time allows them to set up enough to transfer without breaking. Then move them to a wire rack to cool completely, or eat them warm if you can’t wait.
The result is the perfect chocolate chip cookie—golden edges, soft centers, and chocolate in every bite. This chocolate chip cookie recipe never disappoints and will quickly become your go-to for any occasion. Enjoy them with loved ones and create your own sweet memories.