
I became obsessed with honeycomb candy after trying a fancy chocolate bar filled with crunchy, airy toffee pieces. The texture was unlike anything I’d experienced—simultaneously crunchy and melt-in-your-mouth. I assumed it required special equipment or professional skills, but when I finally looked up how to make it, I was shocked to discover it uses just four simple ingredients and comes together in minutes. The first time I watched sugar syrup erupt into a billowing, golden foam after adding baking soda, I felt like a kitchen magician. This honeycomb candy recipe has since become my favorite edible gift and party trick.
Why You’ll Love This Honeycomb Candy Recipe
This impressive confection requires only four basic pantry ingredients and takes just fifteen minutes to make. The dramatic transformation when baking soda hits the hot sugar syrup is genuinely exciting to watch—it’s pure kitchen science in action. The result is a light, crispy candy with an airy structure that literally melts on your tongue while delivering deep caramel flavor. Kids and adults alike are fascinated by both the making process and the final honeycomb structure. It’s naturally gluten-free and can be enjoyed plain or dipped in chocolate for an extra-special treat. The candy makes an excellent homemade gift when packaged in clear bags or jars. Despite its gourmet appearance, it costs just pennies to make compared to store-bought versions. The recipe is also incredibly forgiving once you understand the basic technique, making it accessible even for beginners who haven’t worked much with candy making.
What Is Honeycomb Candy?
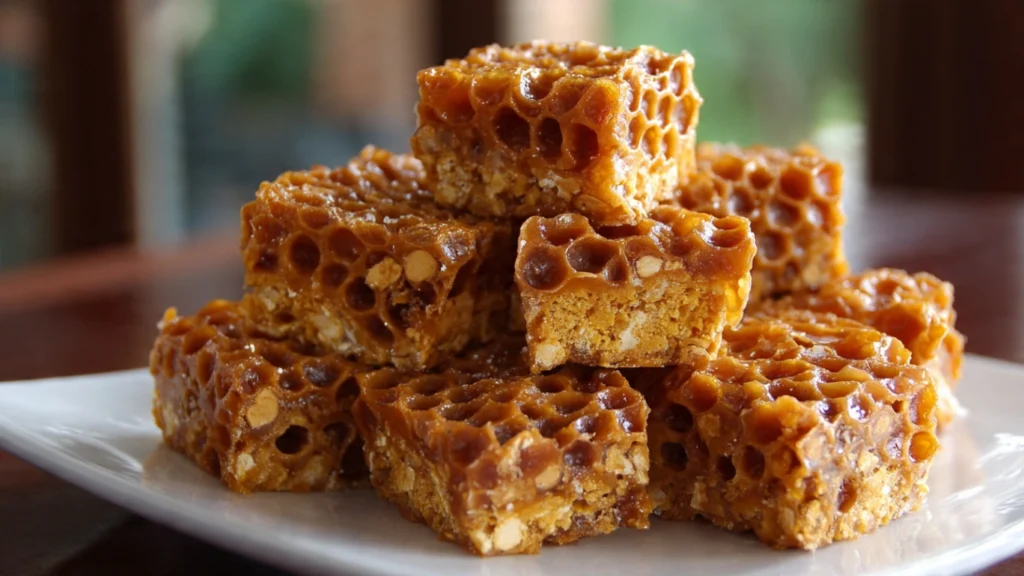
Honeycomb candy, also known as sponge toffee, cinder toffee, or hokey pokey, is a light, airy confection made by adding baking soda to hot sugar syrup. The baking soda reacts with the hot mixture, releasing carbon dioxide gas that creates countless tiny bubbles throughout the candy, resulting in its characteristic honeycomb-like structure. This chemical reaction causes the mixture to foam up dramatically, expanding to several times its original volume. Once cooled and hardened, the candy has a delicate, crunchy texture that shatters easily and dissolves quickly in your mouth. The flavor is deeply caramelized with subtle butterscotch notes. This candy is popular worldwide under various names—it’s called “sponge candy” in Buffalo, “cinder toffee” in Britain, and “hokey pokey” in New Zealand. Many candy bars feature honeycomb pieces covered in chocolate. The name comes from its appearance, which resembles a bee’s honeycomb with its network of air pockets and golden color.
Common Mistakes to Avoid
Several pitfalls can affect the success of your honeycomb candy recipe. The most critical mistake is not heating the sugar mixture to the correct temperature. It must reach the hard crack stage at 300°F to 310°F—anything lower results in sticky, chewy candy rather than crisp, crunchy pieces. Using a candy thermometer is essential for accuracy. Another common error is stirring the mixture after adding the baking soda. Once you stir in the baking soda and it foams up, pour it immediately without further stirring, which would deflate the bubbles. Some people use old baking soda that’s lost its potency, resulting in minimal foaming. Always use fresh baking soda for the best reaction. Adding the baking soda too slowly also reduces the dramatic foaming effect—add it all at once and stir quickly. Many beginners use too small a pot, causing the foaming mixture to overflow. Use a large, deep pot with at least four times the volume of your initial ingredients. Attempting to touch or move the candy before it’s completely cool causes it to crack incorrectly or stick. Finally, making honeycomb on humid days can result in sticky candy because the sugar absorbs moisture from the air.
How to Know It’s Done
The key to perfect honeycomb candy lies in recognizing the right stage at each step. When cooking the sugar syrup, it’s done when it reaches exactly 300°F to 310°F on a candy thermometer. The mixture will be bubbling vigorously and will have transformed from clear to a light amber or golden color. If you don’t have a thermometer, you can test by dropping a small amount into ice water—it should immediately harden into brittle threads that crack easily. Once you add the baking soda, the mixture should foam up dramatically, increasing to about four times its original volume within seconds. This vigorous reaction indicates fresh baking soda and proper temperature. After pouring into your prepared pan, the candy is done setting when it’s completely cool to the touch and has stopped making any crackling sounds, which usually takes about one hour at room temperature. When fully set, it should break cleanly with a sharp snap rather than bending. The interior should show that distinctive honeycomb structure with countless tiny air pockets throughout.
What to Serve With Honeycomb Candy
This versatile treat works beautifully in many contexts and combinations. Enjoy it plain as a crunchy candy snack between meals or after dinner. Dip pieces in melted chocolate—dark, milk, or white—for an elevated confection that rivals expensive candy bars. Break it into smaller pieces and fold into vanilla ice cream or sprinkle over sundaes for added crunch. Crush it coarsely and use as a topping for cakes, cupcakes, or mousse. It’s delicious stirred into hot chocolate, where it slowly dissolves and adds sweetness. Package it in decorative bags or jars as homemade gifts for holidays, teacher appreciation, or hostess presents. Some people enjoy it alongside coffee or tea as an afternoon treat. You can also incorporate crushed honeycomb into cookie dough, brownie batter, or cheesecake for added texture and flavor. For an impressive dessert presentation, serve large pieces of honeycomb standing upright on plates with whipped cream and fresh berries. The deep caramel flavor pairs particularly well with chocolate, vanilla, coffee, and caramel flavors.
Storage Tips
Proper storage is crucial for maintaining honeycomb candy’s signature crunch. Once completely cool and broken into pieces, store it immediately in an airtight container. Glass jars with tight-fitting lids or plastic containers with good seals work best. Layer the pieces with parchment paper to prevent sticking. Store at room temperature in a cool, dry place away from humidity. A pantry or cupboard works well, but avoid storing near the stove or in the refrigerator, as temperature fluctuations and moisture will make the candy sticky. Under ideal dry conditions, honeycomb candy keeps for up to two weeks, though it’s best enjoyed within the first week when the texture is optimal. In humid climates, the candy may only stay crispy for a few days as sugar naturally absorbs moisture from the air. If your honeycomb does become sticky, you can try placing it in a 200°F oven for about five minutes to dry it out, though this doesn’t always work. Chocolate-covered honeycomb stores slightly better than plain honeycomb since the chocolate provides a protective barrier against moisture. Never freeze honeycomb candy as it will become soggy when thawed.
Estimated Nutrition Information
Per piece (based on 16 pieces): Approximately 80 calories, 2g fat, 16g carbohydrates, 14g sugar, 0g protein. This is pure candy meant as an occasional treat.
Recipe Overview
Prep Time: 5 minutes
Cook Time: 10 minutes
Cooling Time: 1 hour
Total Time: 1 hour 15 minutes
Difficulty: Easy to Moderate
Yield: About 16 pieces
Ingredients
- 1 cup granulated sugar
- 1/4 cup light corn syrup
- 2 tablespoons honey
- 2 tablespoons water
- 1 tablespoon baking soda, sifted (sifting is important to remove lumps)
- Pinch of salt
Step-by-Step Instructions
Before you begin this honeycomb candy recipe, prepare your workspace. Line an 8×8-inch baking pan with parchment paper, letting it hang over the edges for easy removal later. Grease the parchment paper generously with butter or cooking spray. Have your sifted baking soda measured and ready in a small bowl right next to your stove—timing is critical once the sugar reaches temperature, so you need everything within reach.
In a large, deep, heavy-bottomed saucepan, combine the sugar, corn syrup, honey, water, and salt. The pot should be at least four quarts in size because the mixture will expand dramatically when you add the baking soda. Stir everything together with a wooden spoon or heat-resistant silicone spatula until the sugar is evenly moistened.
Place the pot over medium-high heat and bring the mixture to a boil, stirring constantly until the sugar completely dissolves. This usually takes about three to four minutes. Once the sugar dissolves and the mixture is boiling, stop stirring completely. Clip a candy thermometer to the side of the pot, making sure the bulb is submerged in the liquid but not touching the bottom of the pan.
Allow the mixture to boil without stirring until it reaches 300°F to 310°F. This is called the hard crack stage and is critical for proper texture. The mixture will bubble vigorously and transform from clear to a light golden amber color. This temperature stage usually takes about five to seven minutes, but watch your thermometer rather than relying on timing. The mixture can go from perfect to burnt quickly at this stage, so stay close.
The moment the thermometer reads 300°F, immediately remove the pot from the heat. Working very quickly, add all the sifted baking soda at once. Stir vigorously with a wooden spoon or whisk for about five seconds. The mixture will foam up dramatically, bubbling and expanding rapidly to several times its original volume. This is exactly what you want—don’t be alarmed by how much it grows.
As soon as the mixture is foamy and expanded, immediately pour it into your prepared pan. Don’t try to scrape out every last bit from the pot or spread the mixture around—just pour it quickly and let it settle naturally. The surface will be very bubbly and irregular, which is perfect. Don’t shake the pan or try to smooth the top.
Let the honeycomb candy cool completely at room temperature without touching or moving it. This takes about one hour. You’ll hear crackling sounds as it cools and sets—this is normal and indicates the candy is hardening properly. Resist the urge to touch it during this time, as disturbing it can cause unwanted cracks or collapse some of the air pockets.
Once completely cool and silent, lift the honeycomb out of the pan using the parchment paper overhang. Place it on a cutting board. Using a large sharp knife or by hand, break the candy into irregular chunks. The pieces should shatter cleanly with that characteristic brittle snap.
Your homemade honeycomb candy is now ready to enjoy! Eat it plain, dip it in chocolate, or use it in any of the ways suggested above. Store any leftovers immediately in an airtight container to maintain that perfect crunch. This impressive confection proves that some of the best candy-making magic requires just a few simple ingredients and a bit of kitchen chemistry!