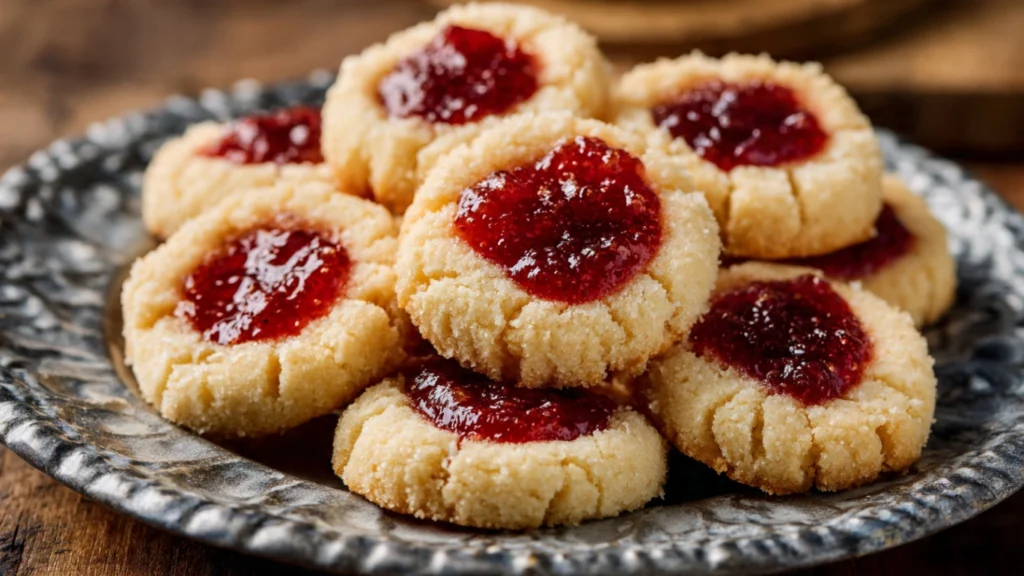

Every Christmas, my grandmother would make dozens of these beautiful little cookies, each one pressed with her actual thumbprint and filled with jewel-toned jam. I loved watching her work, and now this jam thumbprint cookies recipe is one of my most treasured family traditions. These tender, buttery cookies with their sweet jam centers never fail to brighten up any cookie platter.
Why You’ll Love This Jam Thumbprint Cookies Recipe
These cookies are absolutely gorgeous with their colorful jam centers that look like little jewels on a cookie tray. The buttery, melt-in-your-mouth dough pairs perfectly with sweet, fruity jam for a wonderful flavor combination. They’re surprisingly easy to make despite looking so elegant and professional. You can customize them with different jam flavors to create variety on one batch—raspberry, strawberry, apricot, and grape all work beautifully. The recipe uses simple ingredients you probably already have in your kitchen. These cookies stay fresh for over a week when stored properly, making them perfect for holiday cookie exchanges or baking ahead for parties.
What Are Jam Thumbprint Cookies?
Jam thumbprint cookies are tender, shortbread-like cookies with an indentation in the center filled with jam or preserves. This jam thumbprint cookies recipe creates a classic version featuring a rich, buttery base that’s often rolled in chopped nuts before baking, though the nuts are optional. The name comes from the traditional method of making the indentation—using your thumb to press into the center of each cookie before filling it with jam. These cookies have European origins and have been popular in American baking since the mid-1900s. The combination of rich cookie and sweet jam creates a perfect balance of flavors and textures that makes them irresistible.
Common Mistakes to Avoid
The biggest mistake with this jam thumbprint cookies recipe is making the indentations too shallow. During baking, the cookies puff up slightly and shallow thumbprints can disappear. Press firmly and make the indentations deep enough to hold a generous amount of jam.
Another common error is adding the jam before baking. The jam can burn or bubble over during the full baking time. It’s better to add it partway through baking or even after the cookies come out of the oven.
Don’t skip chilling the dough if it feels too soft to work with. Warm dough spreads excessively during baking and loses its shape. If the dough seems sticky, refrigerate it for thirty minutes.
Many people use jelly instead of jam or preserves. Jelly is too thin and watery—it runs all over the cookies during baking. Always use thick jam or preserves that will stay put in the indentations.
Finally, avoid overcrowding the baking sheet. Give cookies adequate space to spread slightly without touching each other, ensuring even baking.
How to Know Your Jam Thumbprint Cookies Are Done
Your jam thumbprint cookies recipe is complete when the edges of the cookies are lightly golden brown but the centers still look pale. The cookies should feel set when you gently touch the edges but might still seem slightly soft in the middle.
The jam should look glossy and bubbly but not burnt or darkened. If the jam starts to darken significantly, the cookies are overbaking.
When you lift a cookie with a spatula, the bottom should be light golden brown, not dark or burnt. The cookies will firm up considerably as they cool, so they should still have a slight give when you remove them from the oven.
Let cookies cool on the baking sheet for five minutes before transferring. They should be firm enough to move without breaking but will continue to set as they cool completely on a wire rack.
What to Serve With Jam Thumbprint Cookies
These elegant cookies are perfect alongside hot tea or coffee. The buttery richness pairs beautifully with Earl Grey tea or a strong cappuccino.
Serve them as part of a holiday cookie assortment with sugar cookies, gingerbread, and chocolate crinkles. The variety of colors and flavors makes an impressive dessert spread.
For afternoon tea parties, arrange jam thumbprint cookies on a tiered stand with scones and finger sandwiches for a classic presentation.
They’re wonderful with hot chocolate or warm apple cider during cold winter months. The fruity jam complements spiced beverages especially well.
Pack them in decorative tins or boxes tied with ribbon for homemade holiday gifts that people will genuinely appreciate.
Storage Tips for Jam Thumbprint Cookies
Store your finished jam thumbprint cookies in an airtight container at room temperature for up to ten days. Layer them carefully between sheets of parchment paper to prevent the jam from sticking to other cookies.
These cookies freeze beautifully for up to three months. Freeze them in a single layer on a baking sheet first, then transfer to freezer bags or containers. This prevents them from sticking together. Thaw at room temperature for about an hour before serving.
Don’t stack the cookies directly on top of each other without parchment paper between layers. The jam can stick and create a mess when you try to separate them.
If you’re giving these as gifts, wait until they’re completely cool before packaging. Any residual warmth can create condensation inside the container, making the cookies soggy.
Keep cookies away from strong-smelling foods, as they can absorb odors. Store them in a dedicated cookie container if possible.
Estimated Nutrition Information
Per cookie (based on 36 cookies): Approximately 85 calories, 4g fat, 11g carbohydrates, 1g protein, less than 1g fiber. These are treats meant for special occasions.
Recipe Overview
Prep Time: 20 minutes
Cook Time: 12 minutes per batch
Total Time: 1 hour
Difficulty: Easy
Servings: 36 cookies
Ingredients
For the cookies:
- 1 cup unsalted butter, softened
- 2/3 cup granulated sugar
- 2 large egg yolks
- 1 teaspoon vanilla extract
- 1/4 teaspoon almond extract (optional)
- 2 cups all-purpose flour
- 1/2 teaspoon salt
- 1 cup finely chopped nuts (walnuts or pecans, optional)
- 1/2 cup jam or preserves (any flavor)
Step-by-Step Instructions
Step 1: Cream butter and sugar
In a large bowl, beat softened butter and sugar together until light and fluffy, about three minutes. This incorporates air for a tender texture.
Step 2: Add egg yolks and extracts
Beat in egg yolks, vanilla extract, and almond extract if using. Mix until well combined and smooth.
Step 3: Add dry ingredients
In a separate bowl, whisk together flour and salt. Gradually add to the butter mixture, mixing on low speed until just combined. Don’t overmix.
Step 4: Chill if needed
If the dough feels too soft to handle, cover and refrigerate for thirty minutes. Otherwise, proceed to shaping.
Step 5: Prepare for baking
Preheat oven to 350°F. Line baking sheets with parchment paper. Place chopped nuts in a shallow bowl if using.
Step 6: Shape cookies
Roll dough into one-inch balls. If using nuts, roll each ball in chopped nuts to coat. Place balls two inches apart on prepared baking sheets.
Step 7: Make thumbprints
Use your thumb or the back of a round half-teaspoon measuring spoon to press a deep indentation into the center of each cookie. The indentation should be about halfway down into the dough.
Step 8: Bake partially
Bake for eight minutes. Remove from oven and re-press the indentations if they’ve puffed up. They often do during initial baking.
Step 9: Add jam and finish baking
Fill each indentation with about half a teaspoon of jam. Return to oven and bake for four to six more minutes, until edges are lightly golden.
Step 10: Cool
Let cookies cool on baking sheet for five minutes, then transfer to a wire rack to cool completely. The jam will set as it cools.
This jam thumbprint cookies recipe creates beautiful, delicious treats that look impressive but are wonderfully simple to make. The combination of buttery cookie and sweet jam never goes out of style!