

The first time I made a smores ice cream cake, it was for a backyard summer party where the weather had turned too hot and windy to actually light a campfire. My kids were devastated — they had been looking forward to toasting marshmallows all week. So I made a deal with them: no campfire tonight, but something even better tomorrow. I stayed up late assembling this frozen beauty in our springform pan, layering graham cracker crust, chocolate ice cream, hot fudge, marshmallow, and toasted marshmallow topping into something that captured every single flavor of a classic s’more — just cold, creamy, and sliceable. When I brought it to the table the next evening, the kids completely forgot about the campfire. That dessert became a family legend, and it’s been on repeat every summer since.
Why You’ll Love It
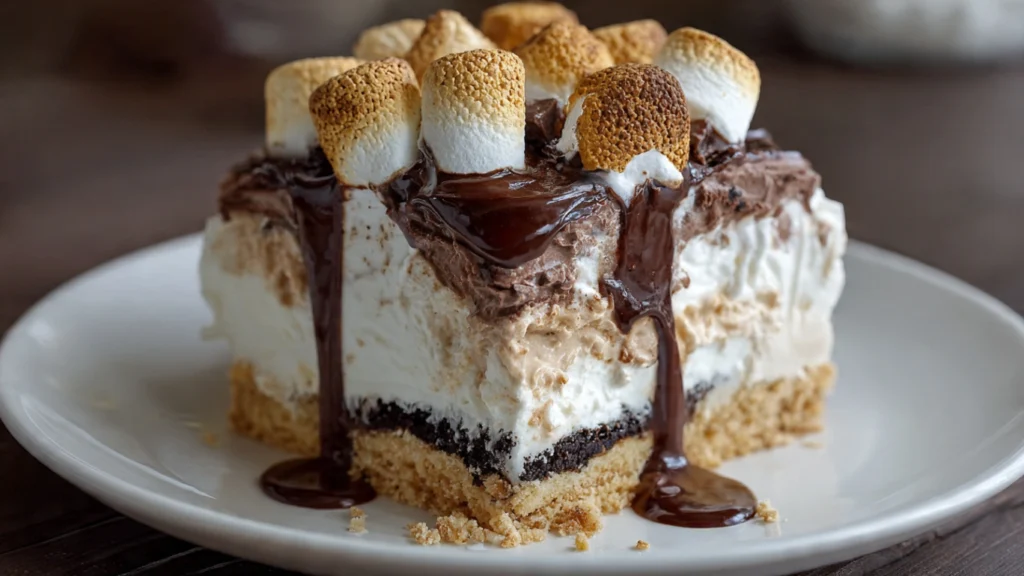
This smores ice cream cake takes everything magical about sitting around a campfire and turns it into a spectacular frozen dessert that feeds a crowd with almost no stress. You get the buttery crunch of a graham cracker crust, the deep richness of chocolate ice cream, the gooey pull of hot fudge, and the pillowy sweetness of toasted marshmallow topping — all in one gorgeous, layered slice. There’s no baking involved beyond a quick broiler step to toast the marshmallow top, which takes about two minutes and makes the whole thing look like it came from a specialty dessert shop. It’s make-ahead friendly, endlessly impressive, and loved by kids and adults equally.
What Is It?
A smores ice cream cake is a frozen layered dessert inspired by the classic campfire treat — graham crackers, chocolate, and toasted marshmallow — reimagined as a cold, creamy, sliceable cake. The base is a thick, buttery graham cracker crust packed with a little brown sugar for extra depth. On top of that sits a generous layer of chocolate or fudge ripple ice cream, followed by a ribbon of thick hot fudge sauce. The next layer is a smooth vanilla or marshmallow ice cream filling, and the whole thing is crowned with a cloud of marshmallow cream or marshmallow fluff that gets briefly toasted under the broiler for that authentic, campfire-charred finish. Every bite delivers the full s’mores experience without a single stick or flame required.
Common Mistakes to Avoid
Skipping the freeze between layers. With any frozen layered dessert, patience is the most important ingredient. If you add the next layer before the previous one is solid, everything blends together into a soft, formless mess. Budget 45 minutes to an hour of freeze time between each layer — your future self will thank you.
Using marshmallow cream straight from the jar without chilling it. Marshmallow cream is very soft at room temperature. If you spread it over the ice cream without letting it set briefly in the freezer first, it will slide and mix with the layer beneath it. Chill it for 20 minutes after spreading before you do the broiler step.
Getting too close with the broiler. When toasting the marshmallow topping, keep the rack about 6 inches from the broiler element and watch it every single second. Marshmallow goes from perfectly golden to fully burnt in under 30 seconds. Never walk away during this step.
Not pressing the crust firmly enough. A loose graham cracker crust crumbles when sliced and makes it impossible to get a clean, beautiful piece. Press it down with real force using the bottom of a flat-bottomed glass or measuring cup. Pack every corner.
Cutting while fully frozen. A completely rock-solid cake is hard to slice cleanly and can crack. Let your smores ice cream cake rest on the counter for 8–10 minutes before cutting. Use a sharp knife run under warm water and wiped dry between each slice.
How to Know It’s Done
Because this is a frozen dessert, “done” means fully set and frozen solid from the very bottom crust to the top marshmallow layer. Before the broiler step, press the center of the cake firmly — it should feel completely hard with zero give or softness. After toasting the marshmallow topping and returning the cake to the freezer for its final set, the top should be firm and the toasted sections should have set in place. The minimum total freeze time for a smores ice cream cake is 6 hours, but an overnight freeze gives you the cleanest, most structurally perfect slices. If you’re unsure, give it another hour — it’s always better to over-freeze than to cut into a cake that isn’t ready.
What to Serve With It
This dessert is a full experience on its own, but a few extras make it feel even more celebratory. A side of warm hot fudge sauce in a small pitcher lets guests drizzle as much as they want over their slice. A plate of whole graham crackers alongside adds a fun, interactive crunch element. Fresh strawberries or raspberries on the plate provide a bright, tart contrast to all that rich sweetness. If you’re serving this at a summer party, mini chocolate bars and extra toasted marshmallows scattered on the serving platter make a beautiful presentation that leans fully into the s’mores theme. For adults, a small scoop of salted caramel ice cream on the side is an absolutely wonderful addition.
Storage Tips
In the freezer: Once fully assembled and the marshmallow topping has been toasted and re-frozen, wrap the cake tightly in plastic wrap followed by a layer of aluminum foil. Stored this way, your smores ice cream cake will keep well in the freezer for up to 10 days. Beyond that, the marshmallow topping can start to weep and become icy.
After slicing: Press plastic wrap directly against any exposed ice cream on the cut edge of the remaining cake before re-wrapping. This prevents ice crystals from forming and keeps the texture smooth and creamy for the next serving.
Do not store in the refrigerator: The fridge is too warm and will soften and collapse the structure of the cake. It lives in the freezer until about 10 minutes before serving — always.
Toasting tip for make-ahead: If you’re making this several days in advance, you can toast the marshmallow topping the day before serving for the best texture and appearance.
Estimated Nutrition (Per Slice, Based on 12 Servings)
- Calories: ~445
- Total Fat: 21g
- Saturated Fat: 12g
- Carbohydrates: 58g
- Sugar: 42g
- Protein: 5g
- Sodium: 295mg
Note: These figures are estimates and will vary based on ice cream brands and exact ingredient quantities used.
Recipe Overview
- Prep Time: 30 minutes
- Broil Time: 2 minutes
- Freeze Time: 6 hours minimum (overnight preferred)
- Total Time: 6 hours 32 minutes
- Difficulty: Easy — beginner-friendly with no baking required
- Servings: 12 slices
Ingredients
For the Graham Cracker Crust:
- 2½ cups graham cracker crumbs (about 18 full graham cracker sheets, crushed)
- 2 tablespoons packed brown sugar
- ½ teaspoon cinnamon
- 6 tablespoons unsalted butter, melted
For the Ice Cream Layers:
- 1.5 quarts chocolate fudge or dark chocolate ice cream, slightly softened
- 1.5 quarts vanilla bean or marshmallow ice cream, slightly softened
For the Fudge Ribbon:
- ¾ cup hot fudge sauce, warmed until just pourable then cooled to room temperature
For the Marshmallow Topping:
- 2 jars (7 oz each) marshmallow cream or marshmallow fluff
- Optional: 1 cup mini marshmallows scattered on top before broiling for extra texture
For Garnish:
- 4 full graham cracker sheets, broken into pieces
- 2 tablespoons chocolate syrup for drizzling
- Crushed graham crackers for sprinkling
Step-by-Step Instructions
Step 1: Prepare the Pan
Line a 9-inch springform pan with plastic wrap, pressing it as smoothly as possible across the bottom and up the sides. Lightly coat the plastic wrap with non-stick cooking spray. Place the lined pan in the freezer while you prepare the crust — starting with a cold pan helps everything set faster and keeps the base firm right from the beginning.
Step 2: Make the Graham Cracker Crust
Crush the graham crackers into fine, even crumbs using a food processor, or place them in a large sealed zip-top bag and crush with a rolling pin until no large pieces remain. Transfer the crumbs to a bowl and add the brown sugar, cinnamon, and melted butter. Stir until every crumb is evenly coated and the mixture clumps together when pressed. Remove the pan from the freezer, pour the crumb mixture in, and press it down firmly using the flat bottom of a measuring cup or drinking glass. Work from the center outward, pressing into every corner and edge. The crust should be packed tightly and completely even. Freeze for 30 minutes until set.
Step 3: Add the Chocolate Ice Cream Layer
Remove the chocolate ice cream from the freezer about 12 minutes before you need it, allowing it to soften just until spreadable — not melted. Once the crust is frozen solid, spoon large dollops of softened chocolate ice cream over it and spread into an even, smooth layer with a rubber spatula. Work gently to avoid disrupting the crust beneath. Smooth the top completely flat. Return the pan to the freezer and freeze for a full hour until the chocolate layer is completely firm.
Step 4: Add the Hot Fudge Ribbon
Warm the hot fudge sauce until pourable, then allow it to cool to room temperature — it should be spreadable but not warm enough to melt the ice cream beneath. Once the chocolate layer is frozen solid, pour the cooled fudge over it and spread into a thin, even ribbon using the back of a spoon or an offset spatula. Every bite of your smores ice cream cake deserves that ribbon of rich fudge running through it. Return the pan to the freezer for 20–30 minutes until the fudge is set and firm.
Step 5: Add the Vanilla Ice Cream Layer
Soften the vanilla or marshmallow ice cream the same way — about 12 minutes on the counter. Once the fudge ribbon is frozen, add the vanilla ice cream layer and spread it smooth and even over the top. This is your final ice cream layer, so take a moment to make it as flat and level as possible — it’s the surface your marshmallow topping will sit on. Return to the freezer and freeze for at least 1 hour until completely solid.
Step 6: Add the Marshmallow Topping
Spoon both jars of marshmallow cream over the frozen vanilla layer. Using an offset spatula or the back of a large spoon, spread it into a thick, even cloud that covers the entire top of the cake. Scatter mini marshmallows over the surface if using. Return the cake to the freezer for 20 minutes to allow the marshmallow layer to firm up slightly before broiling.
Step 7: Toast the Marshmallow Top
Position your oven rack about 6 inches below the broiler element and preheat the broiler to high. Remove the cake from the freezer — keep it in the springform pan for stability. Slide it under the broiler and watch it constantly. Within 60–90 seconds, the marshmallow top will begin to turn golden and develop beautiful charred spots. The moment it looks toasted to your liking, pull it out immediately. Do not walk away — this step happens fast.
Step 8: Final Freeze and Serve
Return the cake to the freezer immediately after broiling and freeze for a final minimum of 4 hours, or overnight. When ready to serve, let the smores ice cream cake rest at room temperature for 8–10 minutes. Release the springform ring, peel back the plastic wrap, and decorate the top with broken graham cracker pieces and a drizzle of chocolate syrup. Slice with a warm, sharp knife and serve while that toasted marshmallow top is still showing off its gorgeous golden color.
Every slice is a campfire memory — no fire required.


