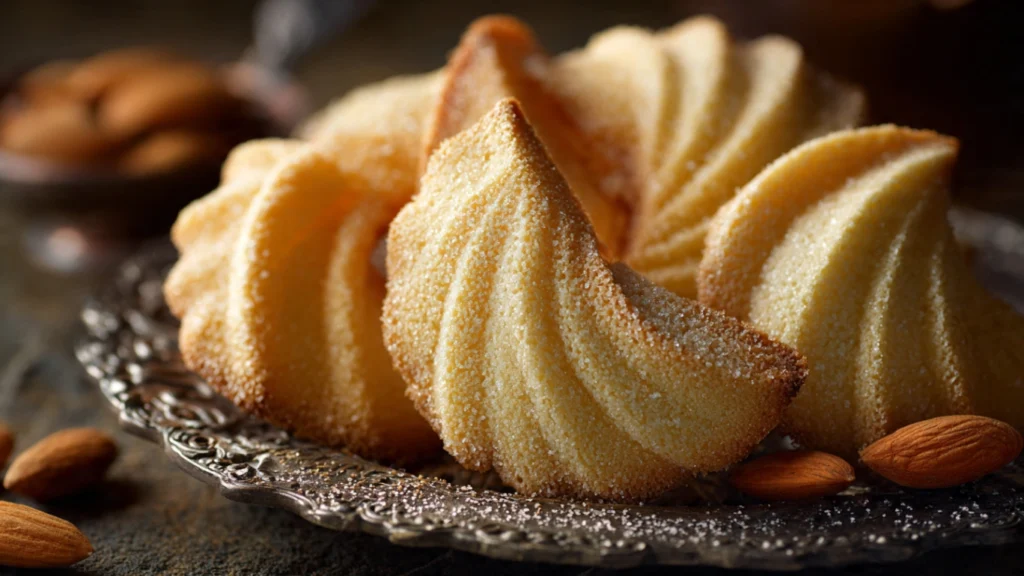

The first time I saw tuiles at a fancy restaurant, I was fascinated by their elegant curved shape resting beside a scoop of vanilla ice cream. The waiter explained they were French cookies named after roof tiles. When I bit into one, the delicate crispness and subtle almond flavor impressed me so much that I had to learn to make them. I assumed they required advanced pastry skills, but when I finally tried, I discovered that tuiles are surprisingly simple—just a thin batter spread and baked. The only trick is shaping them while they’re still warm and pliable. Now this tuiles recipe is my secret weapon for making any dessert look professionally plated.
Why You’ll Love This Tuiles Recipe
These elegant French cookies require just five basic ingredients and come together in minutes, yet they look incredibly sophisticated and professional. The delicate, crispy texture provides a wonderful contrast to creamy desserts like ice cream, mousse, or panna cotta. Their curved shape isn’t just beautiful—it also makes them perfect for serving alongside desserts or filling with whipped cream or fruit. Despite their fancy-restaurant appearance, tuiles are actually quite forgiving to make once you understand the technique. They’re naturally gluten-friendly when made with almond flour, and the recipe easily adapts to different flavors like citrus zest, cocoa, or vanilla. The batter can be made ahead and refrigerated, making last-minute baking simple. They’re also incredibly versatile in presentation—shape them into cups, cigarette rolls, or classic curves depending on your needs. A small batch yields about twenty cookies, perfect for entertaining without overwhelming leftovers.
What Are Tuiles?
Tuiles are thin, crispy French cookies traditionally shaped into curves that resemble the clay roof tiles found throughout the French countryside. The name “tuile” literally means “tile” in French. These delicate cookies are made from a simple batter of egg whites, sugar, butter, flour, and often almonds, which spreads very thin during baking to create a lacy, delicate cookie. The key characteristic of tuiles is that they’re shaped while still hot from the oven, when they’re pliable and flexible. As they cool, they harden into crispy, elegant forms. Traditional tuiles are curved over a rolling pin, but they can also be shaped into cups, cigarette rolls, or cones depending on how you mold them. They’re classic French patisserie items often served alongside refined desserts or with coffee. Their impressive appearance belies their simple preparation, making them favorites of home bakers who want restaurant-quality presentation.
Common Mistakes to Avoid
Several pitfalls can affect the success of your tuiles recipe. The most common mistake is spreading the batter unevenly, which creates cookies with thin spots that burn while other areas remain underdone. Take time to spread the batter into perfect circles of uniform thickness. Baking too many at once is another frequent error—you need to shape each cookie while it’s hot and pliable, which means working quickly. Bake only three or four at a time so you can shape them before they cool and harden. Not letting the baking sheet cool completely between batches causes the batter to spread too much before it even goes in the oven. Some people also wait too long to shape the cookies, and once they cool and harden, it’s too late—they’ll crack if you try to bend them. Conversely, trying to shape them when they’re too hot can burn your fingers. Using the wrong temperature or baking time is another issue—these delicate cookies go from perfect to burnt in seconds, so watch carefully. Finally, storing them in a humid environment causes them to lose their signature crispness and become soft and chewy.
How to Know They’re Done
Perfectly baked tuiles have distinct visual characteristics. The cookies should be golden brown around the edges with a lighter golden color in the center. They shouldn’t have any pale or translucent spots, which indicate underbaking. The entire surface should look set and dry, not wet or shiny. The edges will darken first, so watch them carefully—once the edges are golden brown, check the centers. Total baking time is typically six to eight minutes, but this varies significantly by oven, so always watch rather than relying solely on time. The cookies should smell nutty and toasty, not burnt. When you remove the baking sheet from the oven, the cookies will still be soft and flexible for about thirty to sixty seconds before they begin to firm up. This brief window is your opportunity to shape them. Once shaped and cooled, they should be completely crisp and snap easily when bent. Any softness indicates they need more baking time.
What to Serve With Tuiles
These elegant cookies are incredibly versatile and elevate any dessert presentation. They’re classic accompaniments to ice cream, sorbet, or gelato, adding textural contrast to creamy frozen desserts. Serve them alongside mousse, panna cotta, or custard for refined plated desserts. They’re perfect with fresh berries and whipped cream for a simple but impressive finish. Tuiles shaped into cups can hold fruit salad, ice cream, or chocolate mousse for individual servings. At afternoon tea, arrange them on a platter with other delicate cookies and petit fours. They pair beautifully with espresso or coffee as a light after-dinner treat. Some restaurants serve them with cheese courses, as their subtle sweetness complements aged cheeses nicely. For casual entertaining, break them into shards and use as garnish on top of cakes, cupcakes, or puddings. They’re also delicious simply enjoyed with hot tea or coffee. Their neutral flavor profile means they complement rather than compete with other dessert components.
Storage Tips
Proper storage is essential for maintaining the delicate crispness of tuiles. Once completely cool, store them immediately in an airtight container at room temperature for up to five days. Don’t wait—even a few hours of exposure to air can make them soft, especially in humid environments. Layer them carefully with parchment paper to prevent breakage. Never refrigerate tuiles, as the moisture in the refrigerator will make them soggy. If they do lose their crispness, you can refresh them by placing them on a baking sheet in a 300°F oven for about three to five minutes, then letting them cool. This re-crisps them beautifully. Tuiles don’t freeze well once baked, as they become soft and lose their delicate texture when thawed. However, the unbaked batter can be refrigerated for up to three days, making it easy to bake fresh cookies whenever needed. In very humid climates, tuiles are best enjoyed the same day they’re made, as they quickly absorb moisture from the air and lose their signature crunch.
Estimated Nutrition Information
Per tuile: Approximately 45 calories, 2g fat, 6g carbohydrates, 5g sugar, 1g protein. These delicate cookies are meant to be enjoyed in moderation as elegant accompaniments.
Recipe Overview
Prep Time: 15 minutes
Cook Time: 8 minutes per batch
Total Time: 45 minutes
Difficulty: Moderate
Yield: Makes about 20 tuiles
Ingredients
- 2 large egg whites, at room temperature
- 1/2 cup granulated sugar
- 1/4 cup all-purpose flour
- 1/4 cup unsalted butter, melted and cooled slightly
- 1/4 cup sliced almonds (optional)
- 1/2 teaspoon vanilla extract
- Pinch of salt
Step-by-Step Instructions
Begin this tuiles recipe by preheating your oven to 350°F. Line a baking sheet with parchment paper or a silicone baking mat. The non-stick surface is important for these delicate cookies.
In a medium mixing bowl, whisk the egg whites and sugar together until well combined and slightly frothy, about one minute. You’re not trying to whip them into peaks—just mix them thoroughly.
Add the vanilla extract and salt, whisking to combine. Sift the flour over the egg white mixture and gently fold it in with a rubber spatula until no streaks of flour remain.
Pour in the melted, cooled butter and fold gently until completely incorporated. The batter should be smooth and have the consistency of heavy cream. If adding sliced almonds, fold them in now.
Using a tablespoon, drop about one tablespoon of batter onto the prepared baking sheet. Using the back of the spoon or a small offset spatula, spread the batter into a thin circle about three to four inches in diameter. The thinner you spread it, the crispier the final cookie will be. Make sure the circle is as even as possible.
Repeat with two or three more circles, spacing them at least two inches apart. Don’t bake more than four at a time—you need to shape them quickly while they’re hot, and working with too many becomes overwhelming.
Bake for six to eight minutes, watching carefully, until the edges are golden brown and the centers are light golden. The exact timing depends on your oven and how thin you spread the batter.
The moment you remove the baking sheet from the oven, work quickly. Let the cookies cool for about fifteen to thirty seconds—just until you can handle them without burning yourself but while they’re still very pliable.
Using a thin spatula, carefully lift one cookie and drape it over a rolling pin, wine bottle, or similar curved object. Press gently to create the classic curved shape. Hold for about ten seconds until it begins to set, then carefully transfer to a wire rack to cool completely.
Repeat with the remaining hot cookies. If one hardens before you can shape it, return the baking sheet to the oven for ten to fifteen seconds to soften it again.
Let the baking sheet cool completely before spreading more batter and baking the next batch. Repeat until you’ve used all the batter.
Your elegant tuiles are now ready to serve! These delicate, crispy cookies add a professional touch to any dessert plate. Whether you’re serving them with ice cream, using them as edible garnishes, or simply enjoying them with coffee, these beautiful French cookies never fail to impress. The combination of their delicate crunch, subtle almond flavor, and graceful curves makes them a sophisticated addition to your baking repertoire.