
I learned to bake from my mom, and her vanilla cake recipe was legendary in our neighborhood. Every birthday party, bake sale, and potluck featured that same beautiful cake with its tender crumb and pure vanilla flavor. When I went to college, I called her in tears after my first attempt turned out dense and rubbery. She laughed gently and said, “Honey, you probably overmixed it. Baking is chemistry, not a workout.” She walked me through it again over the phone, and suddenly everything clicked. That second attempt came out perfect—fluffy, moist, and fragrant. Now, twenty years later, I’m still using her vanilla cake recipe, and I’ve taught my own daughter to make it. There’s something magical about a simple, well-made vanilla cake that no fancy flavors can replace.
Why You’ll Love This Vanilla Cake Recipe
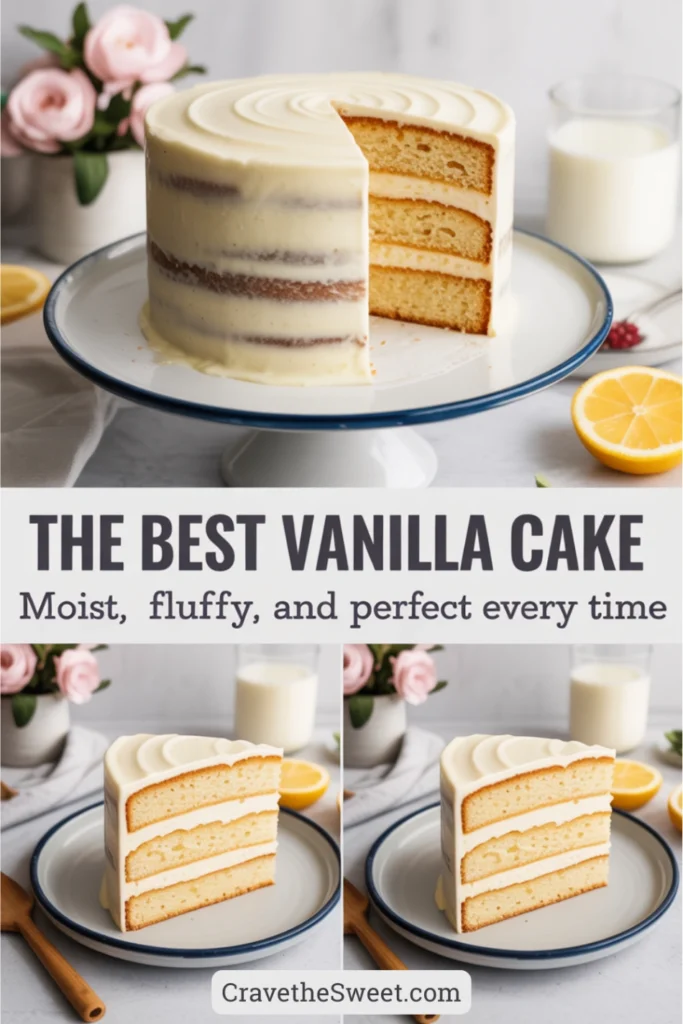
This vanilla cake recipe delivers consistent, bakery-quality results every single time. You’ll love how the cake is incredibly moist without being heavy, with a tender crumb that literally melts in your mouth. The pure vanilla flavor shines through beautifully, making it the perfect canvas for any frosting or filling you can imagine. Unlike some recipes that require unusual ingredients, this one uses basic pantry staples you probably already have.
The method is straightforward and forgiving, perfect for beginners while still being reliable enough that experienced bakers return to it again and again. It bakes up with a level top, making frosting and decorating much easier. The texture stays soft for days, meaning you can bake ahead without sacrificing quality. Whether you’re making a simple sheet cake, elegant layer cake, or festive cupcakes, this recipe adapts beautifully. Best of all, it tastes like childhood memories and celebration—the kind of cake that makes people close their eyes and smile with that first bite.
What Is a Vanilla Cake?
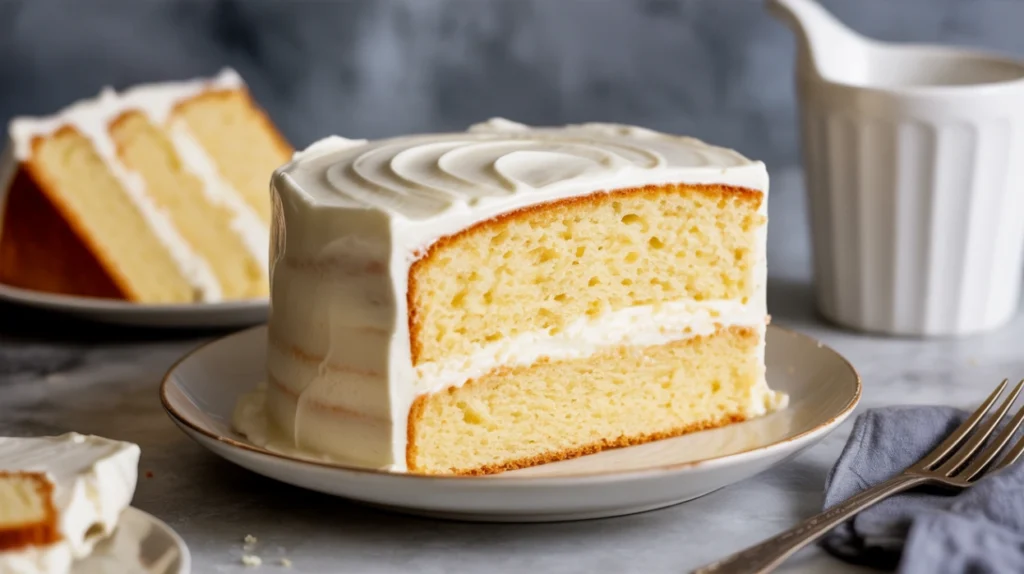
A vanilla cake is a classic butter cake flavored primarily with vanilla extract, creating a sweet, delicate flavor that’s universally loved. Unlike white cake, which uses only egg whites, this vanilla cake recipe uses whole eggs for a richer taste and golden-hued crumb. The base is what bakers call a “creaming method” cake, where butter and sugar are beaten together until fluffy, creating tiny air pockets that make the cake light and tender.
The beauty of vanilla cake lies in its simplicity and versatility. It’s the foundation of countless celebrations—birthdays, weddings, anniversaries, and casual weekend treats. The flavor profile is sweet but not overwhelming, with warm vanilla notes that complement rather than compete with frostings and fillings. Traditional vanilla cake has a fine, even crumb and a soft, moist texture that stays tender even when refrigerated.
What sets a great vanilla cake recipe apart is the balance of ingredients. The right ratio of butter creates richness, while proper amounts of leavening agents provide lift without making the cake taste artificial or chemical. Quality vanilla extract is essential—it’s the star of the show, so don’t skimp on it. This isn’t just a blank slate for frosting; it’s a delicious cake that’s wonderful even on its own with just a dusting of powdered sugar.
Common Mistakes to Avoid
Even with a reliable vanilla cake recipe, certain mistakes can affect your results. The most common error is using cold ingredients. Butter, eggs, and milk should all be at room temperature, around 65-70°F. Cold ingredients don’t combine properly, creating a dense, uneven texture. Take everything out of the fridge about an hour before you start baking.
Overmixing the batter after adding flour is another frequent problem. Once flour hits liquid, gluten starts developing. Too much mixing creates a tough, chewy cake instead of a tender one. Mix only until you can’t see dry flour streaks—some small lumps are perfectly fine. Using the wrong type of flour matters too. This vanilla cake recipe calls for all-purpose flour; cake flour makes it too delicate, while bread flour makes it tough.
Not measuring ingredients accurately causes inconsistent results. Baking is precise chemistry. Scoop your flour incorrectly, and you could add 25% more than the recipe calls for, resulting in a dry, dense cake. Always spoon flour into your measuring cup and level it off, or better yet, use a kitchen scale. Opening the oven door repeatedly during baking is tempting but harmful. Every time you peek, you release heat and can cause the cake to sink in the middle.
Finally, many bakers don’t properly prepare their pans. Even with nonstick pans, you need to grease and flour them well. Some bakers line the bottom with parchment paper for insurance. Skipping this step often results in cake stuck stubbornly to the pan, ruining your beautiful creation when you try to remove it.
How to Know Your Vanilla Cake Is Done
Determining doneness correctly ensures perfect texture with this vanilla cake recipe. Start checking at the minimum baking time. The top should be golden brown and spring back when you gently press the center with your finger. If your fingerprint stays indented, it needs more time. The edges should just be starting to pull away from the sides of the pan—not dramatically, just a tiny gap.
The toothpick test is your most reliable indicator. Insert a wooden toothpick or cake tester into the center of the cake. It should come out clean or with just a few moist crumbs clinging to it. If you see wet batter, keep baking and check again in 3-5 minutes. Be careful not to mistake a crumb for wet batter—crumbs are fine, but shiny, gooey batter means it’s underdone.
Listen to your cake too. When it’s nearly done, the baking sounds quiet down. Earlier in baking, you might hear bubbling and sizzling. When those sounds stop, that’s a good indicator it’s close to ready. The cake should look set across the entire surface, not jiggly in the middle.
Your kitchen will fill with the most amazing vanilla and butter aroma when the cake is almost done. Trust your senses—if it smells perfectly baked, looks golden, and passes the toothpick test, it’s ready. Remember that carryover cooking continues for a few minutes after you remove it from the oven, so slightly underdone is better than overbaked. An overbaked vanilla cake becomes dry and crumbly, while a properly baked one stays moist and tender.
What to Serve With Vanilla Cake
The versatility of this vanilla cake recipe means it pairs wonderfully with countless accompaniments. Classic buttercream frosting is traditional and delicious—vanilla, chocolate, or cream cheese all work beautifully. For something lighter, try fresh whipped cream with berries. Strawberries, raspberries, or blueberries add color and a tart contrast to the sweet cake.
Chocolate ganache turns this simple cake into an elegant dessert worthy of special occasions. The rich chocolate complements the delicate vanilla perfectly. Lemon curd between layers creates a bright, tangy surprise that’s refreshing and sophisticated. For casual gatherings, dust the top with powdered sugar and serve with vanilla ice cream and hot fudge sauce.
Coffee and tea are perfect beverage pairings. The cake’s not-too-sweet flavor makes it ideal for afternoon tea service. Cold milk is always a hit, especially with children. For adult celebrations, consider serving it with champagne, dessert wine, or even coffee liqueur.
During different seasons, adapt your accompaniments. In summer, serve it with fresh peaches and cream. In fall, add caramel sauce and toasted pecans. Winter calls for peppermint frosting and chocolate shavings, while spring is perfect for pastel-colored frostings and edible flowers. The neutral flavor profile of this vanilla cake recipe makes it the ultimate blank canvas for creativity.
Storage Tips
Proper storage keeps your vanilla cake fresh and delicious for days. Once completely cooled, unfrosted cake can be wrapped tightly in plastic wrap and stored at room temperature for up to three days. Make sure it’s wrapped well to prevent it from drying out. If your kitchen is very warm or humid, refrigerate it instead.
Frosted cake should be stored in an airtight container or cake keeper. Buttercream-frosted cakes can stay at room temperature for two days, but cakes with cream cheese frosting, whipped cream, or custard fillings must be refrigerated. When refrigerating, let the frosting set first, then cover loosely with plastic wrap to avoid damaging your decoration. Before serving refrigerated cake, let it sit at room temperature for 30-60 minutes to restore the tender texture and full flavor.
This vanilla cake recipe freezes exceptionally well. Wrap unfrosted cake layers tightly in plastic wrap, then add a layer of aluminum foil. Freeze for up to three months. Thaw overnight in the refrigerator, still wrapped, to prevent condensation from making the cake soggy. You can also freeze frosted cakes using the same method, though the frosting may need minor touch-ups after thawing.
For best results, freeze cake layers separately before assembling and frosting. This approach gives you flexibility to defrost only what you need and ensures the freshest possible final product. Many bakers actually prefer working with frozen layers because they’re sturdier and easier to frost without crumbs getting into the frosting.
Estimated Nutrition Information
Per serving (based on 12 servings, unfrosted): Approximately 290 calories, 12g fat, 41g carbohydrates, 4g protein, 70mg cholesterol, 200mg sodium. These values will vary based on specific ingredients used and whether you add frosting or other toppings. This vanilla cake recipe creates a special treat meant to be enjoyed as an occasional indulgence within a balanced diet.
Recipe Overview
Prep Time: 20 minutes
Cook Time: 30 minutes
Total Time: 50 minutes
Difficulty: Easy
Servings: 12
Ingredients
For the cake:
- 2 3/4 cups all-purpose flour
- 2 1/2 teaspoons baking powder
- 1/2 teaspoon salt
- 1 cup unsalted butter, softened to room temperature
- 1 3/4 cups granulated sugar
- 4 large eggs, room temperature
- 1 tablespoon vanilla extract
- 1 cup whole milk, room temperature
Step-by-Step Instructions
Step 1: Prepare Your Workspace
Preheat your oven to 350°F. Grease two 9-inch round cake pans with butter or cooking spray, then dust them lightly with flour, tapping out any excess. For extra insurance, line the bottoms with circles of parchment paper. Bring all your ingredients to room temperature if you haven’t already. This step is crucial for the success of this vanilla cake recipe.
Step 2: Mix Dry Ingredients
In a medium bowl, whisk together the flour, baking powder, and salt until well combined. Set this aside. Whisking ensures even distribution of the leavening agents, which helps your cake rise uniformly.
Step 3: Cream Butter and Sugar
In a large mixing bowl, beat the softened butter with an electric mixer on medium speed for about one minute until smooth and creamy. Gradually add the sugar and continue beating for 3-4 minutes until the mixture is light, fluffy, and pale in color. This creaming process incorporates air, which is essential for a light, tender cake. Don’t rush this step.
Step 4: Add Eggs
Add the eggs one at a time, beating well after each addition. The mixture should look smooth and cohesive after each egg. If it looks slightly curdled, that’s okay—it will come together when you add the flour. Mix in the vanilla extract.
Step 5: Alternate Dry and Wet Ingredients
With your mixer on low speed, add about one-third of the flour mixture to the butter mixture. Mix just until the flour disappears. Pour in half of the milk and mix gently until incorporated. Add another third of the flour mixture, then the remaining milk, and finally the last of the flour. Mix each addition only until just combined. This alternating method is key to achieving the perfect texture with this vanilla cake recipe.
Step 6: Finish the Batter
Stop the mixer and scrape down the sides and bottom of the bowl with a spatula. Give the batter a few gentle folds by hand to ensure everything is evenly mixed. The batter should be smooth, thick, and creamy.
Step 7: Divide and Bake
Divide the batter evenly between your prepared pans. A kitchen scale makes this easy—weigh each pan to ensure equal amounts. Smooth the tops with a spatula. Tap each pan firmly on the counter a few times to release any air bubbles that could create holes in your cake.
Step 8: Bake
Place both pans on the center rack of your preheated oven. Bake for 28-32 minutes, rotating the pans halfway through for even browning. The cakes are done when they’re golden brown, spring back when touched, and a toothpick inserted in the center comes out clean or with a few moist crumbs.
Step 9: Cool
Remove the pans from the oven and let them cool on a wire rack for exactly 10 minutes. Run a knife around the edges to loosen the cakes. Place a wire rack on top of one pan, flip it over, and gently remove the pan. Peel off the parchment paper if you used it. Repeat with the second cake. Let the cakes cool completely before frosting—this takes about an hour.
Step 10: Frost and Serve
Once completely cool, place one cake layer on your serving plate. Spread frosting on top, then add the second layer. Frost the top and sides as desired. This vanilla cake recipe is ready to slice and enjoy!
This vanilla cake has been my trusty companion through countless celebrations and quiet afternoons when I just needed something sweet. The recipe is reliable, the flavor is pure and comforting, and the texture is everything a cake should be. Whether you’re baking for a special occasion or simply because you want cake on a Tuesday, this recipe won’t let you down. Happy baking!


