
When my best friend announced her engagement, she asked if I’d bake her wedding cake. I nearly choked on my coffee. Me? Bake a wedding cake? But she trusted me, and after some panic and a lot of research, I discovered that a wedding cake recipe doesn’t have to be intimidating. It’s essentially a carefully planned vanilla cake made in multiple tiers. I spent weeks practicing, and on her wedding day, that three-tier cake stood proudly on the dessert table. Guests raved about how moist and flavorful it was, and my friend cried happy tears when she cut into it. That experience taught me that with the right recipe and some patience, anyone can create a stunning wedding cake. You don’t need professional training—just confidence and attention to detail.
Why You’ll Love This Wedding Cake Recipe
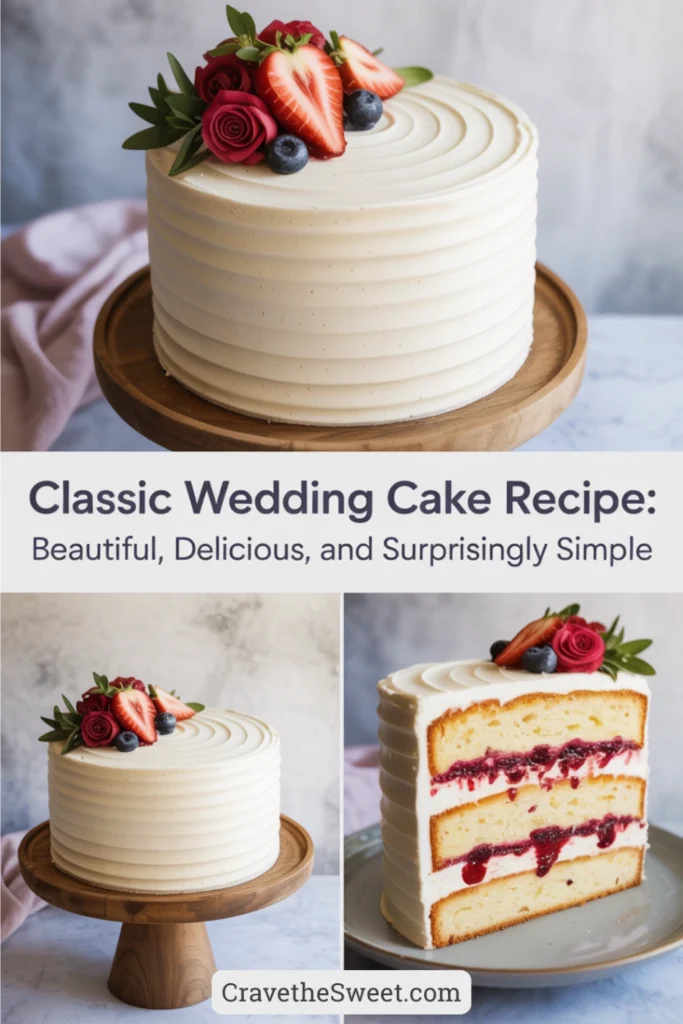
This wedding cake recipe takes the mystery out of creating an impressive tiered cake. You’ll love how it uses a reliable base recipe that you can multiply for different tier sizes, making the math simple. The cake itself is incredibly moist with a fine, tender crumb that holds up beautifully to stacking and decorating. Unlike dense fruitcakes or overly sweet alternatives, this has a delicate vanilla flavor that appeals to almost everyone.
The recipe is designed for stability, which is crucial when working with multiple tiers. The texture is firm enough to support weight without being heavy or dry. You can make the layers ahead and freeze them, spreading the work over several days instead of one stressful marathon session. The flavor actually improves after a day or two, meaning you can bake in advance without sacrificing quality.
This wedding cake recipe is also adaptable—you can keep it simple with classic vanilla or add almond extract, lemon zest, or other flavors to personalize it. The straightforward method means you can focus your creative energy on decoration rather than worrying about whether the cake will turn out. Best of all, you’ll save thousands of dollars compared to ordering from a bakery, and you’ll have the satisfaction of creating something truly meaningful for a special celebration.
What Is a Wedding Cake?
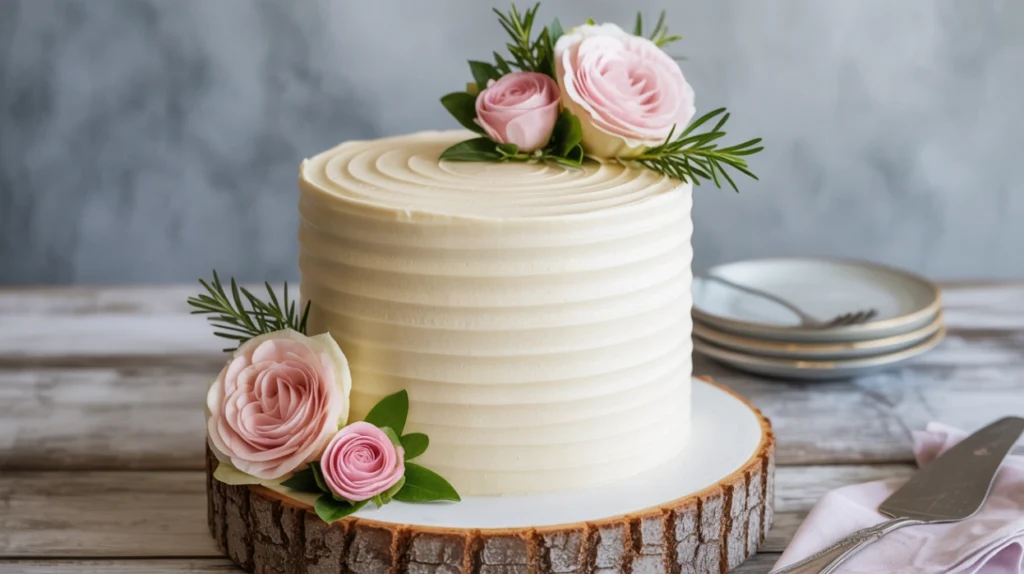
A wedding cake is a tiered cake traditionally served at wedding receptions as a centerpiece dessert. While wedding cakes come in countless styles and flavors, the most traditional version features multiple round tiers of white or vanilla cake stacked on top of each other, frosted with buttercream or fondant, and decorated to match the wedding theme.
This wedding cake recipe creates what bakers call a “white cake” or “bride’s cake”—a moist, tender vanilla-flavored cake with a tight crumb that’s sturdy enough for stacking. The tiers typically decrease in size as they go up, creating a dramatic visual effect. Each tier is usually made of two or three layers of cake with filling between them, then frosted and stacked using support systems like dowels or cake boards.
The tradition of wedding cakes dates back centuries, though they’ve evolved dramatically. Modern wedding cakes prioritize both taste and appearance. This recipe focuses on creating a cake that’s genuinely delicious rather than just decorative. The key difference between a wedding cake and a regular celebration cake is the engineering—wedding cakes must be structurally sound enough to support multiple tiers without collapsing, which requires specific techniques and ingredients.
A typical three-tier wedding cake serves 75-100 people, making it perfect for medium-sized weddings. The beauty of this wedding cake recipe is that you can adjust the number of tiers based on your guest count, scaling up or down as needed.
Common Mistakes to Avoid
Creating a wedding cake involves several potential pitfalls, but knowing them helps you avoid disaster. The biggest mistake is not doing a trial run. Never attempt a wedding cake recipe for the first time on the actual wedding week. Practice at least once to understand timing, quantities, and assembly.
Using the wrong pan sizes causes major problems. Wedding cake tiers have standard sizes—6-inch, 8-inch, 10-inch, and 12-inch are most common. Using pans that are too shallow means your cake won’t have enough height per layer. Professional wedding cake pans are typically 3 inches deep, not the standard 2-inch depth of regular cake pans.
Skipping structural support is dangerous. Each tier except the top needs dowels or straws inserted to bear the weight of the tiers above. Without proper support, your beautiful cake can collapse, creating a wedding day nightmare. Many beginners also make the mistake of not using cake boards between tiers, which are essential for stability and safe transport.
Not accounting for settling time is another error. After stacking, wedding cakes need several hours to settle and stabilize. The frosting firms up, and everything compacts slightly. Stack your cake at least 4-6 hours before the event, not right before serving.
Temperature issues ruin many wedding cakes. If your venue is outdoors or very warm, buttercream can melt. This wedding cake recipe works best with buttercream in climate-controlled environments. For hot weather, consider fondant over buttercream for stability. Finally, many people underestimate transportation challenges. Wedding cakes are delicate and require secure, flat transport in a cool vehicle.
How to Know Your Wedding Cake Is Done
Properly baked layers are crucial for a successful wedding cake recipe. Start checking your layers at the minimum baking time. The tops should be golden brown and spring back when gently pressed in the center. Because wedding cake layers are often thicker than regular cake layers, they take longer to bake—sometimes 40-50 minutes for larger tiers.
Use the toothpick test, but test in multiple spots, not just the center. Insert a toothpick about halfway between the center and the edge. It should come out clean or with just a few moist crumbs. If you see wet batter, continue baking and check every 5 minutes.
The edges of the cake should just be starting to pull away from the pan sides. The surface should look completely set, not jiggly or shiny. Your kitchen will smell amazing—that’s always a good sign. Listen for silence too. When the cake stops making those subtle bubbling sounds, it’s usually close to done.
For larger tiers, consider using an instant-read thermometer. The internal temperature should read 205-210°F when fully baked. This is especially helpful for 10-inch and 12-inch tiers where visual cues are harder to judge. Remember that darker pans conduct heat differently than lighter ones, potentially requiring temperature adjustments or different timing.
What to Serve With Wedding Cake
A wedding cake recipe this delicious deserves thoughtful accompaniments. Traditionally, wedding cake is served with champagne or sparkling wine, creating an elegant pairing for toasts. The bubbles and slight dryness of champagne complement the sweet cake beautifully. Coffee service is also standard at wedding receptions, with both regular and decaf options for guests.
Consider offering a dessert table alongside the wedding cake. Fresh berries like strawberries and raspberries make lovely additions—their tartness balances the sweet frosting. Small dishes of whipped cream or vanilla ice cream can be offered for guests who want extra indulgence.
Some couples serve the wedding cake with dessert wines or cordials. Sweet Moscato or Riesling pairs wonderfully with vanilla cake. Hot tea is another thoughtful option, especially for afternoon or evening receptions. For summer weddings, consider offering sorbet or lemon ice as a palate cleanser alongside the cake.
The traditional first slice goes to the bride and groom, often served with a vintage champagne. Some couples provide flavored syrups or sauces—caramel, chocolate, or berry coulis—so guests can customize their slices. However, with this wedding cake recipe, the cake is so delicious that it truly needs nothing extra. Many guests prefer it plain to fully appreciate the tender crumb and delicate vanilla flavor.
Storage Tips
Proper storage is essential when working with a wedding cake recipe, especially since you’ll likely bake components over several days. Unfrosted cake layers can be wrapped tightly in plastic wrap and stored at room temperature for one day or refrigerated for up to three days. For longer storage, freeze wrapped layers for up to three months.
When freezing, wrap each layer individually in plastic wrap, then add a layer of aluminum foil. Label each package with the tier size and date. Thaw frozen layers overnight in the refrigerator, still wrapped, to prevent condensation from making them soggy. Bring to room temperature before frosting.
Once assembled and frosted, a buttercream wedding cake can stay at cool room temperature for several hours. If your event is more than 6 hours away, refrigerate the finished cake. However, condensation forms when moving a cold cake to a warm room, which can damage your decoration. Plan to move the cake from refrigeration to the venue at least 2-3 hours before serving to allow it to come to temperature gradually.
After the wedding, leftover cake should be refrigerated within 2 hours. The top tier is traditionally saved for the couple’s first anniversary. Wrap it extremely well in several layers of plastic wrap and aluminum foil, then place it in a freezer bag or airtight container. Freeze for up to one year. While the texture may suffer slightly, the tradition remains meaningful for many couples.
Estimated Nutrition Information
Per serving (based on 100 servings for a three-tier cake, including buttercream frosting): Approximately 310 calories, 14g fat, 44g carbohydrates, 3g protein, 65mg cholesterol, 180mg sodium. These values vary based on specific ingredients and decoration choices. Wedding cake is a celebratory treat meant to be enjoyed on special occasions.
Recipe Overview
Prep Time: 3 hours (includes all tiers)
Cook Time: varies by tier size (30-50 minutes per tier)
Total Time: 6-8 hours (spread over 2-3 days recommended)
Difficulty: Intermediate
Servings: 75-100 (for a three-tier cake: 6-inch, 9-inch, and 12-inch)
Ingredients
For each tier, you’ll need to multiply the base recipe. Here’s the base recipe, which makes one 9-inch tier (two layers):
- 3 cups all-purpose flour
- 1 tablespoon baking powder
- 1/2 teaspoon salt
- 1 cup unsalted butter, softened
- 2 cups granulated sugar
- 4 large eggs, room temperature
- 1 tablespoon vanilla extract
- 1/2 teaspoon almond extract (optional)
- 1 1/4 cups whole milk, room temperature
For the buttercream frosting (enough for one tier):
- 1 cup unsalted butter, softened
- 4 cups powdered sugar
- 2 teaspoons vanilla extract
- 3-4 tablespoons heavy cream
- Pinch of salt
Multiply these amounts based on your tier sizes. A 6-inch tier uses about 0.5x the recipe, a 12-inch tier uses about 2x the recipe.
Step-by-Step Instructions
Step 1: Plan Your Timeline
This wedding cake recipe works best when spread over several days. Three days before: bake all cake layers and freeze. Two days before: make buttercream and fill/crumb coat tiers. One day before: final frosting and decoration. Day of: transport and assemble at venue.
Step 2: Prepare Pans
Preheat your oven to 325°F (note: lower temperature for wedding cakes prevents doming). Grease your cake pans generously with butter, line bottoms with parchment paper, then grease the parchment. Dust with flour and tap out excess. This preparation is crucial for this wedding cake recipe to release cleanly.
Step 3: Mix Dry Ingredients
In a large bowl, whisk together flour, baking powder, and salt until well combined. Set aside.
Step 4: Cream Butter and Sugar
In a very large mixing bowl or stand mixer, beat butter on medium speed for 1 minute. Gradually add sugar and beat for 4-5 minutes until light and fluffy. The mixture should be pale and increased in volume.
Step 5: Add Eggs and Flavoring
Add eggs one at a time, beating well after each addition. Mix in vanilla and almond extract. The mixture should look smooth and cohesive.
Step 6: Combine Wet and Dry
With mixer on low, add one-third of the flour mixture. Mix until just combined. Pour in half the milk and mix gently. Continue alternating, ending with flour. Mix only until you can’t see dry flour streaks. Overmixing creates tough cake.
Step 7: Bake the Layers
Divide batter evenly between pans (use a scale for accuracy). Smooth tops with a spatula and tap pans firmly on the counter to release air bubbles. Bake until golden and a toothpick comes out clean—30-35 minutes for 6-inch tiers, 35-40 minutes for 9-inch, 45-50 minutes for 12-inch. Cool in pans for 15 minutes, then turn out onto wire racks to cool completely.
Step 8: Level and Fill
Once cake layers are completely cool (or thawed if frozen), level the tops with a long serrated knife or cake leveler. Place one layer on a cake board, spread with buttercream frosting, then add the second layer. This creates one tier.
Step 9: Crumb Coat
Apply a thin layer of frosting all over each tier. This “crumb coat” traps crumbs and creates a smooth base. Refrigerate for 30 minutes until firm.
Step 10: Final Frosting
Apply a thicker layer of frosting over the crumb coat, smoothing with an offset spatula or bench scraper. Refrigerate until ready to stack.
Step 11: Stack and Assemble
Insert dowels into the bottom and middle tiers to support weight. Cut dowels flush with the cake top. Place cake boards under each tier. Stack carefully, using a bit of frosting to secure each tier. Transport carefully to your venue.
This wedding cake recipe has helped me create cakes for several friends’ weddings now. Each time, I feel that same mix of nervousness and excitement. But when I see the finished cake standing tall and beautiful, and watch guests enjoy slice after slice, it’s worth every moment. You can absolutely do this—take your time, follow the steps carefully, and believe in yourself. Your wedding cake will be both gorgeous and delicious!


