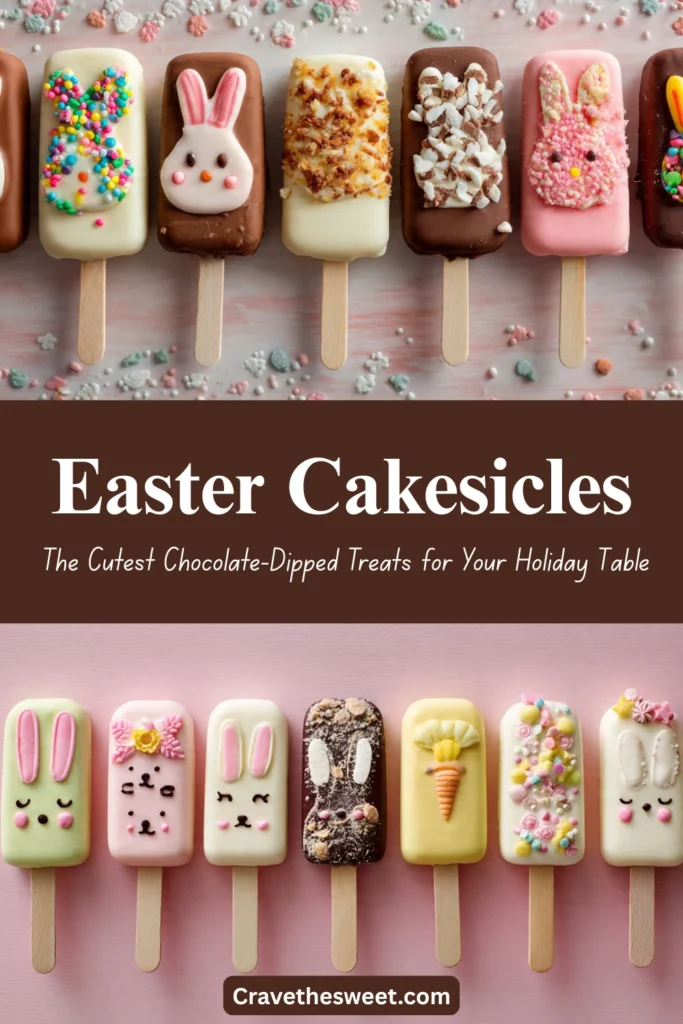
Last Easter, I wanted to make something for our egg hunt celebration that was a little more special than store-bought candy but not so complicated that I’d spend the entire holiday weekend in the kitchen. My daughter had been asking about cakesicles ever since she spotted them at a bakery, so I decided to give them a try with a spring twist. We melted pastel chocolates, filled the molds with crumbled vanilla cake and frosting, and decorated them with little sprinkles and hand-drawn chick faces. They were an absolute hit. Every single kid at the party wanted two, and the adults weren’t far behind. Easter cakesicles have been on our holiday menu ever since.
Why You’ll Love Them
Easter cakesicles are the perfect combination of adorable and delicious. They look like something from a professional bakery but are genuinely approachable for home bakers of any skill level. Kids love helping make them, they photograph beautifully in an Easter basket, and they taste like a rich, fudgy cake pop in popsicle form. You can decorate them as Easter eggs, bunnies, chicks, or spring flowers — the creativity is completely yours. They’re also make-ahead friendly, which is a gift during a busy holiday weekend.
What Are Easter Cakesicles?
Cakesicles are chocolate-shell treats shaped like popsicles, filled with a mixture of crumbled cake and frosting — similar to a cake pop but molded into a flat popsicle shape with a stick. Easter cakesicles put a seasonal spin on this treat using pastel-colored melting chocolate in soft pinks, yellows, lavenders, and mint greens, decorated with Easter-themed designs. The shell is smooth and snappy, the inside is moist and dense like a truffle, and every bite delivers that perfect balance of chocolate shell and sweet cake filling. They’re a wonderful alternative to traditional Easter desserts and make beautiful edible gifts.
Common Mistakes to Avoid
Overfilling the mold. Leave a small gap at the top of the filling so the back chocolate layer seals properly. Overfilled molds won’t close cleanly and the filling will spill out when you unmold them.
Using chocolate that’s too hot. If your melted chocolate is very hot when you coat the mold, it will be too thin and won’t create a thick enough shell. Let it cool slightly until it coats the back of a spoon before using.
Not chilling between steps. Every layer needs to be set before moving on. Rushing through the chilling steps results in shells that crack or filling that oozes out.
Making the filling too wet. Add frosting to your crumbled cake a little at a time. The filling should hold together when pressed but shouldn’t feel sticky or wet — wet filling makes the chocolate shell crack from the inside.
How to Know They’re Done
Your Easter cakesicles are ready to decorate when the chocolate shell feels completely firm and opaque with no soft or tacky spots. When you pop them out of the mold, the surface should be smooth and glossy. The stick should be firmly anchored — give it a very gentle tug, and it shouldn’t shift at all. Once decorated, let all additional chocolate drizzles and designs set completely at room temperature or in the refrigerator for 10 minutes before packaging or serving.
What to Serve With Them
Easter cakesicles shine brightest when tucked into Easter baskets surrounded by Easter grass, arranged on a pastel dessert table alongside sugar cookies and macarons, or served at brunch next to a fresh fruit platter. They pair wonderfully with a glass of cold milk for kids or a cup of hot tea or coffee for adults. For a beautiful display, stand them upright in a shallow dish filled with green-tinted coconut flakes to look like a spring meadow.
Storage Tips
Room temperature: Easter cakesicles can be stored in a cool, dry spot at room temperature for up to 2 days, as long as your home isn’t too warm — chocolate can bloom or soften in heat above 70°F.
Refrigerator: Store in an airtight container in the refrigerator for up to 1 week. Let them come to room temperature for 10–15 minutes before serving for the best texture and flavor.
Freezer: Freeze undecorated cakesicles in a single layer, then transfer to a freezer-safe bag for up to 6 weeks. Thaw overnight in the refrigerator, then decorate before serving.
Estimated Nutrition (Per Cakesicle, Based on 12 Servings)
- Calories: ~285
- Total Fat: 14g
- Saturated Fat: 8g
- Carbohydrates: 38g
- Sugar: 28g
- Protein: 2g
- Sodium: 160mg
Note: Values are estimates and vary based on cake flavor and chocolate brand used.
Recipe Overview
- Prep Time: 30 minutes
- Chill Time: 45 minutes
- Total Time: 1 hour 15 minutes
- Difficulty: Easy to Intermediate
- Servings: 12 cakesicles
Ingredients
For the Filling:
- 2 cups crumbled baked vanilla or funfetti cake (from a box mix or scratch)
- 3–4 tablespoons vanilla buttercream frosting, store-bought or homemade
For the Shell:
- 2 cups pastel candy melts (pink, yellow, lavender, or mint — one color per batch or mixed)
- 1 tablespoon coconut oil or vegetable shortening (to thin the chocolate if needed)
For Decoration:
- White candy melts or white chocolate for drizzling
- Easter-themed sprinkles, sugar pearls, or pastel nonpareils
- Edible markers for drawing designs (optional)
- 12 popsicle sticks
Step-by-Step Instructions
Step 1: Bake and Cool the Cake
Bake your cake according to package or recipe directions and allow it to cool completely. You only need about 2 cups of crumbled cake for this recipe, so this is a perfect use for leftover cake or the inside of a cake that cracked during baking. Once completely cool, crumble the cake into a large bowl until no large chunks remain.
Step 2: Make the Filling
Add buttercream frosting to the crumbled cake one tablespoon at a time, mixing with your hands or a spoon after each addition. Stop when the mixture holds together firmly when you press a small amount between your fingers — it should feel like soft clay, not sticky dough. Roll the filling into a log and refrigerate for 20 minutes to firm up slightly, making it easier to portion into the molds.
Step 3: Melt the Chocolate
Melt your pastel candy melts in a microwave-safe bowl in 30-second intervals, stirring well between each burst, until completely smooth. Add a teaspoon of coconut oil if the chocolate seems thick — you want it fluid enough to coat the mold easily but not so thin it runs straight out. Let it cool for 2–3 minutes before using.
Step 4: Coat the Mold
Using a small spoon or food-safe paintbrush, coat the inside of each cakesicle mold cavity with a generous layer of melted chocolate. Make sure to cover every corner and edge evenly with no thin spots or gaps — this is your shell, so it needs to be thorough. Place the mold in the refrigerator for 8–10 minutes until the chocolate is completely set and firm.
Step 5: Insert the Sticks
Once the first chocolate layer is set, dip the tip of each popsicle stick into the melted chocolate and press it into the designated stick slot in the mold. The chocolate acts as a glue that anchors the stick securely inside the shell. Refrigerate for 5 minutes to set the stick in place.
Step 6: Fill the Molds
Scoop a portion of the cake filling and press it firmly into each chocolate-lined mold cavity. Fill to about ⅛ inch from the top edge — don’t overfill. Press down firmly with your fingertip so there are no air pockets and the filling is completely compact and level.
Step 7: Seal the Back
Spoon enough melted chocolate over the filling to cover it completely and seal the back of each cakesicle flush with the edge of the mold. Smooth with the back of a spoon or offset spatula. Refrigerate for 15–20 minutes until completely firm.
Step 8: Unmold and Decorate
Gently flex the mold to release each Easter cakesicle. They should pop out cleanly with smooth, glossy fronts. Now comes the fun part — decorate! Drizzle contrasting colored chocolate in zigzag patterns, press sprinkles or sugar pearls onto the wet chocolate immediately so they adhere, and use edible markers to draw Easter egg designs, bunny ears, or chick faces. Let all decorations set completely before serving or packaging.
Arrange them in a basket or on a spring platter and watch the Easter magic happen.