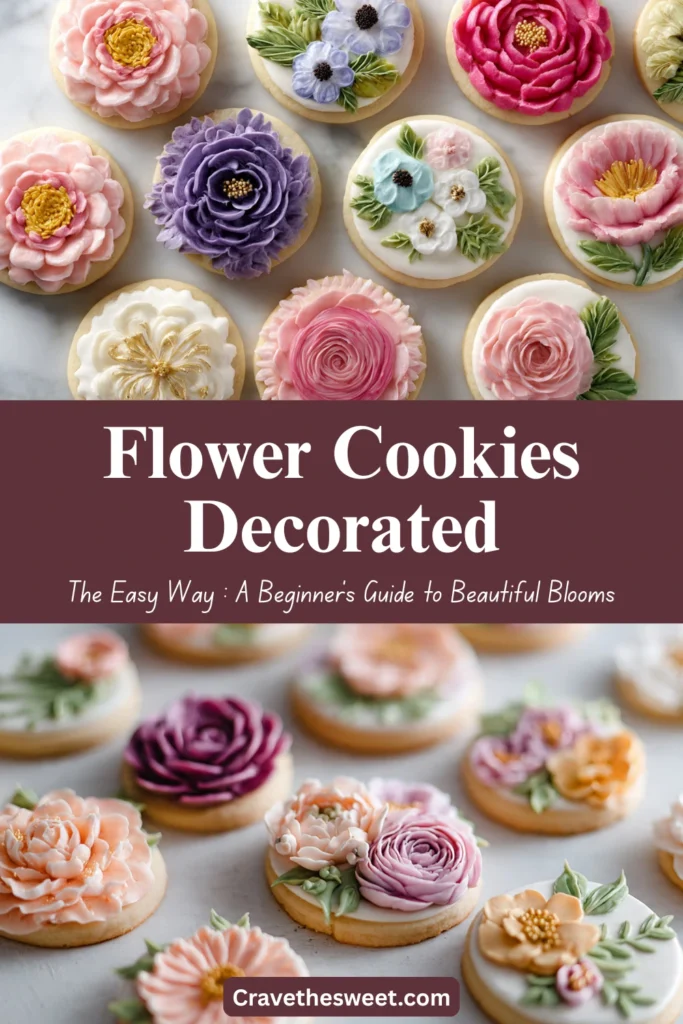
The first time I made flower cookies decorated with royal icing, I was convinced I had ruined them. The petals were uneven, the colors bled together, and one cookie looked more like a blob than a daisy. But here’s the thing — my kids didn’t care one bit. They thought those lopsided flowers were the most magical cookies they had ever seen. That moment stuck with me, and now I make flower cookies decorated for every spring gathering, birthday, and just-because Tuesday.
If you’ve been scrolling past gorgeous cookie art feeling like it’s not something you could pull off at home — this is your sign to try. This guide walks you through everything, from the dough to the decorating, and I promise it’s more approachable than it looks.
Why You’ll Love It
Flower cookies decorated with simple royal icing are one of those projects that feels fancy but doesn’t require fancy skills. The dough comes together in under twenty minutes, and the decorating is genuinely relaxing once you get the hang of it. Kids can join in, you can customize the colors for any season, and they make unforgettable gifts. Plus, there is something truly satisfying about a cookie that looks like a little piece of art you made yourself.
What Is It?
Flower cookies decorated in this style are classic butter or sugar cookies cut into flower shapes, then decorated using royal icing — a simple glaze made from powdered sugar, meringue powder, and water. The icing dries hard and smooth, which makes it perfect for layering colors and adding detail. You can keep things simple with a one-color flood fill, or add petals, dots, and outlines for something more intricate. Either way, the result is cheerful, colorful, and absolutely delicious.
Common Mistakes to Avoid
Even experienced bakers run into a few bumps with flower cookies decorated in royal icing. Here are the ones I see most often:
Icing too thin or too thick. The consistency of your icing is everything. Flooding icing should be like honey — it flows slowly and settles smooth. If it’s too runny, it drips off the edges. Too thick, and it won’t spread evenly.
Skipping the outline step. Always pipe a border around each cookie before flooding with icing. That outline acts like a dam and keeps the icing perfectly in place.
Rushing the drying time. Royal icing needs at least 6 to 8 hours to fully set. If you stack or bag your flower cookies decorated too soon, the icing will smudge or crack.
Not chilling the dough. Cookie dough that hasn’t been properly chilled will spread in the oven, and your flower shapes will lose their crisp edges.
How to Know It’s Done
Your cookies are baked perfectly when the edges are just barely turning a light golden color and the centers look set but not browned. They’ll feel slightly soft when you pull them from the oven — that’s normal. They firm up as they cool. For the icing, a simple touch test tells you everything: if it doesn’t stick to your finger, it’s set.
What to Serve With It
Flower cookies decorated with pastel icing are wonderful on their own, but they pair beautifully with a pot of chamomile or earl grey tea. Set them out at a bridal shower, Mother’s Day brunch, or Easter spread. They also look stunning arranged on a tiered stand with fresh strawberries and mini lemon tarts.
Storage Tips
Store your flower cookies decorated and fully dried in a single layer in an airtight container at room temperature. They keep well for up to one week. If you need to stack them, place a sheet of parchment paper between each layer. Avoid refrigerating decorated cookies — the humidity can make the icing sticky or cause colors to bleed. Undecorated baked cookies can be frozen for up to three months.
Estimated Nutrition (Per Cookie)
| Nutrient | Amount |
|---|---|
| Calories | ~180 kcal |
| Carbohydrates | 26g |
| Fat | 7g |
| Protein | 2g |
| Sugar | 15g |
Nutrition is approximate and will vary based on icing quantity and cookie size.
Recipe Overview
| Detail | Info |
|---|---|
| Prep Time | 25 minutes |
| Chill Time | 1 hour |
| Cook Time | 10–12 minutes |
| Decorating Time | 30–45 minutes |
| Total Time | ~2 hours |
| Difficulty | Beginner-Friendly |
| Servings | 24 cookies |
Ingredients
For the Cookies:
- 2 ¾ cups all-purpose flour
- 1 teaspoon baking powder
- ½ teaspoon salt
- 1 cup (2 sticks) unsalted butter, softened
- 1 cup granulated sugar
- 1 large egg
- 1 teaspoon pure vanilla extract
- ½ teaspoon almond extract (optional but lovely)
For the Royal Icing:
- 3 cups powdered sugar, sifted
- 2 tablespoons meringue powder
- 5–6 tablespoons warm water
- Gel food coloring in your favorite flower shades
Step-by-Step Instructions
Step 1: Make the Cookie Dough In a medium bowl, whisk together the flour, baking powder, and salt. Set aside. In a large bowl, beat the softened butter and sugar together until light and fluffy, about 3 minutes. Mix in the egg, vanilla extract, and almond extract. Gradually add the flour mixture, mixing just until a soft dough forms. Do not overmix.
Step 2: Chill the Dough Divide the dough in half and flatten each portion into a disk. Wrap in plastic wrap and refrigerate for at least one hour, or up to overnight. This step is important for keeping your flower cookies decorated with clean, sharp edges.
Step 3: Preheat and Roll Preheat your oven to 350°F. Line baking sheets with parchment paper. On a lightly floured surface, roll out one disk of dough to about ¼-inch thickness. Use flower-shaped cookie cutters in whatever sizes you like.
Step 4: Bake Place cut cookies onto prepared baking sheets, spacing them about an inch apart. Bake for 10 to 12 minutes, until the edges are just barely golden. Remove from the oven and let cool on the pan for 5 minutes before transferring to a wire rack. Cool completely before decorating.
Step 5: Make the Royal Icing Beat the meringue powder and warm water together until foamy. Add the sifted powdered sugar and beat on medium-high speed for 5 to 7 minutes until thick, glossy, and white. This is your base “outline” consistency. Divide into bowls and tint with gel food coloring.
Step 6: Thin the Flooding Icing For each color, reserve a small portion for outlining. Thin the rest by adding water a few drops at a time until it flows like honey when drizzled. This is your flooding icing.
Step 7: Decorate Your Flower Cookies Pipe an outline around each cookie using the thicker icing and a small round piping tip. Let the outline set for 5 minutes. Then use the thinned flooding icing to fill in the center. Use a toothpick to gently spread it to the edges. While the base is still wet, add dots, swirls, or petal details in a contrasting color. The wet-on-wet technique creates a beautiful blended effect.
Step 8: Let Dry Completely Set your flower cookies decorated with icing aside at room temperature for at least 6 to 8 hours before handling or packaging. Once dry, they’re ready to share — or enjoy all by yourself. No judgment here.
Making flower cookies decorated with royal icing is one of those skills that grows on you quickly. Your first batch might be a little wobbly, but your third batch will look like something from a bakery window. Keep practicing, have fun with colors, and remember — the most important ingredient is the joy you put into every single cookie.