The first time I made these, it was a rainy Saturday afternoon and I had a few pieces of fruit sitting on my counter that needed to be used before they went bad. I didn’t have a specific plan, just a sheet of puff pastry in the freezer and a craving for something sweet. What came out of the oven that day surprised me so much that fruit pastries have become a regular weekend baking project in my house ever since, and now my kids ask for them almost every Sunday morning.
Why You’ll Love It
These pastries are flaky, buttery, and bursting with fresh fruit flavor in every single bite. They look impressive enough for a bakery display, but they’re actually simple enough for beginners to make with just a handful of ingredients and no advanced baking skills required. Because the recipe is so flexible, you can use whatever fruit you have on hand, making it a great way to use up ripe fruit before it goes to waste. They’re also perfect for breakfast, dessert, or an afternoon treat with coffee, and they make any ordinary day feel a little more special.
What Is It?
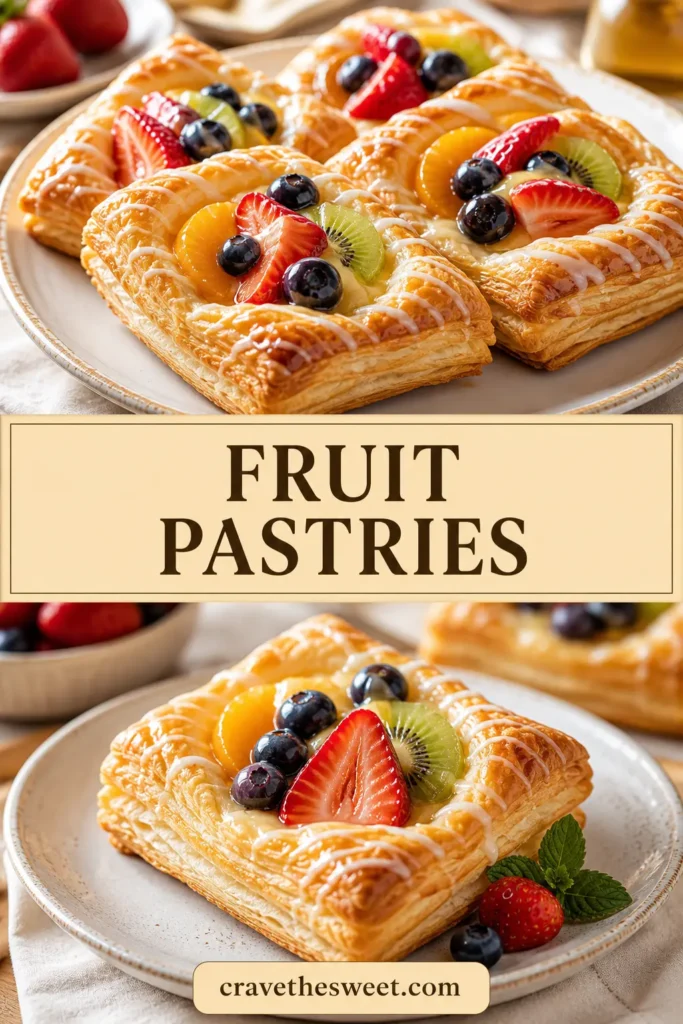
Fruit pastries are small, individual pastries made using a sheet of puff pastry filled with sweetened fruit, then folded or shaped before baking until golden and flaky. The pastry dough puffs up in the oven, creating light, crispy layers that contrast beautifully with the soft, juicy fruit filling tucked inside. They can be made in several shapes, including squares, triangles, or braided strips, and are often finished with a light glaze or a dusting of powdered sugar for extra sweetness and visual appeal. Because the base recipe is so adaptable, no two batches ever have to look or taste exactly the same.
Common Mistakes
One common mistake is using fruit that’s too watery, which can make the pastry soggy instead of crisp and flaky. Draining excess liquid from the fruit or tossing it lightly with a bit of cornstarch can help prevent this issue and keep the layers crisp. Another mistake is overfilling the pastries, which can cause the filling to leak out during baking and prevent the pastry from sealing properly along the edges. It’s also important to keep the puff pastry cold before baking, as warm dough can lose its ability to puff up nicely in the oven, resulting in flatter, denser pastries instead of light, airy ones.
How to Know It’s Done
Your fruit pastries are ready when the pastry turns a deep golden brown and looks crisp and flaky on the outside, with visible layers along the edges. This usually takes about 20 to 25 minutes in the oven, depending on the size of the pastries and how thick the filling is. The fruit filling should look bubbly and slightly thickened, and the bottom of the pastry should feel firm and crisp rather than soft or doughy when gently lifted from the baking sheet with a spatula.
What to Serve With It
These pastries are delicious on their own, but they also pair wonderfully with a cup of coffee or tea for a relaxing breakfast or afternoon snack. A scoop of vanilla ice cream or a dollop of whipped cream can turn them into a more indulgent dessert for evening gatherings. For an extra touch, drizzle a simple powdered sugar glaze over the top just before serving, or add a sprinkle of cinnamon for a warm, cozy flavor.
Storage Tips
Store leftover pastries in an airtight container at room temperature for up to 2 days. For longer storage, keep them in the refrigerator for up to 4 days, though the pastry may lose some of its crispness over time. To refresh them, warm the pastries in the oven for a few minutes before serving, which helps restore some of that flaky texture. These pastries can also be frozen unbaked, then baked straight from the freezer with a few extra minutes added to the baking time, making them a convenient make-ahead option.
Estimated Nutrition (per pastry, approximate)
Calories: 210 Sugar: 12g Fat: 11g Carbohydrates: 24g Protein: 3g
Recipe Overview
Prep Time: 20 minutes Cook Time: 25 minutes Total Time: 45 minutes Difficulty: Easy Servings: 8 pastries
Ingredients
- 1 sheet puff pastry, thawed
- 2 cups fresh or frozen fruit (berries, apples, or peaches work well)
- 1/4 cup sugar
- 1 tablespoon cornstarch
- 1 teaspoon lemon juice
- 1 egg, beaten (for egg wash)
- 1/2 cup powdered sugar
- 1 to 2 tablespoons milk (for glaze)
Step-by-Step Instructions
- Prepare the Fruit Filling In a bowl, combine the fruit, sugar, cornstarch, and lemon juice. Stir gently until evenly coated, and let it sit for a few minutes to release some juice and thicken slightly.
- Preheat the Oven Preheat your oven to 400°F and line a baking sheet with parchment paper for easy cleanup.
- Cut the Pastry Roll out the puff pastry slightly and cut it into even squares or rectangles, depending on your preferred shape and size.
- Add the Filling Spoon a small amount of the fruit filling onto the center of each pastry square, leaving space around the edges for sealing.
- Fold and Seal Fold the pastry over the filling, forming a triangle or rectangle, and press the edges firmly with a fork to seal in the filling completely.
- Apply Egg Wash Brush the tops of each pastry with the beaten egg to help them turn a deep golden brown while baking in the oven.
- Bake Place the pastries on the prepared baking sheet and bake for 20 to 25 minutes, or until golden brown, puffed, and crisp on the outside.
- Cool Slightly Allow the pastries to cool on the baking sheet for a few minutes before transferring them carefully to a wire rack.
- Make the Glaze Whisk together the powdered sugar and milk until smooth, adjusting the consistency with more milk or sugar as needed.
- Glaze and Serve Drizzle the glaze over the warm pastries before serving for an extra touch of sweetness and a beautiful finished look.
These fruit pastries are a wonderful way to turn simple ingredients into something that feels special and homemade without much effort. With their flaky layers and sweet fruit filling, they’re perfect for breakfast, dessert, or anytime you’re craving something a little indulgent. Once you try making them yourself, you’ll likely find endless ways to customize them with your favorite fruits and flavors, turning this simple recipe into a staple in your own kitchen for years to come.