The first time I made a punch bowl cake, it was for my niece’s graduation party, and I honestly threw it together because I didn’t have time to bake anything fancy. I layered cake, pudding, fruit, and whipped topping in an old glass bowl, stuck it in the fridge, and forgot about it until dessert time. By the time I brought it out, half the guests were already asking for the recipe. That’s the funny thing about a punch bowl cake. It looks like it took hours, but it’s one of the simplest desserts you can make.
If you’ve never heard of it before, don’t worry. This treat is forgiving, fun to build, and almost impossible to mess up.
Why You’ll Love It
A punch bowl cake is the kind of dessert that works for almost any occasion, from birthdays to potlucks to lazy Sunday dinners. You don’t need special baking skills, and you don’t need to worry about perfect slices or a cracked top. It’s meant to look a little messy and colorful, which takes all the pressure off. It’s also a great make-ahead dessert since it actually tastes better after chilling for a few hours. On top of that, it’s easy to customize with whatever fruit, pudding flavor, or cake type you already have at home.
What Is It?
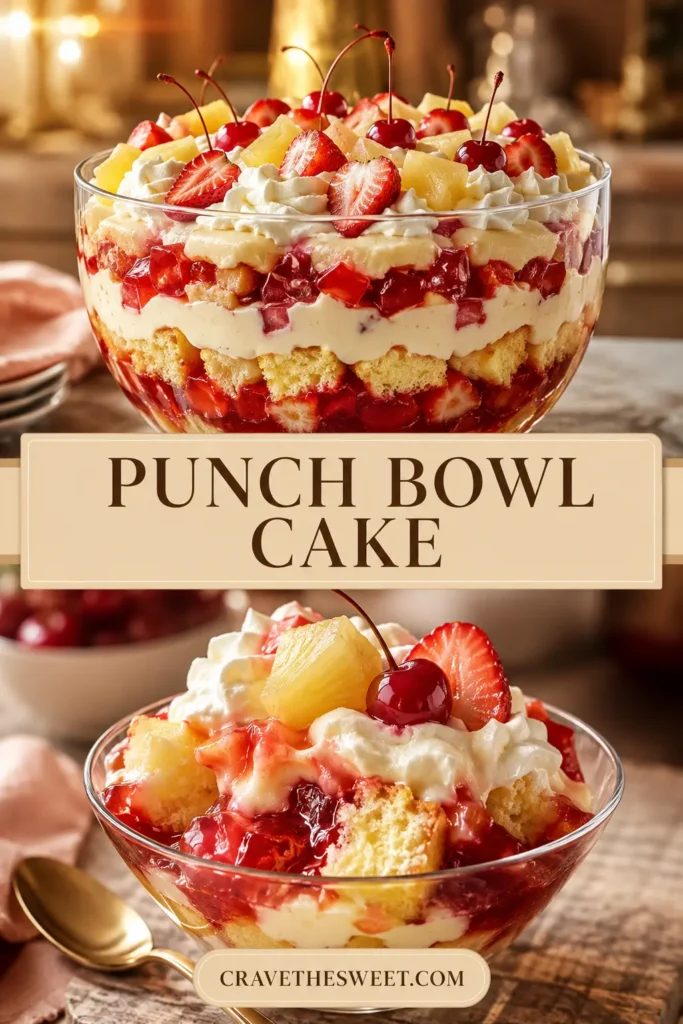
A punch bowl cake is a layered no-bake style dessert made by combining chunks of cake, pudding, fruit, and whipped topping in a large bowl, usually a punch bowl, which is where the name comes from. Instead of frosting a cake the traditional way, you build it in layers inside a clear bowl so you can see all the colorful layers stacked on top of each other. It’s part cake, part trifle, and it’s meant to be scooped out and served in cups or small bowls rather than sliced.
Common Mistakes
One common mistake is using cake that’s still warm. Warm cake will melt the whipped topping and make everything soggy. Always let your cake cool completely before you start layering.
Another mistake is skipping the chill time. A punch bowl cake needs at least a few hours in the refrigerator so the layers can set and the flavors can blend together. If you skip this step, the layers won’t hold their shape when you scoop them.
People also sometimes overmix the pudding, which can make it too thin. Follow the pudding instructions closely so it thickens properly before you add it to the bowl.
Finally, don’t drown the layers in too much liquid, like extra juice from canned fruit. Drain your fruit well so the cake doesn’t turn mushy.
How to Know It’s Done
Since this is a no-bake dessert, “done” really means fully chilled and set. You’ll know it’s ready when the layers look firm rather than runny, and when you can pull out a spoonful and see clean, distinct layers of cake, pudding, fruit, and topping. If the pudding still looks loose or the cake pieces feel wet and mushy, give it more time in the fridge.
What to Serve With It
A punch bowl cake is rich and sweet on its own, so it pairs nicely with something light. Fresh coffee or iced tea works well alongside it. If you’re serving it at a party, a simple fruit platter on the side balances out the sweetness. For a fun touch, add a few extra berries on top right before serving.
Storage Tips
Store your punch bowl cake covered in the refrigerator, and it will stay fresh for about three to four days. Because of the whipped topping and pudding, it should always be kept cold and should not sit out at room temperature for more than two hours. This dessert does not freeze well, since the texture of the pudding and whipped topping changes once thawed, so it’s best enjoyed fresh within a few days.
Estimated Nutrition
Per serving (based on 12 servings): Calories: 320, Fat: 12g, Carbohydrates: 46g, Sugar: 30g, Protein: 3g. These numbers will vary depending on the exact ingredients and brands you use.
Recipe Overview
Prep Time: 25 minutes
Chill Time: 4 hours
Total Time: 4 hours 25 minutes
Difficulty: Easy
Servings: 12
Ingredients
- 1 baked cake (yellow, chocolate, or angel food), cut into cubes
- 2 boxes instant pudding (vanilla or your favorite flavor), prepared
- 2 cans crushed pineapple, drained
- 2 cups sliced strawberries
- 2 cups blueberries
- 1 large tub whipped topping, thawed
- 1/2 cup chopped nuts (optional)
Step-by-Step Instructions
Step 1: Prepare your cake. Bake your chosen cake according to the package or recipe instructions, then let it cool completely. Once cooled, cut it into bite-sized cubes.
Step 2: Make the pudding. Prepare your instant pudding according to the package directions and let it sit in the refrigerator until it thickens slightly.
Step 3: Prep your fruit. Drain the crushed pineapple well, and wash and slice your strawberries. Have your blueberries rinsed and ready.
Step 4: Start layering. In a large glass punch bowl, add a layer of cake cubes across the bottom.
Step 5: Add pudding. Spoon a layer of prepared pudding over the cake, spreading it gently to cover the cake evenly.
Step 6: Add fruit. Sprinkle a layer of pineapple, strawberries, and blueberries over the pudding.
Step 7: Add whipped topping. Spread a layer of whipped topping over the fruit.
Step 8: Repeat the layers. Continue layering cake, pudding, fruit, and whipped topping until you reach the top of the bowl, finishing with a final layer of whipped topping.
Step 9: Garnish. Sprinkle chopped nuts or a few extra berries on top for color and crunch.
Step 10: Chill. Cover the bowl and refrigerate for at least 4 hours, or overnight for best results.
Step 11: Serve. Scoop out generous portions with a large spoon so each serving has all the layers, and enjoy your punch bowl cake with family and friends.