I still remember the first time I attempted a cherry cheesecake recipe for my mom’s birthday. I was nervous, convinced it would crack or turn out rubbery like some of my earlier baking disasters. But that first bite of creamy, tangy cheesecake topped with sweet-tart cherries changed everything. My mom cried happy tears, and I’ve been making this cherry cheesecake recipe every year since. It’s become our little family tradition, and today I’m sharing it with you.
Why You’ll Love It
This cherry cheesecake recipe is everything a dessert should be: rich, creamy, and bursting with fruity flavor. The buttery graham cracker crust adds the perfect crunch, while the smooth filling melts in your mouth. Best of all, this cherry cheesecake recipe doesn’t require any fancy equipment or professional baking skills. If you can mix and bake, you can make this. It’s also a fantastic make-ahead dessert, which means less stress when you’re hosting guests.
What Is It?
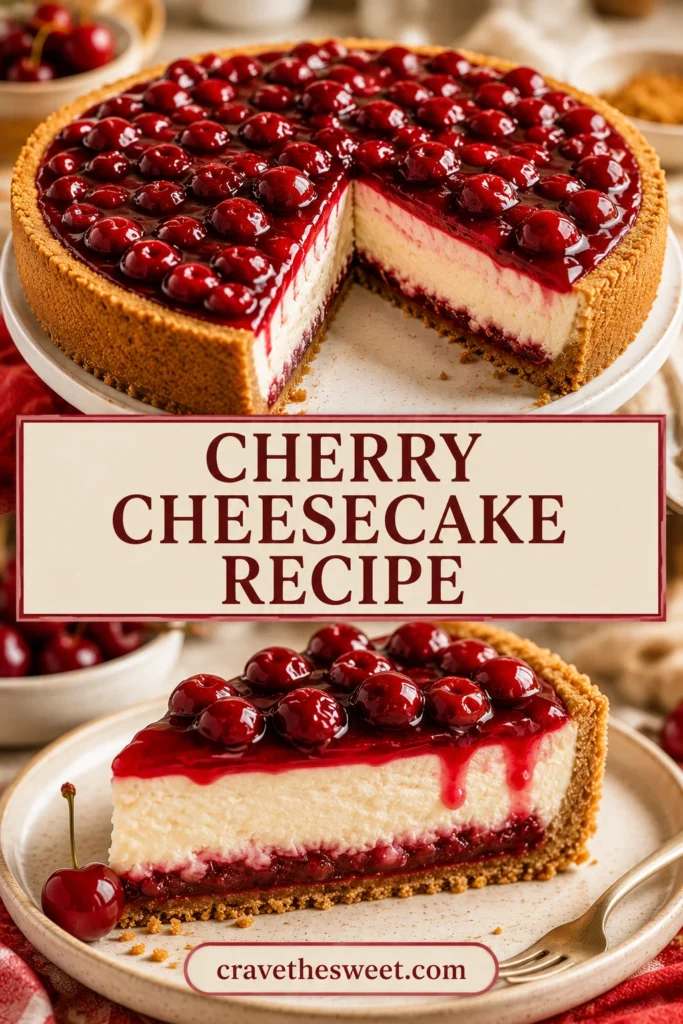
A cherry cheesecake is a classic baked dessert made with a creamy cream cheese filling set on top of a crumbly crust, then finished with a luscious cherry topping. This cherry cheesecake recipe blends the tanginess of cream cheese with the natural sweetness of cherries, creating a balanced flavor that appeals to almost everyone. It’s a timeless dessert perfect for birthdays, holidays, or simply treating yourself on a weekend.
Common Mistakes
Even a simple cherry cheesecake recipe can go wrong if you’re not careful. One common mistake is overmixing the batter, which adds too much air and can cause cracks. Another issue is baking at too high a temperature, which dries out the filling. Using cold cream cheese instead of room temperature can also leave lumps in your mixture. Lastly, skipping the cooling process and rushing to slice the cheesecake too soon can ruin its texture. Patience truly is key with any cherry cheesecake recipe.
How to Know It’s Done
Your cheesecake is ready when the edges are set but the center still has a slight jiggle, almost like gelatin. It will continue to firm up as it cools. Avoid waiting for the center to look completely solid while baking, as this often means it’s overbaked. A gentle wobble in the middle is exactly what you want.
What to Serve With It
This cherry cheesecake recipe pairs wonderfully with a hot cup of coffee or tea. For a more indulgent touch, add a dollop of whipped cream or a drizzle of chocolate sauce. Fresh mint leaves also add a lovely pop of color and freshness. If you’re serving guests, a light fruit salad on the side complements the richness of the cheesecake beautifully.
Storage Tips
Store your cherry cheesecake in an airtight container in the refrigerator for up to five days. If you want to keep it longer, you can freeze individual slices wrapped tightly in plastic wrap for up to two months. Thaw overnight in the refrigerator before serving for the best texture.
Estimated Nutrition (Per Slice)
Calories: 320
Protein: 5g
Carbohydrates: 28g
Fat: 21g
Sugar: 19g
These are approximate values and may vary based on ingredient brands used.
Recipe Overview
Prep Time: 20 minutes
Cook Time: 55 minutes
Chill Time: 4 hours
Total Time: About 5 hours 15 minutes
Difficulty: Beginner-friendly
Servings: 8 slices
Ingredients
For the crust:
- 1 ½ cups graham cracker crumbs
- 5 tablespoons melted butter
- 2 tablespoons granulated sugar
For the filling:
- 24 oz cream cheese, softened
- ¾ cup granulated sugar
- 3 large eggs
- 1 teaspoon vanilla extract
- ½ cup sour cream
For the topping:
- 2 cups fresh or frozen cherries, pitted
- ½ cup sugar
- 1 tablespoon cornstarch
- 2 tablespoons water
- 1 teaspoon lemon juice
Step-by-Step Instructions
Step 1: Prepare the Crust
Preheat your oven to 325°F. In a bowl, mix the graham cracker crumbs, melted butter, and sugar until it resembles wet sand. Press the mixture firmly into the bottom of a 9-inch springform pan. Bake for 8 minutes, then set aside to cool.
Step 2: Make the Filling
In a large mixing bowl, beat the softened cream cheese until smooth and creamy. Add the sugar and mix well. Add the eggs one at a time, mixing gently after each addition. Stir in the vanilla extract and sour cream until fully combined. Avoid overmixing, as this can add too much air to the batter.
Step 3: Bake the Cheesecake
Pour the filling over the cooled crust and smooth the top with a spatula. Place the pan on a baking sheet to catch any drips. Bake for 50 to 55 minutes, or until the edges are set but the center still jiggles slightly. Turn off the oven and let the cheesecake sit inside with the door slightly open for 30 minutes. This helps prevent cracking.
Step 4: Chill
Remove the cheesecake from the oven and let it cool completely at room temperature. Once cooled, cover and refrigerate for at least 4 hours, though overnight is best for the perfect texture.
Step 5: Make the Cherry Topping
In a saucepan, combine the cherries, sugar, and lemon juice over medium heat. Cook until the cherries release their juices, about 5 minutes. In a small bowl, mix the cornstarch and water, then add it to the cherry mixture. Stir continuously until the sauce thickens, about 2 minutes. Remove from heat and let it cool completely.
Step 6: Assemble and Serve
Once the cheesecake is fully chilled, release it from the springform pan. Spoon the cooled cherry topping evenly over the top. Slice with a warm, clean knife for neat servings, wiping the blade between cuts.
And there you have it, a beautiful, homemade cherry cheesecake recipe that’s sure to impress family and friends. Whether it’s for a special celebration or just because you’re craving something sweet, this dessert never disappoints. Enjoy every creamy, fruity bite!