
My father-in-law has played golf every Saturday morning for thirty-seven years without exception. Rain, heat, holidays — the man is on the course. When his seventieth birthday came around last spring, the family wanted to do something truly personal for his celebration cake. I had never attempted golf themed cakes before, but I figured if I could make a layered cake and handle green-tinted frosting, I could pull it off. What came out of my kitchen that afternoon was a two-tiered vanilla cake with a green fondant fairway on top, a little white fondant golf ball sitting beside a toothpick flag, and a chocolate sand trap along one edge. My father-in-law teared up a little when he saw it. For a man who cries at nothing, that was everything. Golf themed cakes are now officially my specialty request at every family celebration.
Why You’ll Love It
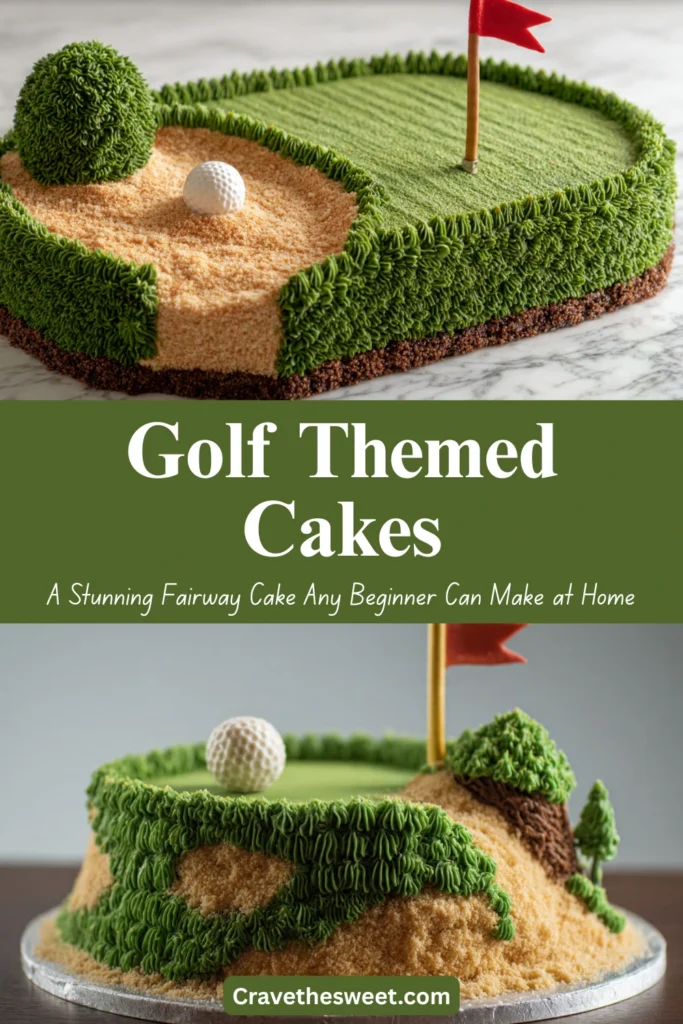
Golf themed cakes are one of the most fun and rewarding decorated cakes you can make at home because the design elements are so recognizable and impactful without requiring advanced skill. The green grass texture, the little white golf ball, the sand trap, the flag — each element is simple to create but together they produce a cake that looks completely intentional, creative, and impressive. This recipe uses a deeply flavorful brown butter vanilla cake with a whipped vanilla Swiss meringue buttercream that tastes as spectacular as it looks. Whether you’re making it for a birthday, Father’s Day, a retirement party, or a golf tournament celebration, this cake guarantees a reaction.
What Are They?
Golf themed cakes are celebration cakes decorated to evoke the look and atmosphere of a golf course — rolling green fairways, sand bunkers, putting greens, golf balls, clubs, flags, and sometimes trees or water hazards. They range from simple one-layer sheet cakes with green-tinted frosting and a few fondant golf balls to elaborate multi-tiered sculptures. This recipe focuses on a beautifully approachable middle ground — a two-layer 8-inch round cake with a smooth green buttercream exterior, a piped grass texture around the base, a fondant putting green on top complete with a flag, a white fondant golf ball, and a chocolate crumb sand trap. It looks professional, photographs magnificently, and requires no special cake decorating tools beyond a piping bag.
Common Mistakes to Avoid
Getting the green color wrong. The signature element of golf themed cakes is that lush, golf course green. Use gel food coloring — not liquid — for a vibrant, true green without altering the frosting consistency. Add the color gradually, mixing thoroughly between additions. Leaf green or juniper gel colors work beautifully for a realistic fairway tone.
Making the fondant decorations the same day. Fondant golf balls, flags, and other decorative elements need 12–24 hours to firm up so they hold their shape on the cake. Make them the day before and let them air dry completely before placing them on the frosted cake.
Overworking the grass piping. The grass border around the base of the cake is created with a simple grass piping tip and short, flicking motions. Less is more — pull each stroke quickly and cleanly. Overworked grass looks clumped and messy rather than lush and natural.
Not leveling the cake layers. A wobbly, uneven cake undermines even the most beautiful decoration. Always trim domed cake layers flat with a serrated knife before stacking. Even golf themed cakes need a solid, level foundation.
How to Know It’s Done
The cake layers are ready when a toothpick inserted in the center comes out completely clean, the tops spring back when gently pressed, and the edges are just beginning to pull away from the sides of the pan. This usually happens between 28 and 32 minutes at 350°F. The completely decorated cake is ready to serve when all buttercream is firm to the touch, the fondant decorations are secure and stable, and the piped grass has set. Refrigerate the finished cake for 20 minutes before moving it to the dessert table for the cleanest presentation and most stable structure.
What to Serve With It
Golf themed cakes look spectacular as the centerpiece of a golf celebration dessert table. Surround it with complementary treats like cake pops decorated as golf balls, green-frosted sugar cookies shaped like golf clubs, and chocolate truffles dusted in white to resemble golf balls. Serve slices alongside vanilla ice cream or fresh whipped cream and seasonal berries. For a Father’s Day or birthday celebration, pair with a signature cocktail — an Arnold Palmer made with fresh lemonade and iced tea is a naturally perfect thematic pairing that guests will love as much as the cake itself.
Storage Tips
Room temperature: The finished golf cake can sit at room temperature for up to 8 hours during a party. Keep it away from direct sunlight or heat, which can soften the buttercream and cause fondant decorations to droop.
Refrigerator: Store covered loosely in plastic wrap or in a large cake box in the refrigerator for up to 4 days. The green buttercream stays vibrant and fresh when refrigerated. Allow slices to come to room temperature for 20 minutes before serving.
Freezer: Unfrosted cake layers freeze beautifully wrapped tightly in plastic wrap and then foil for up to 2 months. Thaw overnight in the refrigerator before assembling, frosting, and decorating.
Estimated Nutrition (Per Slice, Based on 16 Servings)
- Calories: ~475
- Total Fat: 23g
- Saturated Fat: 14g
- Carbohydrates: 63g
- Sugar: 47g
- Protein: 5g
- Sodium: 285mg
Note: Values are estimates and will vary based on frosting quantity and decoration choices.
Recipe Overview
- Prep Time: 40 minutes
- Cook Time: 30 minutes
- Cooling and Decorating Time: 2 hours
- Total Time: About 3 hours 10 minutes
- Difficulty: Intermediate — very achievable for motivated beginners
- Servings: 16 slices
Ingredients
For the Brown Butter Vanilla Cake:
- 1 cup (2 sticks) unsalted butter, browned and cooled to room temperature
- 2½ cups all-purpose flour
- 2 teaspoons baking powder
- ½ teaspoon fine salt
- 1¾ cups granulated sugar
- 4 large eggs, room temperature
- 2 teaspoons pure vanilla extract
- 1 cup whole buttermilk, room temperature
For the Vanilla Swiss Meringue Buttercream:
- 5 large egg whites
- 1¼ cups granulated sugar
- 2 cups (4 sticks) unsalted butter, softened
- 2 teaspoons pure vanilla extract
- Pinch of fine salt
- Leaf green or juniper green gel food coloring
For the Golf Course Decorations:
- 4 oz white fondant (for golf ball and flag pole base)
- 2 oz light green fondant (for putting green circle on top)
- 1 toothpick and small square of white paper for the flag
- ½ cup chocolate cookie crumbs or crushed graham crackers (for sand trap)
- Green sanding sugar (optional, for extra grass texture on top)
- Black edible marker for golf ball dimple details
Step-by-Step Instructions
Step 1: Brown the Butter and Bake the Cake
In a light-colored saucepan, melt both sticks of butter over medium heat, stirring frequently. Continue cooking until the foam subsides, the butter turns golden, and brown bits appear at the bottom with a deep nutty aroma. Pour into a bowl immediately and cool completely. Preheat oven to 350°F. Grease two 8-inch round cake pans and line with parchment. Whisk flour, baking powder, and salt together in a bowl. Beat cooled brown butter and sugar on medium-high for 2 minutes. Add eggs one at a time, beating after each. Add vanilla. Alternate adding flour mixture and buttermilk in three and two additions respectively, beginning and ending with flour. Mix just until combined. Divide between pans and bake 28–32 minutes until a toothpick comes out clean. Cool in pans 10 minutes, then turn out onto wire racks to cool completely.
Step 2: Make the Fondant Decorations (Day Before)
Roll a small piece of white fondant into a smooth, perfectly round ball about 1 inch in diameter for the golf ball. Use a toothpick or the blunt end of a skewer to press small shallow dimples all over the surface in a pattern. Once dry, use a black edible marker to emphasize the dimples slightly. Roll the light green fondant into a flat circle about 3 inches in diameter for the putting green. Press a small hole in the center for the flag. Cut a small triangle from white paper and attach to a toothpick for the flag. Let all fondant pieces air dry uncovered on parchment for 12–24 hours.
Step 3: Make the Swiss Meringue Buttercream
Combine egg whites and sugar in a stand mixer bowl set over simmering water. Whisk by hand constantly until the mixture reaches 160°F and feels completely smooth — no sugar granules between your fingers. Transfer to the stand mixer and whip on high with the whisk attachment until the meringue is very thick, glossy, and the bowl feels completely cool — about 10–12 minutes. Switch to the paddle attachment and add softened butter cubes one at a time on medium speed. The mixture may look curdled or soupy at some point — keep mixing and it will come together into a silky, beautiful buttercream. Add vanilla and salt, beat until smooth. Remove about ¾ cup of plain white buttercream and set aside for any detail work. Tint the remaining buttercream with leaf green gel food coloring, adding gradually and mixing thoroughly until you reach a rich, vibrant golf course green.
Step 4: Level, Fill, and Stack
Use a serrated knife to carefully trim any dome from the top of each cooled cake layer, creating a perfectly flat surface. Place the first layer on your cake board or serving plate. Spread a generous, even layer of green buttercream across the top. Place the second layer directly on top, cut side facing down, and press gently to adhere.
Step 5: Crumb Coat and Chill
Apply a thin, even layer of green buttercream over the entire outside of the cake — top and sides — using an offset spatula. This crumb coat seals in loose crumbs and creates a stable base for your final decorative layer. Refrigerate the crumb-coated cake for 20–25 minutes until completely firm to the touch.
Step 6: Final Frost and Create the Fairway
Apply a generous final layer of green buttercream to the entire cake, smoothing the sides with a bench scraper and the top with an offset spatula. For the top, use a small offset spatula or the back of a spoon to create gentle, sweeping undulations that mimic the rolling texture of a golf fairway — not perfectly smooth, but gracefully contoured. Fit a piping bag with a grass tip and pipe short, flicking strokes of green buttercream around the entire base of the cake to create a lush grass border. Work in rows, pulling each stroke upward and quickly away for natural-looking individual blades.
Step 7: Add the Golf Course Details
Sprinkle the chocolate cookie crumbs or crushed graham crackers in a curved patch on one side of the cake top to create a sand trap bunker — press lightly so they adhere to the buttercream. Position the light green fondant putting green circle on the opposite side of the top. Press the flag toothpick gently into the center hole of the putting green. Place the white fondant golf ball beside the putting green, pressing very slightly into the buttercream so it stays put. Scatter a small amount of green sanding sugar across the top of the cake for extra texture and sparkle.
Stand back, take a photo, and prepare for the golf lover in your life to be completely speechless.


