
There is a very specific kind of craving that hits at around nine o’clock on a weeknight — not hungry enough for a full dessert, but absolutely not willing to go to bed without something warm and chocolatey. For years, my solution was a spoonful of peanut butter over the sink, which is fine but not exactly satisfying. Then a coworker mentioned mug cakes during a lunch break, almost casually, and I went home that evening and made one. Five minutes later I was sitting on my couch with a warm, gooey, perfectly portioned chocolate cake that I had made entirely in a single mug using ingredients I already had in my pantry. It felt like discovering a secret that everyone else had been keeping from me. I have made mug cakes at least twice a week ever since, and I am completely unapologetic about it.
Why You’ll Love It
Mug cakes are the answer to every situation where you want dessert without the commitment of baking a full cake. There’s no mixing bowl to wash, no waiting for an oven to preheat, no portioning, no storing leftovers — just one mug, a fork, a few pantry ingredients, and about sixty seconds in the microwave between you and a warm, tender chocolate cake. They’re endlessly customizable, genuinely delicious when made correctly, and they cost almost nothing to produce. Whether you’re cooking for one, satisfying a late-night craving, or showing a kid the most magical thing a microwave can do, mug cakes deliver every single time.
What Are They?
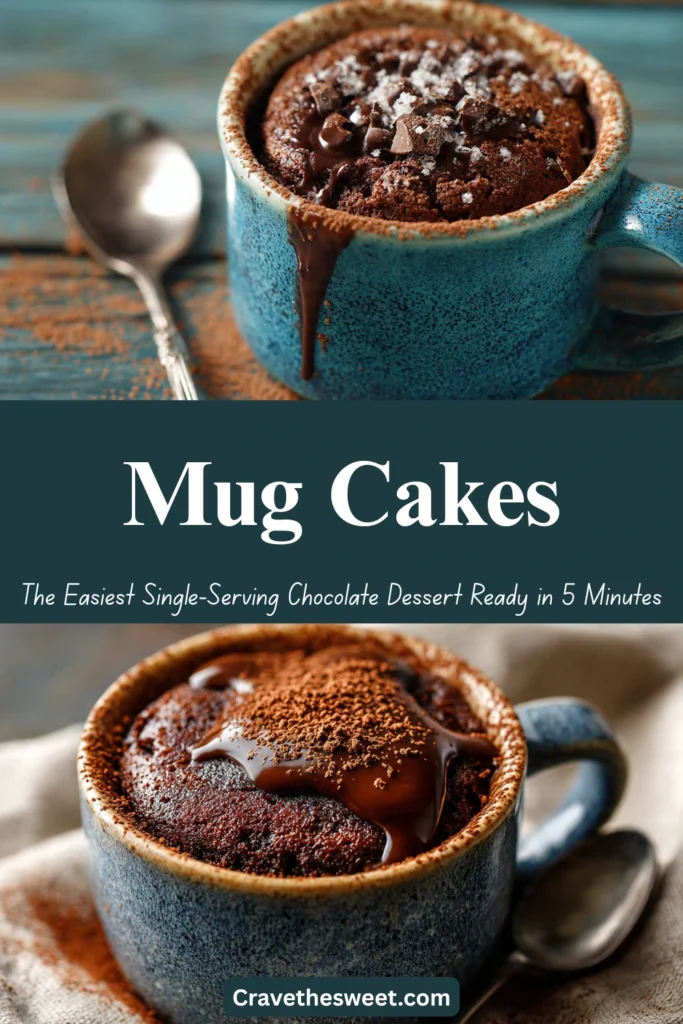
Mug cakes are single-serving cakes made directly in a microwave-safe mug. The batter is mixed right in the mug itself — no separate bowl required — and cooked in a microwave for 60 to 90 seconds. The result is a warm, soft, individually portioned cake with a texture somewhere between a traditional baked cake and a steamed pudding — slightly denser and moister than oven-baked cake, with a tender, almost fudgy center when done correctly. The classic version is chocolate, but mug cakes work beautifully in vanilla, peanut butter, lemon, cinnamon, and even red velvet variations. This recipe focuses on the ultimate classic — a rich, deeply chocolatey mug cake with a molten center achieved by tucking a square of chocolate into the batter before microwaving.
Common Mistakes to Avoid
Overmixing the batter. Stir just until everything is combined and no dry patches remain. Overmixed mug cake batter develops too much gluten and produces a rubbery, tough texture instead of the soft, tender crumb you want.
Using too much flour. Mug cakes are unforgiving with measurements. Even a tablespoon of extra flour makes the cake dry and dense. Use a proper measuring spoon — don’t scoop straight from the bag — and level it off.
Overcooking. This is the single most common mug cake mistake. Start with 60 seconds and check before adding more time. An overcooked mug cake is dry, rubbery, and nothing like the tender, slightly gooey result you’re going for. The center should look just barely set when you pull it out — it continues cooking from residual heat for another 30 seconds or so.
Using a mug that’s too small. The batter rises significantly during cooking. Use a mug with at least a 12-ounce capacity — ideally 14 to 16 ounces — to prevent overflow and a very messy microwave situation.
How to Know It’s Done
A perfectly cooked mug cake will look set and slightly pulling away from the sides of the mug around the edges, while the very center may still look just slightly moist or glossy. Touch the top gently with your fingertip — it should spring back lightly and not feel wet or liquid. If it leaves a wet indent, give it another 10–15 seconds. If the entire top looks dry and matte and the cake has pulled completely away from the mug walls, you’ve gone slightly too long — it will still be edible but drier than ideal. The sweet spot is a top that looks just set with a soft, moist center that becomes perfectly fudgy as it sits for 30–60 seconds after cooking.
What to Serve With It
Mug cakes are wonderful completely on their own, straight from the mug with a fork. But a few easy additions elevate them into something truly special. A small scoop of vanilla ice cream placed directly on top of the warm cake melts into the most perfect sauce. A drizzle of caramel or chocolate syrup adds richness and visual appeal. A spoonful of peanut butter pressed into the top immediately after cooking melts slightly and creates a wonderful flavor combination. Fresh raspberries or sliced strawberries on the side add brightness that cuts through the richness of the chocolate. Freshly whipped cream takes about 30 seconds to add and makes the whole thing feel genuinely indulgent.
Storage Tips
Mug cakes are best eaten immediately. The texture is at its absolute peak the moment it comes out of the microwave — warm, soft, and slightly gooey in the center. As it cools, mug cakes become denser and drier, losing much of their appeal.
Storing baked mug cake: If you must save it, cover the mug with plastic wrap and refrigerate for up to 24 hours. Reheat for 15–20 seconds in the microwave before eating. It won’t be quite as good as fresh, but it’s perfectly acceptable.
Storing unmixed dry ingredients: For the fastest possible mug cake experience, pre-measure the dry ingredients into a small jar or zip-top bag. When craving strikes, just dump them in the mug and add the wet ingredients — ready in under 2 minutes total.
Estimated Nutrition (Per Mug Cake, 1 Serving)
- Calories: ~380
- Total Fat: 18g
- Saturated Fat: 10g
- Carbohydrates: 50g
- Sugar: 32g
- Protein: 6g
- Sodium: 280mg
- Fiber: 3g
Note: Values are estimates and vary based on mix-ins, toppings, and specific ingredient brands.
Recipe Overview
- Prep Time: 3 minutes
- Cook Time: 70 seconds
- Total Time: Under 5 minutes
- Difficulty: Very Easy — absolutely beginner-friendly
- Servings: 1 mug cake
Ingredients
The Base:
- 4 tablespoons all-purpose flour
- 4 tablespoons granulated sugar
- 2 tablespoons good-quality unsweetened cocoa powder
- ¼ teaspoon baking powder
- Pinch of fine salt
- 3 tablespoons whole milk
- 2 tablespoons vegetable oil or melted butter
- ¼ teaspoon pure vanilla extract
- 1 large egg yolk (or 1 small whole egg)
The Secret Center:
- 1–2 squares of dark or milk chocolate, or 1 tablespoon chocolate chips
Optional Mix-Ins (choose one):
- 1 tablespoon peanut butter swirled in before cooking
- 1 tablespoon Nutella dropped into the center
- A few mini marshmallows pressed in after cooking
- 1 teaspoon instant espresso powder added to the dry ingredients for a mocha version
For Serving:
- Vanilla ice cream, whipped cream, chocolate syrup, or fresh berries
Step-by-Step Instructions
Step 1: Choose Your Mug
Select a microwave-safe mug with at least a 12-ounce capacity — 14 to 16 ounces is ideal. The batter will rise during cooking, and a small mug means a messy microwave. Give the inside of the mug a very light spray of non-stick cooking spray or rub a tiny amount of butter around the bottom and sides. This minor step makes the cake release from the mug cleanly and makes eating it considerably easier.
Step 2: Add the Dry Ingredients
Add the flour, sugar, cocoa powder, baking powder, and pinch of salt directly to the mug. Use a fork to whisk these dry ingredients together right in the mug until completely combined with no cocoa clumps remaining. This takes about 20 seconds and ensures the leavening and cocoa are evenly distributed throughout the batter so every bite is consistent.
Step 3: Add the Wet Ingredients
Add the milk, vegetable oil or melted butter, vanilla extract, and egg yolk directly to the dry ingredients in the mug. Stir everything together with a fork until the batter is smooth and completely uniform with no dry pockets of flour or cocoa hiding at the bottom of the mug. Scrape the bottom and sides of the mug with the fork to make sure everything is fully incorporated. The batter will be thick but pourable — similar to a brownie batter consistency.
Step 4: Add the Molten Center
This is the step that transforms good mug cakes into exceptional mug cakes. Press 1–2 squares of good-quality chocolate or a tablespoon of chocolate chips into the center of the batter, pushing them down slightly so they’re just barely submerged. During cooking, these will melt into a warm, gooey molten center that makes the whole experience feel like a restaurant-quality lava cake. If you’re doing the peanut butter variation, drop a tablespoon right on top of the batter and use a toothpick or fork to swirl it in three or four strokes — not fully mixed, just marbled.
Step 5: Microwave
Place the mug in the center of your microwave. Cook on full power for 60 seconds. Stop and check — the edges should look set and pulling away from the mug sides, while the very center should look just barely done or slightly glossy. If the center still looks completely wet and liquid, add 10 seconds at a time, checking after each. Most microwaves land somewhere between 60 and 80 seconds for the perfect result. Remember that the cake continues cooking from residual heat for another 30 seconds after you stop the microwave, so always pull it a touch early rather than waiting for it to look completely done.
Step 6: Rest, Top, and Eat
Let the mug cake rest for 60 seconds — this rest period is when the center finishes setting to that perfect fudgy, molten consistency and the whole cake becomes slightly easier to eat without burning your mouth. Add your toppings immediately while the cake is still warm — ice cream, whipped cream, a drizzle of syrup, a scatter of berries. Eat directly from the mug with a long fork or spoon, right there on your couch, at nine o’clock at night, without apology. This is exactly what mug cakes were made for.


