Last summer, my niece turned seven and refused any birthday cake that wasn’t “the ice cream kind.” I panicked for about five minutes, then realized — wait, I can totally do this. Making ice cream cakes homemade turned out to be one of the most fun and rewarding things I’ve done in my kitchen. No fancy equipment, no pastry school required. Just a few simple ingredients, a little patience, and a freezer that works. The look on her face when she saw that cake? Priceless. Now I make one for almost every celebration, and I’m here to walk you through exactly how to do it.
Why You’ll Love It
Ice cream cakes homemade are everything a store-bought version is — but better. You get to choose every single flavor. Chocolate cake with mint chip ice cream? Done. Vanilla sponge with strawberry swirl? Absolutely. You control the sweetness, the toppings, and the size. Plus, you’ll save a ton of money compared to ordering from a bakery. This dessert is also incredibly make-ahead friendly, which means less stress on party day. Whether it’s a birthday, a summer cookout, or just a Tuesday when you’re craving something special, this recipe delivers every time.
What Is It?
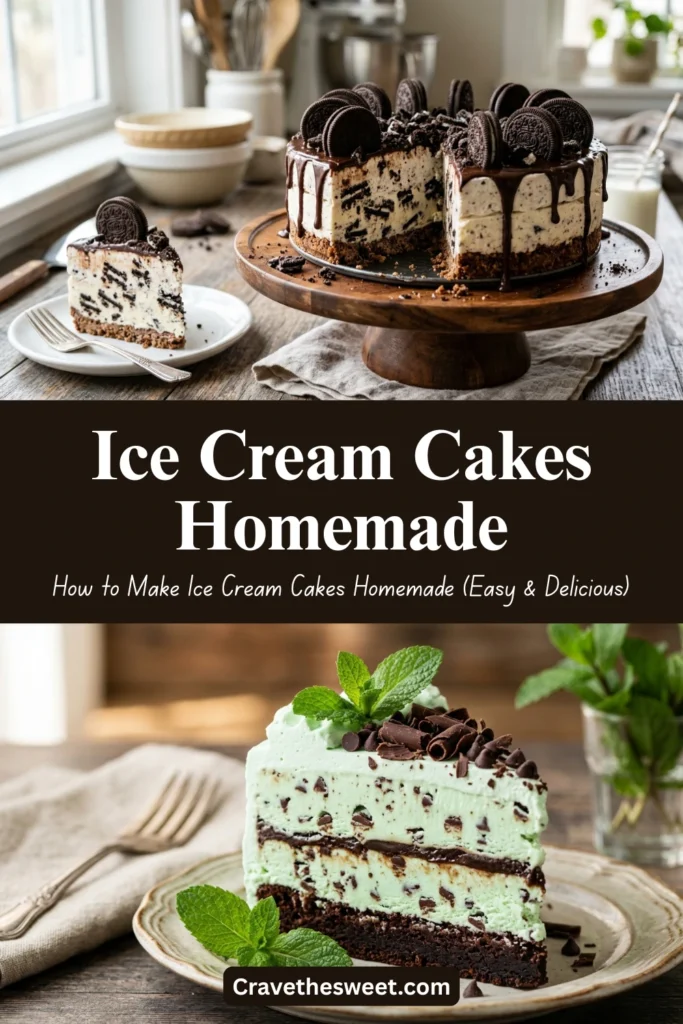
An ice cream cake is exactly what it sounds like — a layered frozen dessert that combines cake with ice cream, usually topped with whipped cream and fun garnishes. The classic version has a layer of chocolate cookie crust or brownie at the base, followed by a thick layer of softened ice cream, sometimes a fudge or ganache ribbon in the middle, and another layer of cake or crust on top. It’s then frozen solid before being frosted and decorated. Ice cream cakes homemade can be made in round springform pans, loaf pans, or even a simple 9×13 baking dish. There’s no single “right” way — it’s all about what works for your occasion and your family’s taste.
Common Mistakes to Avoid
Not softening the ice cream enough. If the ice cream is too hard, it tears the cake layers and creates air gaps. Let it sit at room temperature for about 10–15 minutes before spreading.
Skipping the freezing steps between layers. Each layer needs at least 30 minutes in the freezer before you add the next one. Rushing this leads to a melted, mixed-up mess.
Not lining your pan. Always line your pan with plastic wrap or parchment paper before assembling. This makes it so much easier to lift the cake out cleanly.
Frosting too early. The whipped cream topping should only go on right before serving or no more than an hour before. It can get icy and lose its texture if left in the freezer too long.
Cutting straight from the freezer. Pull the cake out and let it sit for 5–7 minutes before slicing. A warm knife dipped in hot water will give you clean, beautiful slices.
How to Know It’s Done
Your ice cream cake is ready when it’s completely frozen solid all the way through. Give it a gentle press in the center — it should feel firm and unyielding, not soft or squishy. The best approach is to freeze it overnight, or for at least 6 hours. If you’re short on time, 4 hours works, but the layers may not be fully set. You’ll know it’s perfect when you slice into it and see clean, distinct layers that hold their shape.
What to Serve With It
Ice cream cakes homemade are a star on their own, but a few extras can make the moment even more special. Set out a tray of toppings like hot fudge sauce, caramel drizzle, rainbow sprinkles, crushed Oreos, or fresh berries so guests can customize their slices. A scoop of extra ice cream on the side never hurts either. For drinks, cold milk is a classic, but sparkling lemonade or a cold brew coffee pairs beautifully with a rich chocolate version. If you’re serving at a birthday party, mini paper cups of warm fudge sauce on the side are a huge hit with kids and adults alike.
Storage Tips
Once assembled and frozen, your homemade ice cream cake will keep well in the freezer for up to two weeks, as long as it’s tightly wrapped in plastic wrap and stored in an airtight container or covered with foil. Avoid storing it near anything with a strong odor — ice cream absorbs freezer smells easily. If you’ve already added whipped cream frosting, it’s best enjoyed within 3 to 5 days for peak texture and flavor. Don’t refreeze a cake that has already started to thaw significantly — it’s best to slice and serve what you need and return the rest to the freezer promptly.
Estimated Nutrition (Per Slice, Based on 12 Servings)
- Calories: approximately 380–420 kcal
- Fat: 20–24g
- Saturated Fat: 12g
- Carbohydrates: 48–52g
- Sugar: 34g
- Protein: 5–6g
- Sodium: 180–220mg
Note: Nutrition will vary depending on ice cream brand, cake base, and toppings used.
Recipe Overview
| Detail | Info |
|---|---|
| Prep Time | 30 minutes |
| Freeze Time | 6–8 hours (or overnight) |
| Total Time | About 7–9 hours |
| Difficulty | Easy – Beginner Friendly |
| Servings | 12 slices |
Ingredients
For the Crust Layer:
- 2 cups chocolate sandwich cookies, crushed (about 20 cookies)
- 4 tablespoons unsalted butter, melted
For the Ice Cream Layers:
- 1.5 quarts vanilla ice cream, softened (or your flavor of choice)
- 1.5 quarts chocolate ice cream, softened
For the Fudge Ribbon (Optional but Recommended):
- ½ cup hot fudge sauce, slightly cooled
For the Whipped Cream Frosting:
- 2 cups heavy whipping cream
- 3 tablespoons powdered sugar
- 1 teaspoon pure vanilla extract
For Topping:
- Sprinkles, crushed cookies, chocolate shavings, or fresh fruit as desired
Step-by-Step Instructions
Step 1: Prepare the Pan Line a 9-inch springform pan with plastic wrap, leaving extra hanging over the edges. This will help you lift the cake out cleanly later. Set aside.
Step 2: Make the Cookie Crust In a bowl, combine the crushed chocolate cookies with the melted butter and mix until it looks like wet sand. Press this mixture firmly and evenly into the bottom of the prepared pan. Place the pan in the freezer for 15 minutes to set.
Step 3: Add the First Ice Cream Layer Remove your pan from the freezer. Scoop the softened vanilla ice cream onto the crust and spread it into an even layer using a spatula or the back of a spoon. Work quickly but gently. Place the pan back in the freezer and freeze for at least 30–45 minutes until that layer is firm.
Step 4: Add the Fudge Ribbon Once the vanilla layer is firm, drizzle or spread the cooled hot fudge sauce over the top in an even layer. Return the pan to the freezer for another 15 minutes to let the fudge set.
Step 5: Add the Second Ice Cream Layer Spread the softened chocolate ice cream over the fudge layer, smoothing it out to the edges. Place back in the freezer for at least 1 hour.
Step 6: Top with Another Crust Layer (Optional) If you want a top crust, press a second round of cookie crumbs over the chocolate ice cream layer. Freeze again for 30 minutes.
Step 7: Freeze Overnight Cover the pan tightly with plastic wrap and freeze the entire cake for at least 6 hours, or overnight for best results. This is the most important step — do not rush it.
Step 8: Make the Whipped Cream Frosting When you’re ready to serve, beat the heavy whipping cream, powdered sugar, and vanilla extract together with a hand mixer or stand mixer until stiff peaks form. This takes about 3–4 minutes on high speed.
Step 9: Unmold and Frost the Cake Remove the cake from the freezer. Release the springform pan sides and lift the cake using the plastic wrap. Peel away the plastic and place the cake on a serving plate or cake board. Frost the top and sides quickly with the whipped cream.
Step 10: Decorate and Serve Add your favorite toppings right away — sprinkles, cookie crumbles, chocolate drizzle, or fresh berries all look gorgeous. Let the cake rest for 5–7 minutes before slicing with a warm knife. Serve immediately and enjoy every single bite.
Making ice cream cakes homemade is truly one of those kitchen projects that feels impressive but is secretly very simple. Once you make it the first time, you’ll wonder why you ever bought one from a store. Go ahead — pick your favorite flavors and make someone’s day a little sweeter.
How to Make Ice Cream Cakes Homemade: The Ultimate Beginner’s Guide to a Crowd-Pleasing Frozen Dessert
Last summer, my niece turned seven and refused any birthday cake that wasn’t “the ice cream kind.” I panicked for about five minutes, then realized — wait, I can totally do this. Making ice cream cakes homemade turned out to be one of the most fun and rewarding things I’ve done in my kitchen. No fancy equipment, no pastry school required. Just a few simple ingredients, a little patience, and a freezer that works. The look on her face when she saw that cake? Priceless. Now I make one for almost every celebration, and I’m here to walk you through exactly how to do it.
Why You’ll Love It
Ice cream cakes homemade are everything a store-bought version is — but better. You get to choose every single flavor. Chocolate cake with mint chip ice cream? Done. Vanilla sponge with strawberry swirl? Absolutely. You control the sweetness, the toppings, and the size. Plus, you’ll save a ton of money compared to ordering from a bakery. This dessert is also incredibly make-ahead friendly, which means less stress on party day. Whether it’s a birthday, a summer cookout, or just a Tuesday when you’re craving something special, this recipe delivers every time.
What Is It?
An ice cream cake is exactly what it sounds like — a layered frozen dessert that combines cake with ice cream, usually topped with whipped cream and fun garnishes. The classic version has a layer of chocolate cookie crust or brownie at the base, followed by a thick layer of softened ice cream, sometimes a fudge or ganache ribbon in the middle, and another layer of cake or crust on top. It’s then frozen solid before being frosted and decorated. Ice cream cakes homemade can be made in round springform pans, loaf pans, or even a simple 9×13 baking dish. There’s no single “right” way — it’s all about what works for your occasion and your family’s taste.
Common Mistakes to Avoid
Not softening the ice cream enough. If the ice cream is too hard, it tears the cake layers and creates air gaps. Let it sit at room temperature for about 10–15 minutes before spreading.
Skipping the freezing steps between layers. Each layer needs at least 30 minutes in the freezer before you add the next one. Rushing this leads to a melted, mixed-up mess.
Not lining your pan. Always line your pan with plastic wrap or parchment paper before assembling. This makes it so much easier to lift the cake out cleanly.
Frosting too early. The whipped cream topping should only go on right before serving or no more than an hour before. It can get icy and lose its texture if left in the freezer too long.
Cutting straight from the freezer. Pull the cake out and let it sit for 5–7 minutes before slicing. A warm knife dipped in hot water will give you clean, beautiful slices.
How to Know It’s Done
Your ice cream cake is ready when it’s completely frozen solid all the way through. Give it a gentle press in the center — it should feel firm and unyielding, not soft or squishy. The best approach is to freeze it overnight, or for at least 6 hours. If you’re short on time, 4 hours works, but the layers may not be fully set. You’ll know it’s perfect when you slice into it and see clean, distinct layers that hold their shape.
What to Serve With It
Ice cream cakes homemade are a star on their own, but a few extras can make the moment even more special. Set out a tray of toppings like hot fudge sauce, caramel drizzle, rainbow sprinkles, crushed Oreos, or fresh berries so guests can customize their slices. A scoop of extra ice cream on the side never hurts either. For drinks, cold milk is a classic, but sparkling lemonade or a cold brew coffee pairs beautifully with a rich chocolate version. If you’re serving at a birthday party, mini paper cups of warm fudge sauce on the side are a huge hit with kids and adults alike.
Storage Tips
Once assembled and frozen, your homemade ice cream cake will keep well in the freezer for up to two weeks, as long as it’s tightly wrapped in plastic wrap and stored in an airtight container or covered with foil. Avoid storing it near anything with a strong odor — ice cream absorbs freezer smells easily. If you’ve already added whipped cream frosting, it’s best enjoyed within 3 to 5 days for peak texture and flavor. Don’t refreeze a cake that has already started to thaw significantly — it’s best to slice and serve what you need and return the rest to the freezer promptly.
Estimated Nutrition (Per Slice, Based on 12 Servings)
- Calories: approximately 380–420 kcal
- Fat: 20–24g
- Saturated Fat: 12g
- Carbohydrates: 48–52g
- Sugar: 34g
- Protein: 5–6g
- Sodium: 180–220mg
Note: Nutrition will vary depending on ice cream brand, cake base, and toppings used.
Recipe Overview
| Detail | Info |
|---|---|
| Prep Time | 30 minutes |
| Freeze Time | 6–8 hours (or overnight) |
| Total Time | About 7–9 hours |
| Difficulty | Easy – Beginner Friendly |
| Servings | 12 slices |
Ingredients
For the Crust Layer:
- 2 cups chocolate sandwich cookies, crushed (about 20 cookies)
- 4 tablespoons unsalted butter, melted
For the Ice Cream Layers:
- 1.5 quarts vanilla ice cream, softened (or your flavor of choice)
- 1.5 quarts chocolate ice cream, softened
For the Fudge Ribbon (Optional but Recommended):
- ½ cup hot fudge sauce, slightly cooled
For the Whipped Cream Frosting:
- 2 cups heavy whipping cream
- 3 tablespoons powdered sugar
- 1 teaspoon pure vanilla extract
For Topping:
- Sprinkles, crushed cookies, chocolate shavings, or fresh fruit as desired
Step-by-Step Instructions
Step 1: Prepare the Pan Line a 9-inch springform pan with plastic wrap, leaving extra hanging over the edges. This will help you lift the cake out cleanly later. Set aside.
Step 2: Make the Cookie Crust In a bowl, combine the crushed chocolate cookies with the melted butter and mix until it looks like wet sand. Press this mixture firmly and evenly into the bottom of the prepared pan. Place the pan in the freezer for 15 minutes to set.
Step 3: Add the First Ice Cream Layer Remove your pan from the freezer. Scoop the softened vanilla ice cream onto the crust and spread it into an even layer using a spatula or the back of a spoon. Work quickly but gently. Place the pan back in the freezer and freeze for at least 30–45 minutes until that layer is firm.
Step 4: Add the Fudge Ribbon Once the vanilla layer is firm, drizzle or spread the cooled hot fudge sauce over the top in an even layer. Return the pan to the freezer for another 15 minutes to let the fudge set.
Step 5: Add the Second Ice Cream Layer Spread the softened chocolate ice cream over the fudge layer, smoothing it out to the edges. Place back in the freezer for at least 1 hour.
Step 6: Top with Another Crust Layer (Optional) If you want a top crust, press a second round of cookie crumbs over the chocolate ice cream layer. Freeze again for 30 minutes.
Step 7: Freeze Overnight Cover the pan tightly with plastic wrap and freeze the entire cake for at least 6 hours, or overnight for best results. This is the most important step — do not rush it.
Step 8: Make the Whipped Cream Frosting When you’re ready to serve, beat the heavy whipping cream, powdered sugar, and vanilla extract together with a hand mixer or stand mixer until stiff peaks form. This takes about 3–4 minutes on high speed.
Step 9: Unmold and Frost the Cake Remove the cake from the freezer. Release the springform pan sides and lift the cake using the plastic wrap. Peel away the plastic and place the cake on a serving plate or cake board. Frost the top and sides quickly with the whipped cream.
Step 10: Decorate and Serve Add your favorite toppings right away — sprinkles, cookie crumbles, chocolate drizzle, or fresh berries all look gorgeous. Let the cake rest for 5–7 minutes before slicing with a warm knife. Serve immediately and enjoy every single bite.
Making ice cream cakes homemade is truly one of those kitchen projects that feels impressive but is secretly very simple. Once you make it the first time, you’ll wonder why you ever bought one from a store. Go ahead — pick your favorite flavors and make someone’s day a little sweeter.