I still remember how exciting it was the first time I watched pita bread puff up in a hot oven. One minute, I had a simple piece of dough on the baking tray, and a few minutes later, it had turned into a beautiful, soft pocket. It felt like a little bit of baking magic happening right in my kitchen.
Homemade pita bread is much easier to make than many people expect. The ingredients are basic, the dough is simple to work with, and the high heat does most of the magic. Once baked, the bread becomes soft and flexible, making it perfect for filling with your favorite ingredients.
This easy pita bread recipe is beginner-friendly and works wonderfully for lunches, dinners, snacks, and family meals. Whether you fill it with grilled chicken, vegetables, cheese, or a simple salad, fresh homemade pita bread can make an everyday meal feel extra special.
Why You’ll Love It
There are plenty of reasons to make pita bread at home.
First, it requires simple ingredients that are easy to find. You need flour, yeast, water, salt, a little sugar, and olive oil. That is all you need to create soft homemade bread.
The texture is another reason this recipe is so enjoyable. Fresh pita bread is soft, slightly chewy, and flexible. When baked correctly, it can puff into a pocket that is perfect for filling.
Homemade pita bread also tastes wonderfully fresh. You can enjoy it straight from the oven while it is still warm and soft.
Another benefit is that you can make the pita as thick or thin as you prefer. You can roll the dough thinner for a delicate bread or slightly thicker for a softer, chewier texture.
Pita bread is also incredibly versatile. Use it for sandwiches, wraps, dipping, pizza-style flatbreads, or simple snacks.
What Is It?
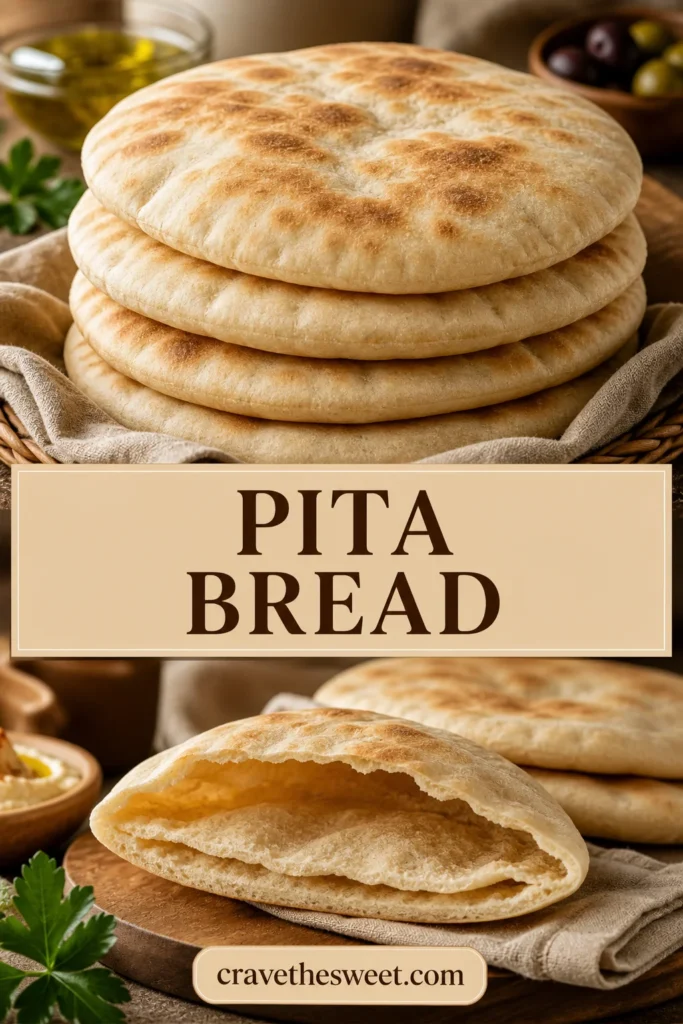
Pita bread is a round, flat bread traditionally made from a simple yeast-based dough. It is known for forming a pocket during baking, although not every pita will puff perfectly every time.
The pocket forms when moisture inside the dough turns into steam in a very hot oven. The steam separates the upper and lower layers of dough, creating an open space inside.
The key to successful pita bread is high heat. A properly heated oven and baking surface help the dough puff quickly.
This recipe creates soft pita bread that can be served warm or stored for later. You can keep the rounds plain or add a light brush of olive oil and herbs after baking.
Recipe Overview
- Prep Time: 25 minutes
- Rise Time: 1 hour
- Cook Time: 8–12 minutes
- Total Time: About 1 hour 40 minutes
- Difficulty: Easy
- Servings: 8 pita breads
- Recipe Type: Flatbread
Ingredients
- 3 cups all-purpose flour
- 2 ¼ teaspoons active dry yeast
- 1 teaspoon granulated sugar
- 1 teaspoon salt
- 1 cup warm water
- 2 tablespoons olive oil
- Extra flour for rolling
Optional Finishing Ingredients
- Olive oil
- Dried parsley
- Sesame seeds
- A pinch of salt
You can use bread flour if you prefer a slightly chewier texture. All-purpose flour works very well for a soft homemade pita bread.
Make sure the water is warm rather than hot. Extremely hot water can damage the yeast.
Step-by-Step Instructions
1. Activate the Yeast
Pour the warm water into a large mixing bowl.
Add the yeast and sugar.
Stir gently and let the mixture sit for about 5–10 minutes.
You should see a light layer of foam develop on top. This is a good sign that the yeast is active.
If there is no foam after several minutes, your yeast may not be active, and the dough may not rise properly.
2. Make the Dough
Add the olive oil and salt to the yeast mixture.
Begin adding the flour gradually.
Mix with a wooden spoon or spatula until a rough dough begins to form.
Once the dough becomes difficult to stir, transfer it to a lightly floured surface.
You may not need every bit of flour, so add it slowly. The dough should be soft and slightly tacky rather than extremely stiff.
3. Knead the Dough
Knead the dough for about 7–10 minutes.
Push the dough forward with the heel of your hand, fold it back, turn it slightly, and repeat.
As you knead, the dough should become smooth and elastic.
If the dough sticks heavily to your hands, add a small amount of flour. Try not to add too much because overly dry dough can produce tough pita bread.
4. Let the Dough Rise
Place the kneaded dough into a lightly greased bowl.
Cover it with a clean kitchen towel or plastic wrap.
Let it rest in a warm place for about 1 hour, or until it becomes noticeably larger.
The dough does not always need to double completely, but it should look soft and puffy.
The rising time may change depending on your kitchen temperature.
5. Divide the Dough
Once the dough has risen, gently press it down to release excess air.
Transfer it to a lightly floured surface.
Divide the dough into 8 equal pieces.
Shape each piece into a small ball.
Cover the dough balls with a clean towel and let them rest for another 10–15 minutes.
This short resting period relaxes the gluten and makes the dough easier to roll.
6. Preheat the Oven
Preheat your oven to 475°F (245°C).
Place a heavy baking sheet, pizza stone, or upside-down sturdy baking tray inside the oven while it heats.
The baking surface needs to become very hot.
High heat is one of the most important parts of making pita bread because it helps create the steam needed for the pocket.
Allow the oven and baking surface to heat thoroughly before you begin baking.
7. Roll the Dough
Take one dough ball and place it on a lightly floured surface.
Roll it into a round about 6–7 inches wide.
Try to keep the thickness even from the center to the edges.
Do not roll the dough extremely thin. A little thickness helps the pita puff properly.
Repeat with the remaining dough balls.
Keep the rolled rounds covered with a clean towel while you work so they do not dry out.
8. Bake the Pita
Carefully place the rolled dough onto the hot baking surface.
Depending on the size of your oven, you may be able to bake two or three at a time.
Bake for about 2–4 minutes on the first side.
You should begin to see bubbles forming.
The pita may puff dramatically and become round like a balloon.
If it does not puff completely, do not worry. It can still be delicious and useful as flatbread.
Flip it if necessary and bake for another 1–2 minutes until lightly golden in spots.
9. Keep the Pita Soft
Remove the baked pita bread from the oven.
Immediately place it inside a clean kitchen towel and cover it.
The trapped steam helps keep the bread soft and flexible.
Repeat with the remaining dough.
Do not leave the finished pita uncovered for a long time because it can dry out quickly.
10. Serve Warm
Once all the pita is baked, serve it warm.
You can gently cut or tear one open and fill the pocket with your favorite ingredients.
If you prefer, brush the warm bread with a little olive oil and sprinkle it with herbs or sesame seeds.
Common Mistakes
One of the most common mistakes is not heating the oven enough. Pita needs high heat to puff properly.
Another mistake is rolling the dough unevenly. If some areas are much thinner than others, the steam may escape instead of creating a pocket.
Do not add too much flour while kneading or rolling. Excess flour can make the bread dry and tough.
Another important tip is not to let the rolled dough sit uncovered for too long. A dry surface can prevent the pita from expanding properly.
Some beginners also become worried if every pita does not puff. Even experienced bakers can have an occasional pita that stays flat. It can still taste delicious.
Finally, avoid overbaking. Pita should generally be lightly colored with a few golden spots rather than deeply browned.
How to Know It’s Done
Pita bread cooks quickly.
You will know it is ready when the dough has puffed or developed light golden-brown spots.
The surface should look dry and cooked rather than wet.
The bread should also feel soft and flexible when removed from the oven.
If the pita becomes hard or very brown, it has probably been baked too long.
For the softest results, immediately wrap each warm pita in a clean towel.
If you are making pita for sandwiches or dipping, you want it soft enough to fold without cracking.
What to Serve With It
Pita bread can be served with almost anything.
For a simple meal, fill it with grilled chicken, lettuce, tomato, cucumber, cheese, and your favorite sauce.
You can also fill pita with roasted vegetables, eggs, beans, or leftover meat.
Warm pita is delicious with hummus, yogurt-based dips, roasted eggplant, or other creamy spreads.
Cut pita into triangles and toast them for homemade chips. Serve the chips with dips as a snack or appetizer.
You can also use pita as a quick pizza base. Add tomato sauce, cheese, and your favorite toppings, then bake until the cheese melts.
For breakfast, fill warm pita bread with scrambled eggs and vegetables.
The possibilities are nearly endless, which makes homemade pita a very useful recipe to have.
Storage Tips
Fresh pita bread is best when eaten the same day, but it can easily be stored.
Allow the bread to cool completely before placing it in an airtight bag or container.
Keep it at room temperature for up to 3 days.
If the pita becomes slightly dry, warm it for a few seconds in the microwave or heat it briefly in a skillet.
For longer storage, freeze the pita.
Place sheets of parchment or wax paper between the pieces if you want to prevent them from sticking together.
Store the bread in a freezer-safe bag for up to 2–3 months.
Thaw frozen pita at room temperature or warm it gently in a skillet or oven.
Estimated Nutrition
The following is an approximate estimate for one pita:
- Calories: 190
- Carbohydrates: 34g
- Protein: 6g
- Fat: 4g
- Saturated Fat: 1g
- Fiber: 2g
- Sugar: 1g
- Sodium: 300mg
Nutrition can vary depending on the exact ingredients and size of each pita.
Helpful Tips for Perfect Pita Bread
Use warm water when activating your yeast, but avoid water that feels hot.
Give the dough enough time to rise. Proper fermentation helps create a softer texture.
When dividing the dough, try to make each piece similar in size so the pitas cook evenly.
Let the dough balls rest before rolling. This makes the dough easier to stretch and helps prevent it from shrinking.
The oven must be very hot. Preheat the baking surface thoroughly before placing the dough inside.
Roll the dough evenly. Avoid creating thin spots around the edges.
Do not use too much flour when rolling. Excess flour can burn on the hot baking surface and make the bread dry.
Once baked, cover the pita immediately with a clean towel. This keeps the steam inside and helps maintain a soft texture.
If your pita does not puff, check the oven temperature and make sure the baking surface was fully heated. Also make sure the dough was rolled evenly.
Remember that homemade pita does not need to look perfect. Some pieces may puff more than others, and rustic shapes are part of the charm.
Final Thoughts
Making pita bread at home is easier and more enjoyable than it may seem. With a handful of basic ingredients, a little patience, and a very hot oven, you can create soft, warm bread that is perfect for countless meals.
The best moment is watching the dough puff in the oven. It happens quickly, and seeing the pocket form feels almost magical.
Whether you fill your pita with grilled chicken and fresh vegetables, serve it alongside a creamy dip, or turn it into crispy chips, homemade pita bread is incredibly versatile.
Once you get comfortable with this recipe, you can keep a batch in the freezer for quick meals throughout the week. Fresh, soft, and wonderfully flexible, pita bread is a simple homemade staple that is well worth learning to make.